MFT Benchmark: Files.com, Thru, Cerberus FTP, and Serv-U Tested
We tested four managed file transfer platforms: Files.com, Thru, Cerberus FTP Server, and Serv-U MFT Server, working through setup, file transfer workflows, inbound collection, security configuration, automation, and administration.
Every observation below comes from hands-on use of trial accounts or installed software.
Our test environment: A symmetric 1,000 Mbit/s line (128 MB/s upload capacity) based in Istanbul, with AWS m6i.xlarge instances provisioned for Cerberus (Windows Server 2025) and Serv-U (Linux).
Managed File Transfer Benchmark Results
1. Setup and Deployment
- Files.com has no installation step. After signing up, you land directly in the file browser. There is no onboarding wizard or setup checklist. The platform is fully hosted; no server is required on your end.
- Thru is also cloud-hosted. After signing up, the dashboard is immediately accessible. Initial configuration requires creating an Organization and at least one Endpoint before any file transfer can occur. There is a mandatory setup sequence, but it is straightforward.
- Cerberus FTP Server is Windows-only. Supported server operating systems are Windows Server 2016, 2019, 2022, 2025, and Windows 10/11. Installation requires provisioning a Windows machine, running an installer, and providing service account credentials. The admin panel is a native desktop application running on the server; it is not accessible remotely. We provisioned a Windows Server 2025 instance on AWS for testing.
- Serv-U supports both Windows and Linux. We installed the Linux version on an AWS m6i.xlarge instance. Installation via the terminal takes four prompts to confirm, choose a directory, install as a service, and start now, and completes in approximately five seconds. The admin panel is browser-based and accessible remotely, which is a meaningful practical difference from Cerberus.
2. Admin panel access
This is one of the clearest functional differences between the cloud-hosted and on-premise products.
- Files.com and Thru are fully browser-based and accessible from any device.
- Serv-U’s admin panel runs on port 8443 and is accessible from any browser remotely.
- Cerberus’s admin panel is a native Windows desktop application that runs on the server itself; managing it requires a remote desktop session into the Windows machine. There is no equivalent web-based admin interface.
3. File transfer interface
- Files.com supports Uploading Files, Folders, and New Folders from the same screen. A persistent upload panel at the bottom shows progress, allows pausing and canceling per transfer, and displays the total number of remaining files and the combined size across all active uploads. Files can be previewed, color-tagged (Priority Color), duplicated, and managed via a per-file context menu.
- Thru handles transfers through its Flow Studio files move between configured source and target endpoints rather than through a direct upload interface. Internal file upload via the File Upload modal in Flow Studio works without issue. The web form embed feature (for external submitter-facing pages) failed in practice due to CORS errors. No CORS configuration was found in the trial interface, though one may exist elsewhere in the platform.
- Cerberus FTP provides a web interface for end users separate from the admin panel. The file manager supports refresh, check all, delete, rename, new folder, zip, and unzip. Folder upload is supported. During a video file upload, an inline video player appeared in the upload queue while the transfer was still in progress. A file preview is available during upload.
- Serv-U client interface supports single-file upload and multi-file upload, but not folder upload. There is no file preview during upload.
4. Upload throughput
We measured throughput using a 342 MB file uploaded through Files.com’s public-facing web inbox. Our test connection: 1,000 Mbit/s symmetric, 128 MB/s upload capacity, Istanbul.
- With storage set to USA, Virginia, the upload ran at 6 MB/s, roughly 5% of available bandwidth. Switching the account’s storage region to EU Germany, Frankfurt, the same file was uploaded at 14 MB/s, more than double the Virginia result, consistent with reduced geographic distance from Istanbul. The region migration itself was completed within seconds, with existing files immediately available in the new region. Both results reflect meaningful throughput constraints, as the available connection inbox upload speed is a real limitation for large file transfer use cases, regardless of region.
- Cerberus throughput was measured during a recipient download of a shared video file. The transfer tab in the admin panel showed 150.1 MB, 4.44 MB/s, and 13% progress during our monitoring window.
- Thru and Serv-U throughput were not measured quantitatively in this benchmark.
5. Inbound file collection
Files.com supports three inbox types: web form (generates a public URL), email inbox (generates a dedicated email address, files sent as attachments land directly in a configured folder), and a combined web and email inbox. Web inboxes support password protection, a registration form, and a clickwrap agreement, all of which are optional and combinable. Email inboxes support sender whitelisting by address or domain and can organize each submission into its own subfolder using a naming template with name, email, domain, and date/time tokens.
We tested the email inbox by sending a 342 MB file from Gmail. Gmail converted it to a Google Drive link rather than sending it as a direct attachment. The file did not reach the inbox, and no error was returned. A small file sent as a genuine inline attachment worked correctly and appeared in the destination folder, automatically organized into its own subfolder.
Thru supports a Web Form endpoint type that generates a browser-based upload page for external submitters. The embed feature is available in the interface via an Embed Thru Upload Component option, but failed in practice due to CORS errors. No CORS configuration was found in the trial interface, though one may exist elsewhere in the platform.
Cerberus supports file sharing via a five-step wizard: share basics (name, expiration, password), options (public download/upload, notifications, auto-cleanup on expiry), security (one-time password via email, guest list up to 500), email (send link directly to recipients), and review. Recipients access a password-protected, read-only file view with individual download and zip download options.
Serv-U supports both outbound file sharing (upload a file and send a download link) and inbound file requests (generate an upload link; the recipient sends files to you). The flows work but require navigating multiple pop-ups. The recipient-facing pages are minimal, with no branding, no contextual information beyond the upload interface.
6. Protocol support
All four platforms support FTP, FTPS, SFTP, and HTTPS. Files.com additionally supports AS2 and WebDAV; neither Thru, Cerberus, nor Serv-U includes these protocols in their standard offering.
Serv-U’s FTP Settings tab lists every FTP command the server supports and allows each to be enabled or disabled individually, a level of FTP command control not observed on the other platforms tested.
We signed up for Files.com and tested its file management interface from scratch, uploading files, navigating the folder structure, managing permissions, and exploring notification and governance settings.
7. Automation and workflow
Files.com supports four automation trigger types: Interval (daily, weekly, monthly, quarterly, yearly), Custom Schedule (exact times and days, supports multiple runs per day, with holiday exclusion by region), Incoming Webhook (triggered by an external system), and Ad-Hoc (manual run). The Custom Schedule trigger’s holiday region exclusion is uncommon in file management platforms. File organization rules support automatic rename on upload, auto-move/copy into subfolders, and automatic personal folder creation per user.
Thru builds automation into its Flow Studio model. Source and target endpoints are configured independently, with per-endpoint processing options (encryption, decryption, compression, decompression), trigger file handling to prevent partial-upload forwarding, and rename rules. The platform supports scheduling via Interval, Custom Schedule, Incoming Webhook, and Ad-Hoc triggers at the flow level.
Cerberus handles automation through its Event Manager. Event Rules support 16 trigger types including File Transfer Event, Login Event, File Deleted Event, File Move/Copy Event, IP Blocked Event, and others. Actions available include Email Event Notification, Launch an Executable, Launch File Operation, Send HTTP POST, Send a File, and Get a File. Scheduled Tasks use the same action set with two additions: Email Saved Report and Scan a Folder. Event Targets define the external endpoints actions can send to: SMTP, Executable, HTTP POST, and Transfer File targets.
Serv-U supports event rules at the server, domain, group, and user levels. The Events tab at the server level supports event types including Server Start and others. User-level events support Send Email and other action types, with a Create Common Events shortcut that auto-generates a standard rule set.
8. Encryption and security
Files.com supports GPG encryption, configurable per folder (with PGP Enforcement, key generation, and management built into the platform). SFTP/SSH key authentication is supported with in-browser key pair generation. Cipher suite control is available. Password policy enforces a minimum of 10 characters with letter, number, symbol, and case requirements; blocks the last 10 reused passwords; and rejects passwords found in known credential leak databases. Password rules can optionally be extended to include sharing links and inboxes. 2FA supports SMS, TOTP, Hardware Key, and YubiKey Native. FTP, SFTP, and WebDAV users can be exempted from 2FA for automated system accounts. Session IP pinning, geo-blocking by country, and IP whitelisting are all available.
Thru includes PGP key generation built into the platform (name, email, algorithm, key strength, passphrase, optional expiration). SSH keys follow the same structure. SSL/TLS certificates can be imported via drag-and-drop. The certificate import UI does not specify accepted formats, chain requirements, or distinctions between client and server certificates.
Cerberus provides a Firewall Controls section showing a six-stage. Auto-blocking triggers after a configurable number of failed logins (default 5) and blocks for a configurable duration (default 180 minutes) or permanently. DoS Protection is active by default. Per-user and per-group password policies are configurable. The blocked extensions list lets admins define a deny list by file extension for uploads and renames.
Serv-U cipher suite configuration covers SSL/TLS for FTPS and HTTPS, SSH private keys for SFTP, individual TLS 1.2/1.3 toggles, SSH Ciphers, SSH MACs, SSH Key Exchange Algorithms, SSH Key Algorithms, and FIPS 140-2 mode. This is the most granular cipher configuration of the four platforms tested. Serv-U Gateway provides a reverse-proxy DMZ component that terminates file-transfer connections in the DMZ, preventing inbound connections to the internal network.
9. User and access management
Files.com user creation includes username, authentication method, email, full name, company, role assignment (Standard User or Site Administrator, plus Billing Administrator and Read-Only Site Administrator options), folder-level permissions, per-user access expiration date, automatic disable date for inactive accounts, IP restrictions, 2FA settings, allowed protocols, and FTP/SFTP root folder configuration. User Lifecycle Rules automatically disable or remove accounts inactive for a configured number of days. SSO supports 13 identity providers: Auth0, Microsoft Entra ID, Box, Dropbox, Cisco Duo, Google, Idaptive, JumpCloud, Microsoft Active Directory, Okta, OneLogin, SAML, and Slack. SCIM provisioning and deprovisioning is supported.
Thru includes a Machine Users section intended for accounts associated with installed Thru Nodes. An Admin section covers Users, Roles, Retention, Audit Log, MFA, Thru Nodes, Feature Flags, and SSO Mappings.
Cerberus user management includes Users, Groups, Policy, Blocked Extensions, Requested Accounts, and Public Shares tabs. Password policy enforces minimum length (10 characters), character requirements (letter, number, special character), and rotation every 180 days with a 3-day advance email notification. AD Users, LDAP Users, and SSO Users sections are separate menu items. AD Users pulls domain accounts automatically if the server is domain-joined. User account creation can be requested from the web interface login page with an administrator approval flow.
Serv-U user creation spans nine tabs: User Information, Directory Access, Virtual Paths, Logging, Groups, Events, IP Access, Limits & Settings, and Multifactor Authentication. Directory access rules, virtual path mappings, connection limits, logging verbosity, and IP restrictions are all configurable per user, per group, per domain, and globally, with lower levels overriding higher levels. Database authentication via ODBC is supported for loading users and groups from an external data source. Windows/AD authentication, LDAP authentication, and support for a custom authentication library are MFT-edition features.
10. Monitoring and audit
Files.com history logs capture every file operation and session event at both the folder level and the site-wide level. Logs are exportable and filterable. File integrity checksums (SHA256, SHA1, CRC, MD5) can be calculated and stored on upload for tamper detection. The Usage section shows real-time and historical storage, transfer volume broken down by native outbound and remote server inbound/outbound, billable user count, and an export-by-folder tool for identifying storage concentration.
Thru: Activity section is a filterable transfer log with filters for Flow, Organization, Endpoint, Filename (with wildcard), Processing Status, Transfer Status, and date range. Individual file records show delivery count, last state, and a full download history. A Share button within the file record generates a time- and count-limited download URL on demand. Export report generation ran in 177ms during testing.
Cerberus: Connections section shows active sessions (connection ID, listener, login time, protocol, username, IP address, client user agent) and active transfers (transfer ID, user, local path, time remaining, progress, total size, transfer rate). The Reporting section supports six report types but requires an SQL database connection before use. Log entries include SSL handshake details and validation step information, sufficient to diagnose configuration errors without external tooling.
Serv-U: Activity monitoring covers Sessions (real-time session data with Disconnect, Abort, Broadcast, and Spy & Chat actions), Statistics (server-wide session and transfer metrics since the last reset), and User & Group Statistics (the same metrics per user or group). The Log tab shows the server process log, not user activity. User-level activity logging is written to a configurable text file path per user. There is no built-in log viewer with filtering or audit-ready export for user activity.
Platform-by-Platform Deep Dive MFT Benchmark
Cerberus FTP
We downloaded and installed Cerberus FTP Server from scratch, set up the admin panel, and explored the web interface available to end users, including file uploads, account settings, and file sharing.
Getting Started
Cerberus has no web dashboard or hosted portal. The trial process starts with a short form: first name, last name, email address, and phone number. Submit it, and you’re immediately redirected to the download page.
Cerberus only runs on Windows.
Installation
For this review, we provisioned a Windows Server 2025 instance on AWS with an m6i.xlarge instance type. Running the installer opens a welcome screen confirming the version being installed. Clicking Next moves you forward.

The next screen asks for the Windows service account credentials, a username, and a policy-compliant password that Cerberus will use to run as a background service.
After entering the credentials, the installation runs on its own and completes within a few minutes.
The Admin Panel
Once installation finishes, the Cerberus management interface opens automatically. This is not a web UI; it’s a native desktop application running on the server, accessible only from the machine itself.
On first launch, the Getting Started Wizard launches and attempts to automatically detect the server’s public IP address. In our setup, it couldn’t determine it. We clicked Next, and the rest of the setup completed without issues.
The main dashboard displays a security overview, network information, upload and download counters, and a vulnerability assessment, all on a single screen. The left sidebar lists all management areas on the platform: Summary, Log, Connections, Reporting, User Manager, AD Users, LDAP Users, SSO Users, Firewall Controls, Server Manager, Event Manager, Sync Manager, Localization, Licensing, and Setup Wizard. We’ll cover each section in detail.
Installation completed, and we reached the admin panel’s main page. This is not a web-based dashboard; it is a native Windows application (an .exe file) that runs directly on the server and can only be accessed from that machine. There is no browser-based remote access.
Web Interface
Beyond the admin panel, Cerberus provides a web interface for end users to handle their file transfers. Logos, welcome messages, and other design elements in this interface can be customized from the server-side admin settings. The login screen is the standard Cerberus web UI.
We signed in with the “inituser” account created during installation. Immediately after login, Cerberus prompts you to set two security questions required before you can proceed anywhere.
File Manager
After completing the security questions, you land on the File Manager. Available actions from the toolbar are: refresh, check all, delete, rename, new folder, zip, and unzip. A filter bar with a recursive find option sits above the file list.
Alongside individual file uploads, you can upload entire folders in one go. When we uploaded a video file, an inline video player appeared in the upload queue while the transfer was still running. You can preview the file before it finishes uploading. Upload speed, progress percentage, and file size are all displayed in real time.
Account Settings
The Account section handles user preferences. Two-factor authentication is available here and can be enabled per user. There’s also a theme selector if you want to change the interface’s look.
At the bottom of the Account page, there’s an Addresses button. Clicking it opens an Address Book where you can save names and email addresses for people you frequently share files with. Contacts can also be imported in bulk via CSV.
File Sharing
The Share menu shows all files and folders you’ve made available to others. To share something, right-click a folder in the File Manager to open a five-step sharing wizard.
Step 1: Confirms the folder name, sets an expiration time (defaulting to 24 hours), and optionally sets a password on the share link.
Step 2: Options: controls permissions, notifications, and cleanup. Allow Public Downloads is checked by default. You can also allow public uploads to the folder, optionally keeping those uploads hidden from other visitors. A notifications dropdown lets you opt into email alerts when files are downloaded or uploaded. A Clean Up option can automatically delete shared files when the share expires.
Step 3: Security lets you require a one-time password sent via email before granting access. A guest list is also available here, capped at 500 guests.
Step 4:Email: optionally sends the share link directly to recipients from within the wizard. Fields for To, Cc, and Bcc are available, along with a subject line (pre-filled as “New Shared Folder”) and an optional message body. A “Send Copy to Me” checkbox is also available.
Step 5: Review: summarizes all configured settings before creation: folder name, expiration date and time, whether a password is required, and whether public downloads are enabled.
After clicking Create Share, we ran into an error: “Client-provided host information failed validation. Please contact your system administrator.”
To debug this, we went back to the admin panel and opened the Log section. The log lists every server event in chronological order, including timestamp, IP address, user, listener ID, and a description. We were able to locate the exact error from the failed share attempt in the list. The log entries also showed the SSL handshake details and the specific validation step that rejected the request. This level of detail made it straightforward to identify the root cause.
After resolving the server-side configuration issue, the share was created successfully. The Share Settings page in the web interface now lists both active shares for the inituser account, showing the folder name, creation date, expiration date, download count, and the full public share URL for each.
Opening the share URL as a recipient displays a password prompt, a simple “Folder Access Password” screen with a single input field and an Open button.
After entering the password, the recipient is taken to a read-only view of the shared folder’s contents. The file list shows the name, type, size, and date. A Zip and Download button is available in the top-right corner, and individual files can be downloaded directly from the list. No login or account is required.
Connections
Back in the admin panel, the Connections section has two tabs: Connections and Transfers.
The Connections tab lists the connection ID, listener, login time, protocol, username, IP address, and client user agent for all active sessions. During our sharing test, three concurrent HTTPS connections were visible from the same IP address, all originating from the inituser account. A Terminate Connection button is available at the bottom for forcibly ending any active session.
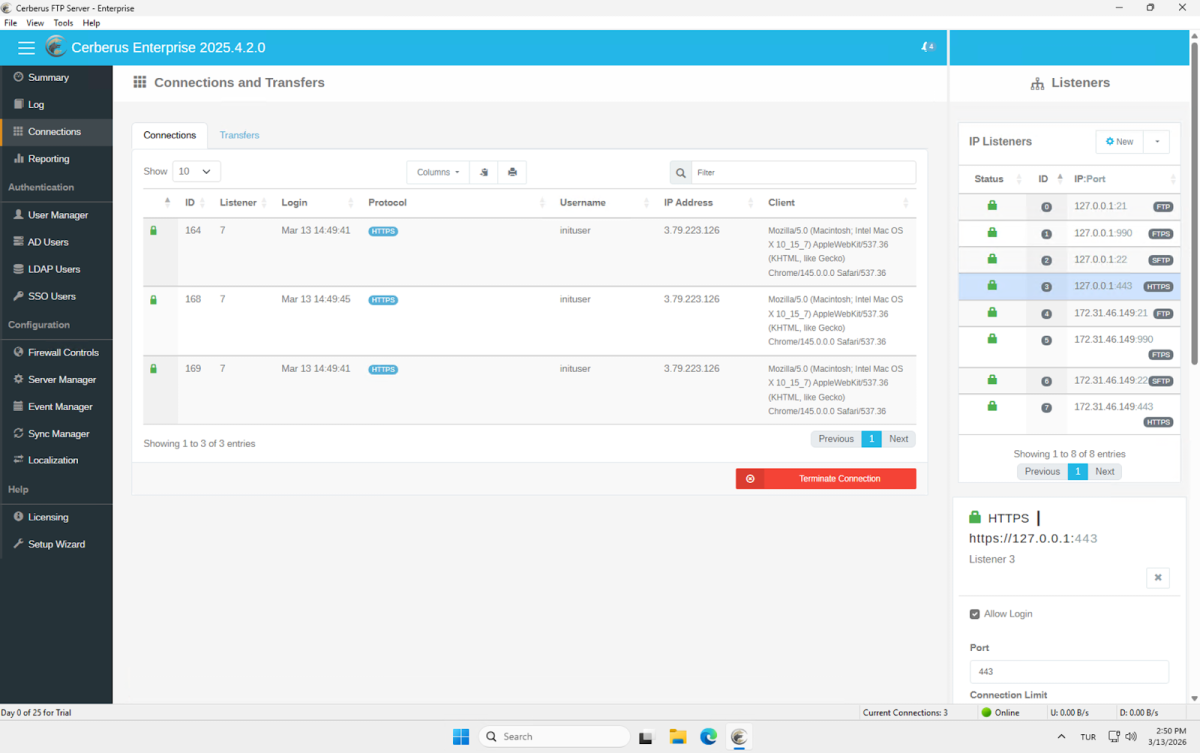
The Transfers tab shows active file transfers in real time. Each row displays the transfer ID, user, local file path, time remaining, progress, total size, transfer rate, and type. While the recipient was downloading the shared video file, the transfer appeared here immediately: 150.1 MB total, 13% progress, running at 4.44 MB/s.
Reporting
The Reporting section is the Report Manager, which generates detailed reports of client activity based on usernames, date ranges, and file access. Six report types are available: User and File Report, Login Report, Audit Report, Account Report, Folder Report, and Storage Report. Using this feature requires connecting an SQL database first; the panel shows a “Setup Required” prompt until that’s configured.
Each report type has its own query form. The File Report, for example, lets you filter by time period (a date range or a rolling lookback window), username, and file path. Results can be sorted by host, username, and timestamp, with a configurable limit. The same query structure carries across the other report types.

User Manager
The User Manager is where you create and manage everyone who can access the server. It has six tabs: Users, Groups, Policy, Blocked Extensions, Requested Accounts, and Public Shares.
The Users tab lists all Cerberus accounts. Currently, just inituser is present. From here, accounts can be created, edited, and deleted.
The Groups tab is empty in our setup but is where you can create user groups and manage permissions at the group level rather than per-user.
The Policy tab controls password complexity requirements and password change policies. The current configuration requires a minimum length of 10 characters with at least 1 letter, 1 number, and 1 special character. The Password Change Policy section enforces a rotation every 180 days, applies to HTTP/S connections, and sends an email notification 3 days before expiration.
The Blocked Extensions tab lets you define a deny list of file extensions. In deny mode, any attempt to upload or rename a file with a listed extension is blocked. Multiple extensions can be added at once using comma separation. The list is currently empty.
The Requested Accounts tab handles the self-service account request flow that’s available from the web interface login page. From here, you configure the notification SMTP server, the administrator email, custom approval and denial email text, and which fields are required on the signup form: first name, last name, telephone, mobile, and justification. Incoming account requests appear at the bottom of this page for administrator approval.
The Public Shares tab sets the server-wide defaults for all share links created by users. Configurable options include default and maximum share durations, whether passwords are required for all shares, whether to enforce the system password policy on shared files, filename obfuscation, whether to allow zip downloads, and how notifications are handled. The One Time Password section below controls OTP settings for the access code length, character requirements, time-to-live, and lockout threshold after failed attempts.

AD Users, LDAP Users, and SSO Users
The AD Users section connects Cerberus to a Windows domain. If the server is joined to a domain, the user list from Active Directory is pulled in automatically. In our case, it shows Administrator, Cerberus, DefaultAccount, Guest, and WDACUtilityAccount from the local machine. From here, you can authorize AD accounts to access the FTP server directly, without creating separate Cerberus accounts for each one. The section also includes tabs for Domain Overview, Binding Options, User MFA Settings, and User & Group Custom Mappings. LDAP Users and SSO Users in the left sidebar cover the same concept for LDAP directories and SSO identity providers, respectively.
The Firewall Controls section handles all connection-level security. The main page displays a Connection Authorization Pipeline diagram showing the six stages every incoming connection passes through: new connection, listener logins allowed, IP allowed, country allowed, listener limit, and authorized. Active statuses for Geolocation (disabled), Autoblocking (active after 5 attempts, blocks for 180 minutes), and DoS Protection (active) are shown on the same screen. IP addresses can be added to an allow or deny list from the Country and IP Management panel. This level of network-layer control doesn’t exist in cloud-based service it’s a meaningful advantage for on-premise deployments.
The Automatic Threat Blocking tab configures the brute force and DoS rules in detail. Auto-Blocking and DoS Protection each have their own toggle. Under Blocking Settings, you set the number of failed logins before an auto-block is triggered (default: 5), the time window before the counter resets (120 minutes), and optionally a list of specific usernames that should always trigger an IP block on failure. The Autoblock Timeout section lets you choose between blocking an IP for a set number of minutes (default 180) or blocking it permanently.
Server Manager
The Server Manager is the primary configuration hub for the server. Tabs cover General settings, Protocols, Listeners, Messages, Remote access, Security, Logging, and Advanced. This is where all technical server configuration lives: protocol settings, SSL/TLS, cipher suites, listener ports, and logging behavior.
Event Manager
The Event Manager is one of the most capable sections in the admin panel. It has four tabs: Event Rules, Scheduled Tasks, Event Targets, and Folder Monitor.
Event Rules let you define triggers based on things that happen on the server. When creating a new rule, the Rule Type dropdown offers: File Transfer Event, IP Blocked Event, User Account Blocked Event, User Disable Date Elapsed, Account Password Expiring Event, New Account Request Event, Login Event, Logoff Event, Directory Created Event, File Deleted Event, File Move/Copy Event, Upgrade Available Event, Public File Shared Event, Public File Transfer Event, Backup Server Synchronized, and File Scanned Event.
Each rule has a trigger, a set of conditions, and a set of actions. We created a test rule using the File Transfer Event trigger.
The conditions section lets you filter by a long list of variables: timestamp, connection ID, IP address, session ID, username, user group, protocol type, first name, last name, email, mobile number, file name, file extension, local file path, remote file path, and more. We set a condition of username equals “inituser”. The filter logic supports Match If Any or Match If All modes.
When the conditions are met, the available actions are: Email Event Notification, Launch an Executable, Launch File Operation, Launch Server Operation, Send HTTP POST, Send a File, and Get a File. This makes it possible to build event-driven workflows entirely within Cerberus for example, triggering an HTTP POST to an external webhook or sending a file to another server whenever a specific user uploads something.
Scheduled Tasks work the same way but fire on a time interval rather than an event. You define a schedule, set conditions, and choose from the same set of actions: with two additions specific to scheduled tasks: Email Saved Report and Scan a Folder.
Event Targets is where you define the external endpoints that actions can send to. Four target types are available: SMTP Server Target, Executable Target, HTTP Post Target, and Transfer File Target. These are referenced when configuring actions in Event Rules and Scheduled Tasks. A practical example: if a user named “x” uploads a file larger than 10 GB, send a Big File Alert to the company Slack via an HTTP POST target.
Sync Manager
The Sync Manager lets you automatically replicate settings across multiple Cerberus FTP Server instances. This enables high availability and redundancy: if you’re running multiple servers, they can stay in sync without manual configuration duplication. All instances must be running the same version and have unique license keys. Setup is straightforward from the Server List and Configure General Settings panels.
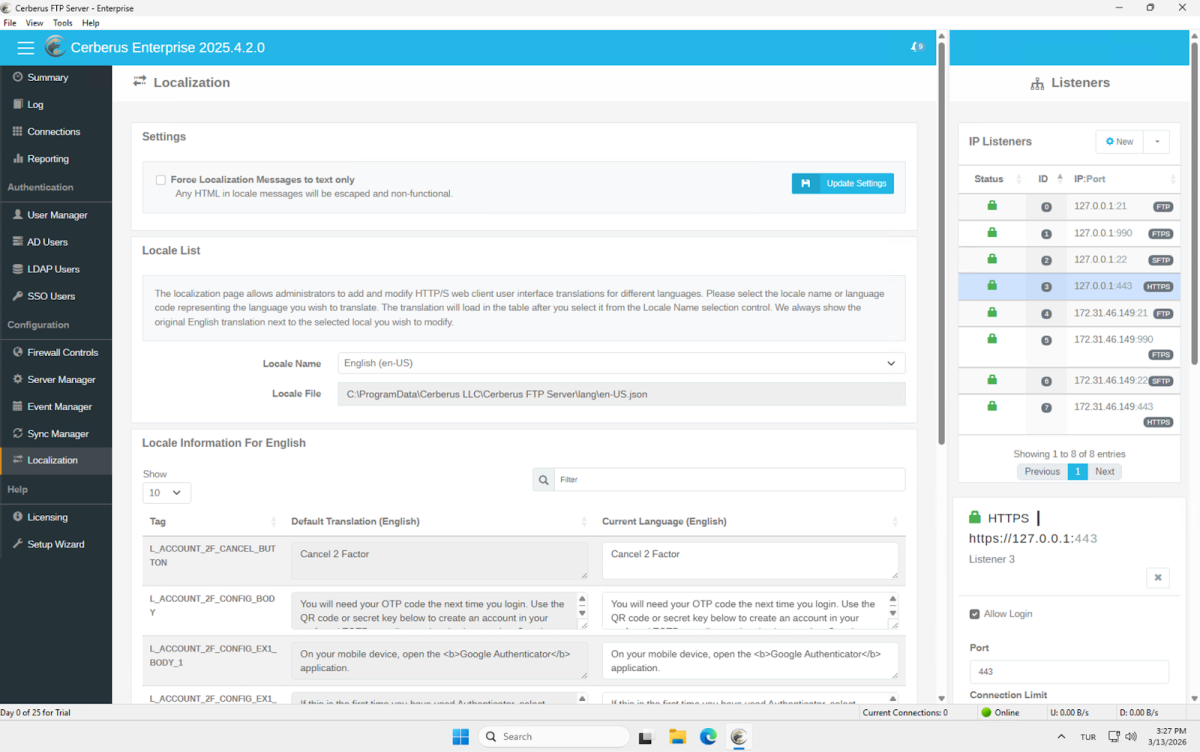
Localization
The Localization section lets you edit every text string in both the server-side and client-side web interface. The locale is loaded from a JSON file, and both the default English translation and the current language translation are shown side by side for each string tag. This gives administrators full control over the language and terminology used across the entire interface.
Files.com
Our walkthrough covers the Root Folder interface, upload flow, file actions, history logs, permission model, encryption, notifications, and data governance options.
Interface Overview
When you first land on Files.com, the file browser opens immediately. There’s no onboarding wizard or setup checklist; you’re dropped directly into the Root Folder view.
The left sidebar lists every major module on the platform: Files, sharing, user accounts, encryption, etc.
The breadth of the sidebar makes clear that Files.com is more than a cloud storage product. It’s a platform with serious enterprise ambitions.
The Root Folder itself has four tabs: Files, History, Permissions, and Settings. The file list view supports three display modes, column customization, and advanced filters accessible from the toolbar.
Storage Location
Before uploading anything, we checked where files would actually be stored.
Clicking the region selector in the top-right corner opens the Storage Location modal. Files.com offers five managed storage regions out of the box.
Beyond these hosted options, there’s also a Remote Server Mount option. This lets you connect a Files.com On-Premise server and route all storage to infrastructure you control entirely, whether that’s your own data center or a private cloud.
For organizations with strict data residency requirements, the combination of regional selection and on-premise mounting covers most compliance scenarios.
Uploading Files
The Root Folder starts empty. Three upload actions are available from the center of the screen:
New Folder: Create a folder structure before uploading
Upload Files: Select individual files
Upload Folder: Upload an entire directory at once
We uploaded a 21 MB PDF file (Test.pdf) using the Upload Files button.
The upload panel appears at the bottom of the screen and stays visible while the transfer runs. You can pause or cancel individual transfers directly from this panel. A summary row at the bottom shows the total number of remaining files and their combined size across all active uploads.
File List & Bulk Actions
Once the upload completes, the file appears in the list with the following columns visible by default.
Test.pdf was listed as an Acrobat document, modified on Mar 1, 2026, at 6:05 AM, and was 21 MB.
Bulk actions work across multiple selected files simultaneously. For single-file operations, the Actions button on the right side of each row opens a context menu with a more complete set of options.
The Priority Color option lets you visually tag files to flag items that need attention in a shared workspace. Duplicate is a separate option from Copy, which creates a local copy in the same folder without requiring a destination selection.
History Tab
The History tab logs every action taken by users across the folder. We found three entries after our initial session:
The log captures both file operations (creation, modification, deletion) and session events (login). Each entry includes the user, action description, interface used (Web in our case), and a timestamp.
The date range filter defaults to a 1-day view but can be adjusted. Filters and column selection are also available on this view. The Export button lets you pull the full log for external analysis or compliance reporting.
Permissions Tab
The Permissions tab shows which users and groups have access to the current folder, and at what level.
The permission model is granular. For each user or group, you can control seven distinct permission types.
Since we were the only user on the site, all seven permissions were checked for our account. The interface includes a note: “You’re the only user on this site and already have full access. To grant folder permissions to others, you’ll need to create a new user.“
An Add new permission button is available at the bottom of the list. Permissions can cascade from parent folders or groups, meaning you don’t have to set them manually at every level of a folder hierarchy.
The tab also includes an expandable Terms and Symbols section that explains each permission type.
Settings Tab
The Settings tab contains four sub-sections: Sharing, Encryption, Notifications, and Data Governance.
Encryption
The Encryption sub-tab shows a single option: GPG, currently set to Off. Clicking Edit opens the configuration for enabling GPG-based encryption for files stored in this folder.
Notifications
This section was the most impressive part of the Settings tab. Files.com supports six notification channels.
Each channel has its own View button that leads to the configuration screen. The range of integrations here is genuinely useful for enterprise environments. Amazon SNS and Google Pub/Sub, in particular, are uncommon in file management tools, suggesting the platform is built for automated pipeline use cases, not just manual file sharing.
Data Governance
The Data Governance section is organized into two categories: Data Retention and Data Restrictions.
All settings ship with Edit buttons. File Expiration lets you set automatic deletion policies useful for folders that hold temporary or time-sensitive data. Archive Removed Files can be enabled to retain deleted files in an archive rather than permanently removing them.
On the restrictions side, Limit File Extensions lets you whitelist or blacklist specific file types (e.g., allow only .pdf and .xlsx uploads). Limit File Names by Regular Expression offers the most granular control, letting you enforce naming conventions with regex patterns. Watermark Previews adds a watermark to file preview screens, relevant when sharing sensitive documents with external parties.
Every one of these settings is off by default, meaning the platform ships in a permissive state and lets administrators enable restrictions as needed.
Sharing
Clicking Sharing in the left sidebar expands a sub-menu with six items.
The platform defaults to Share Links. Filters, column customization, and an Export button are available, consistent with those in every other list view on the platform.
Creating a Share Link
Clicking New Share Link opens a panel inline within the file browser rather than navigating to a separate screen.
The first setting is the share type, labeled Reflect File/Folder Changes in Share:
Live Share Link: Always points to the current version of the file. If the file is updated after the link is created, recipients always see the latest version.
Snapshot Share Link: The link is locked to the state of the file at the moment of creation. Subsequent changes to the original do not affect what recipients can access.
This distinction matters in document workflows. A snapshot is appropriate for a signed contract or a versioned report; a live link is appropriate for a living specification or a shared working document.
You can include multiple files in a single share, or upload additional items directly into the share bundle at creation time. Items uploaded directly into the share are scoped to the share link only and are removed when the link expires or is revoked.
Available Actions
The Available Actions dropdown controls what recipients are permitted to do with the shared files. This range covers most real-world sharing scenarios without requiring separate user accounts for external parties.
Inboxes
The Inboxes section under Sharing lets you create dedicated file submission endpoints that route incoming files directly into a Files.com folder. Three inbox types are available:
Accept Files via Web: Generates a public URL. Password, registration form, and clickwrap controls are available.
Accept Files via Email: Generates a dedicated inbox email address. Files sent as attachments land directly in the configured folder. Sender whitelisting by address or domain is supported.
Accept Files via Web and Email: Accepts both channels simultaneously. Password and registration form enforcement is not supported in this combined mode.
Each inbox requires a destination folder, a display title, and a URL key. The URL key determines the public path for the inbox. The URL is generated as a preview before the inbox is saved, so you can verify the address before publishing it.
Inbox Configuration
We set the destination to Root Folder, entered a title, and set the URL key. The public inbox URL is generated immediately as a preview at https://aimultiple.files.com/u/aimultiple-file-uploads, so you can verify the address before saving.
Submission Controls (Web)
For web-based inboxes, a Submissions Controls section provides three independent access gates:
A password is required before the upload form is accessible. The platform applies the same password complexity rules configured in User Settings to inbox passwords.
Registration Form require uploaders to fill in a form before submitting. You can use the platform’s standard form or select a custom form built in the Custom Forms section. An optional receipt email notifies uploaders of successful submission.
Clickwrap requires uploaders to accept a clickwrap agreement before proceeding. Agreements can be created inline or selected from an existing library.
All three controls are optional and can be combined in any configuration on a single inbox.
Email Inbox
When configuring an email-based inbox, Files.com automatically generates a dedicated address. In our test, this was aimultiple-aimultiple-file-uploads@inbox.files.com.
Files sent as attachments to this address are deposited directly into the configured destination folder. Note that when switching to email mode, the password, registration form, and clickwrap controls disappear entirely and are replaced with email-specific settings.
The email inbox exposes two additional configuration sections. Email Sender Permissions & Replies lets you optionally restrict submissions to specific sender addresses or entire domains via a whitelist, which requires activating inbound email authentication in Sharing Settings first. A Notifications toggle can optionally send a confirmation email to the sender upon successful upload.
Inbound Email Settings contains the Separate Submissions Into Subfolders option, which organizes each email’s attachments into its own subfolder using a naming template. The template supports name, email, and email domain tokens, as well as date/time tokens. If left blank, subfolders are named sequentially. This prevents submissions from different senders from piling up in a flat directory.
Inbox Confirmed
After saving, the confirmation screen displays both endpoints simultaneously. The Visit Inbox button opens the public-facing upload page directly. A View Files button links to the destination folder.
Upload Speed Test via Inbox
The public inbox page requires no account or login. It shows the inbox title, Upload Files and Upload Folder buttons, and a drag-and-drop zone.
The Files.com logo and color scheme appear by default.
We uploaded a 342 MB file through this page to measure real-world throughput. With storage set to the USA, Virginia, the upload ran at 6 MB/s. Our test connection is a symmetric 1,000 Mbit/s line with 128 MB/s upload capacity. The achieved throughput was approximately 5% of available bandwidth, well below what the connection can deliver.
Upload Speed: USA vs. Germany
We tested the inbox by uploading a 342 MB file through the public web form. Our test connection is a symmetric 1,000 Mbit/s line with 128 MB/s upload capacity.
With storage set to USA, Virginia, the upload ran at 6 MB/s, roughly 5% of available bandwidth.
We switched the account’s storage region to EU – Germany, Frankfurt. The region migration completed within seconds, with all existing files immediately available in the new region.
The same file uploaded to Frankfurt at 14 MB/s more than double the Virginia result. The improvement is consistent with reduced geographic distance from our test location in Istanbul. That said, 14 MB/s against a 128 MB/s connection is still 11% utilization. Upload throughput through the inbox was noticeably constrained across all regions, which is a significant limitation for use cases involving large file transfers.
Email Submission Test
We also tested the email inbox by sending the same 342 MB file as an email attachment. Gmail automatically converted it to a Google Drive link rather than sending it as a direct attachment. The file did not reach the Files.com inbox, and no error notification was returned. Retesting with a small file sent as a genuine inline attachment worked correctly: the file appeared in the Root Folder automatically, organized into its own subfolder.
The Root Folder, after several test submissions, shows the automatic subfolder structure working as expected. The email submission from a named sender was organized into a folder labeled with their name and email address. Anonymous web form submissions landed in sequentially numbered folders. No manual sorting was needed.
User Accounts
The User Accounts section in the left sidebar opens a user list. Clicking Create User reveals a detailed form organized into several collapsible sections:
User Identity collects username, authentication method, email, full name, and company. The default authentication method is Email Signup, which sends the new user an invitation to set their own password.
Permissions lets you assign a role, Standard User or Site Administrator, plus optional additional roles (Billing Administrator, Read-Only Site Administrator). Folder-level permissions are configured here as well.
Security provides per-user access controls, including an access expiration date, an automatic disable date for users who haven’t logged in by a set deadline, IP address restrictions, a bypass option for the site IP whitelist, and Two-Factor Authentication settings (use site-wide setting, always require, or never require). A Shared/Bot User flag exempts the account from 2FA requirements and prevents changes to the password or email.
Connection Options covers allowed protocols and FTP/SFTP root folder configuration. Preferences handle time zone, language, and avatar. Categorization & Notes provides internal tagging and notes fields.
The platform also includes User Lifecycle Rules, which allow you to automatically disable or remove accounts that have been inactive for a specified number of days. This is useful for cleaning up accounts created for customers or contractors who are no longer active, without requiring manual audits. Access reports are also available from the user list view for audit purposes.
Partners
The Partners sub-menu under User Accounts is designed for externally managed user group organizations or vendors whose users share the same folder access and permission structure. Creating a partner requires a name, a root folder assignment, and permission configuration. The User Access Controls section lets you define whether partner admins can create users, reset credentials, bypass 2FA for FTP/SFTP/WebDAV connections, and manage GPG keys for their own users.
SSO
The SSO section supports 13 identity providers out of the box: Auth0, Microsoft Entra ID, Box, Dropbox, Cisco Duo, Google, Idaptive, JumpCloud, Microsoft Active Directory, Okta, OneLogin, SAML, and Slack. SCIM provisioning and deprovisioning is supported to automate user and group lifecycle management through the identity provider.
Encryption
SFTP/SSH Keys associates public keys with user accounts, allowing those users to authenticate to Files.com via SFTP without a password. The form lets you select a user, add a title, and either paste a public key or upload a key file. You can also generate a key pair directly in the browser. This is particularly useful for automated system integrations and long-term authentication that should not expire or rotate automatically.
GPG
The GPG section manages GPG/PGP keys used for automated file encryption and decryption at the folder level. Files.com notes this is common in healthcare and finance environments where counterparties or compliance requirements mandate GPG encryption.
Ciphers
The Ciphers section controls the SSL/TLS cipher suites permitted for FTP and SFTP connections. By default, Files.com requires the most secure modern ciphers.
Automation Trigger Types
Four trigger types are available for automations:
- Interval runs on a recurring schedule such as daily, weekly, monthly, quarterly, or yearly
- Custom Schedule runs at exact times, days, or intervals you define; supports multiple runs per day and optional holiday skipping by region
- Incoming Webhook fires when triggered by an external system through a secure Files.com webhook endpoint
- Ad-Hoc (Run Manually) runs on demand using the Run Now action, with no schedule attached; suited for one-off tasks
The Custom Schedule trigger supports holiday region exclusions, meaning automations can be configured to skip runs on national holidays in a specified country a level of scheduling precision that most platforms don’t offer out of the box.
Services
The Services menu in the left sidebar manages the connection protocols that clients can use to access Files.com. Each service has its own Settings and Logs sub-tabs, allowing administrators to configure behavior and review connection history independently per protocol.
The FTP settings page, shown below, illustrates the level of control available. Options include enabling or disabling the service entirely, controlling ASCII mode line ending conversion, requiring SSL on all connections, optionally auto-creating parent folders for uploads from clients that expect this behavior, and setting a custom Message of the Day shown to FTP clients on login. The same depth of configuration is available for SFTP, AS2, and WebDAV.
Integrations
The Integrations menu expands into seven sub-sections: Catalog, Remote Servers, Sync, Mount, SSO, SIEM, and Custom SMTP.
The Catalog page presents the full library of available third-party integrations. The breadth here is notable; it covers cloud storage targets, file transfer protocols, identity providers, productivity tools, observability and security platforms, workflow automation, and developer SDKs for JavaScript, .NET, Python, PHP, Ruby, Go, and Rclone. The catalog also includes the Files.com Desktop App, CLI App, and Agent as installable connectors.
Remote Servers
Remote Servers allows you to connect Files.com to an external storage system and use it as a destination for folders, automations, and syncs rather than relying solely on Files.com’s own managed storage. Once a remote server is configured, it can be mounted for real-time access or used as a source or target for scheduled sync jobs. This is particularly relevant for organizations that need to store files in a specific environment for compliance reasons but still want to use Files.com for orchestration, access control, and file transfer features.
Sync
The Sync feature lets you define scheduled or triggered file synchronization jobs between any two supported endpoints this site, an agent-connected on-premise system, or a configured remote server. Source and destination are configured independently, and options include whether to keep or delete source files after copying. A trigger filename can be specified to fire a downstream event after sync completes. Include and exclude patterns allow fine-grained control over which files are in scope for a given sync job.
Custom SMTP
The Custom SMTP option under Integrations allows all outbound emails from Files.com notifications, inbox confirmations, share link deliveries to be sent through your own mail server rather than Files.com’s infrastructure. For organizations with strict data governance or email routing requirements, this ensures no message metadata passes through a third-party mail relay.
Notifications
The Notifications menu supports six delivery channels:
Email, Webhooks, Amazon SNS, Google Pub/Sub, Slack, and Microsoft Teams.
Configuration follows the same pattern across channels. For Slack, you provide an incoming webhook URL from your Slack workspace, select the folder path to monitor, choose whether notifications apply to the selected folder only or all subfolders, and specify whether to fire on all file actions or only specific ones. The result is real-time alerts in your Slack workspace for any file activity on a chosen folder tree useful for teams that need operational awareness of incoming submissions or file changes without logging into the platform.
Client Apps
The Client Apps menu provides downloads and documentation for the full range of Files.com client applications. Available clients include a Desktop App for Windows and macOS, a Command Line (CLI) App, and a Mobile App. The desktop app integrates Files.com as a mounted drive in Mac Finder or Windows File Explorer, enabling native file operations including drag-and-drop transfers. The CLI app is particularly useful for scripted workflows and server-to-server transfers. Having CLI support alongside GUI clients means the platform can accommodate both end users and technical operators from the same account.
On-Premise Agent
The On-Premise Agent is a cross-platform background service that connects your local file systems including NAS devices (NFS, SMB, CIFS) and storage-attached networks (SAN) to your Files.com site. Once installed, the agent can be registered as a Remote Server and used for real-time mounted access or as a source/destination in sync jobs. This is the key mechanism for organizations that must keep files on their own infrastructure for GDPR, HIPAA, or other compliance reasons but still want to leverage Files.com for access control, file transfer orchestration, and sharing. All data transmission between the agent and Files.com is encrypted.
Usage
The Usage menu provides a real-time and historical view of account consumption. The current billing period summary shows total storage used, transfer volume broken down by native outbound and remote server inbound/outbound, and billable user count. A time-series chart lets you switch between Storage, Transfer Usage, Users, and API views, with a configurable date range. An Export Site Usage by Folder tool generates a report of storage consumption per folder path, with options for recursion depth and minimum folder size threshold useful for identifying where storage is concentrated before making retention or cleanup decisions.
Security
The Passwords page details all active restrictions. The current configuration requires a minimum of 10 characters, including a letter, number, symbol, and both upper and lowercase letters. Reuse of the last 10 passwords is blocked. Prevent Use of Breachable Passwords is enabled, meaning passwords that appear in known credential leak databases are rejected at creation. Password expiration is configurable but disabled by default. A notable option is Apply password rules to Shares, Inboxes, and Publicly Served Folders when enabled, the same complexity requirements extend to passwords set on share links and inboxes, not just internal user accounts. Brute force protection is also configurable, with Files.com’s own defaults applied unless overridden.
Two-Factor Authentication
The 2FA page controls site-wide enforcement and permitted authentication methods. Enforcement is currently set to “not required” it can be changed to require 2FA for all users or specific user types. The four supported methods are SMS, TOTP (authenticator apps), Hardware Key, and YubiKey Native. A separate toggle controls whether FTP, SFTP, and WebDAV users can bypass 2FA for those specific protocols useful for automated system accounts that cannot interactively complete a 2FA challenge.
Data Governance
The Data Governance menu contains seven sub-sections: Retention, Restrictions, Organization, Clickwraps, Global Regions, File Integrity, and Restore.
Data Retention
The Retention section manages how long data is kept on the platform. File Expiration lets you set rules that automatically remove folder contents after a specified period of time. Archive Removed Files controls how long deleted files are retained before being permanently purged this is the window within which deleted files can be recovered. A Settings tab configures site-wide overwrite behavior and Archive-Only mode.
Data Restrictions
The Restrictions section provides fine-grained controls over what can be uploaded and how filenames are structured. Tabs cover File Extension Limits, File Name Length Limits, File Name Regex Limits, Folder Locks, and Watermark Previews. These restrictions apply to upload, move, and copy operations, and cascade to subfolders unless explicitly overridden.
The Organization section enables rule-based file management at the point of upload. Rename Uploaded Files lets you define rules that automatically standardize filenames when files arrive useful for maintaining consistent naming schemes across integrations.
Organize Files defines rules for automatically moving or copying files into subfolders based on criteria. Create User Folders automatically provisions a personal folder for each user. Together, these features can replace manual file handling workflows entirely.
Clickwraps
The Clickwraps section is where legal agreements are created and stored for use across the platform. Any agreement defined here becomes available for selection when configuring web-based inboxes or share links that require user acceptance before access.
Global Regions
The Global Regions section, shown above as Data Storage Regions, lets you assign individual folders to specific geographic storage regions. The Root Folder in our account is currently assigned to EU: Germany, Frankfurt, following our earlier region migration. In a multi-region organization, different folders can be routed to different regional storage endpoints; for example, files submitted by European customers can be stored in Frankfurt while North American submissions land in Virginia improving both latency and compliance with data residency requirements. When a region assignment changes, existing files are automatically migrated to the new region in the background.
File Integrity
The File Integrity section lets you configure which checksums Files.com calculates and stores for every uploaded file. Four algorithms are available: SHA256, SHA1, CRC, and MD5. When enabled, the checksum is stored alongside the file metadata and can be used to verify that a file has not been altered after upload. This is particularly valuable in regulated industries where file tamper detection is a compliance requirement, and for automated transfer workflows where the receiving system needs to verify file integrity before processing.
Restore
The Restore section functions as an enterprise-grade recycle bin. Previously deleted files, folders, and users can be recovered as long as they fall within the retention window configured in Data Retention settings. Restore requests run as background jobs, making them suitable for large-scale recovery operations.
When creating a restore request, you can scope the operation to a specific folder or the entire site, filter by deletion date to limit what is recovered, and choose whether to restore files in place (original path) or to a new folder at the root. File modification timestamps can be preserved as-is or updated to the current date and time with a warning that preserving the original timestamp may immediately trigger File Expiration Rules if they are active on the destination folder. Folder permissions can optionally be restored alongside files. Restore requests are tracked with status updates, and files that have been permanently purged based on retention settings cannot be recovered.
Branding
The Branding page reveals the full extent of white-labeling available. Configurable elements include the site name, interface color scheme, login page help text, header and footer text for both the internal interface and public-facing pages (inboxes, share links), a custom logo, a custom login background image, custom icons, and the reply-to address and footer text used in outbound email notifications. Combined with the Custom Domain setting, these options let organizations present Files.com entirely under their own brand the Files.com name need not appear anywhere in the user-facing experience.
Developers
The Developers menu at the bottom of the left sidebar contains three sub-sections: SDK, API, and CLI. This section is aimed at teams that want to build Files.com functionality directly into their own applications, scripts, or automated pipelines.
SDK
Files.com maintains officially supported SDKs for seven languages: Ruby, .NET, JavaScript, Python, Go, Java, and PHP. Each SDK is published to its language’s standard package registry and linked to a public GitHub repository. The SDKs expose every platform capability available through the web UI file operations, user management, permissions, share links, inboxes, folder settings, and site configuration as native objects in the target language. The platform explicitly recommends using SDKs over direct API calls, noting that their internal engineering teams use the same SDKs and that issues are therefore found and fixed rapidly.
API
The API section provides access to the Files.com REST API documentation and API key management. Every action available through the web interface is also available via the API, making it suitable for embedding Files.com capabilities into custom applications, websites, iPaaS solutions, or databases. Administrator-level API keys can perform site management operations including user provisioning, permission changes, share link creation, inbox configuration, and folder settings the full administrative surface of the platform, programmatically accessible.
CLI
The CLI sub-section provides access to the Files.com Command Line application. Alongside the desktop app for Windows and macOS, the browser-based interface, the mobile app, and the SDK/API surface, the CLI rounds out a complete set of access modalities. For automation workflows scheduled transfers, scripted file processing, server-to-server operations the CLI is the most direct tool available. It supports the same file and administrative operations as the web interface and can be integrated into shell scripts, cron jobs, or CI/CD pipelines without writing application code. For teams managing Files.com as part of a larger infrastructure automation stack, the CLI is often the most practical day-to-day interface.
Thru, Inc
We signed up for Thru and tested its file transfer interface from scratch, working through the organization setup, endpoint configuration, flow creation, and the end-to-end file transfer workflow.
Setup & First Impressions
After logging in, the dashboard immediately presents transfer statistics, ingress/egress bytes, current vs. maximum storage, file processing operations (encrypt, decrypt, compress, decompress), and a transaction chart broken down by month. On a fresh account, all values are zero, which is expected, but the layout does a reasonable job of communicating what the platform tracks.
The left navigation consists of six primary items: Dashboard, Organizations, Flows, Activity, Reports, and Alerts, plus Help and Admin at the bottom.
Organizations
Organizations serve as the top-level container for all resources. Creating one requires a name, optional tags, and a description
After saving, the list updates with the new entry:
Clicking into AIMultiple opens the Properties screen. The left sidebar now shows the organization-level menu: Endpoints, Subscription, PGP Keys, SSH Keys, Certificates, Thru Nodes, and Machine Users.
Properties lets you edit the information entered at creation time.
Endpoints
Endpoints are where Thru’s flexibility becomes apparent. When creating a new endpoint, the Type dropdown exposes a range of storage options. Based on testing, the available types include:
Creating a new endpoint asks for a title and a type. The type dropdown lists the available storage options:
- Thru FTPS: Thru’s own managed FTPS storage
- Thru SFTP: Thru’s own managed SFTP storage
- Thru File Share: A self-hosted node running Thru’s compatible file transfer server (see Thru Nodes below)
- Amazon S3: Route transfers to your own AWS bucket
- Azure Blob Storage: Route transfers to your own Azure storage
- External SFTP: Connect to a third-party SFTP server
- External FTPS: Connect to a third-party FTPS server
- Web Form: A browser-based upload page for external parties
The managed Thru endpoints (FTPS, SFTP) are the lowest-friction option credentials, and URLs are provisioned automatically. The external storage options (S3, Azure, third-party SFTP/FTPS) are a meaningful differentiator compared to platforms that only offer their own managed storage.
We selected Thru FTPS for testing. The endpoint address was generated immediately and displayed on screen.
Subscription
The Subscription screen lets you select an organization and activate a subscription for it.
PGP Keys
PGP key generation is built directly into the platform. The form collects key name, username/email, algorithm, key strength, passphrase (with confirmation), and an optional expiration date. Keys can be used to encrypt or decrypt files as they pass through flows. This is configured at the flow endpoint level, not globally, which is the correct design.
SSH key management follows an identical structure to PGP (name, email, algorithm, key strength, passphrase). These are used as authentication credentials for SFTP-type endpoints. Generation is handled within the platform rather than requiring users to import externally generated keys, though the latter option likely exists as well.
Certificates
The Certificates section allows importing SSL/TLS certificates for use with FTPS endpoints via a drag-and-drop upload modal. The interface specifies only that the file should be a valid certificate no further guidance is provided on accepted formats (PEM, PFX, CRT, etc.), certificate chain requirements, or whether client certificates vs. server certificates are distinct concepts in this context. This is a notable gap. Most administrators dealing with FTPS certificate management will have questions that the UI currently does not answer inline.
Self-Hosted Nodes (Thru Nodes)
Thru Nodes deserve specific attention. Through the Thru Nodes section, users can register a node and then download an installation script for Windows (PowerShell) or Linux (curl & bash), with crontab or systemd as the service manager on Linux. The node effectively turns any server into a compatible Thru endpoint, a significant capability for organizations that cannot or will not route data through third-party cloud storage.
Comparison note: files.com does not offer a self-hosted node option; storage is exclusively managed by the vendor. Thru’s self-hosted capability is a concrete differentiator for on-premises or hybrid deployments.
Linux installation guide
Installation is straightforward on both platforms. The practical implication: if you don’t want to use Thru’s managed storage, Amazon S3, Azure, or an external FTP/SFTP server, you can run Thru’s own file transfer server on your own hardware. When creating a File Share endpoint, Thru prompts you to select one of the nodes registered here. This is a self-hosted storage path that has no equivalent in Files.com, which offers only managed storage regions and remote server connections.
The Machine Users section is empty. The table has Flow Endpoint, Type, and Org Endpoint columns but no entries. The expectation is that machine users associated with an installed Thru Node would appear here since no node installation was performed in this benchmark, the list remains empty.
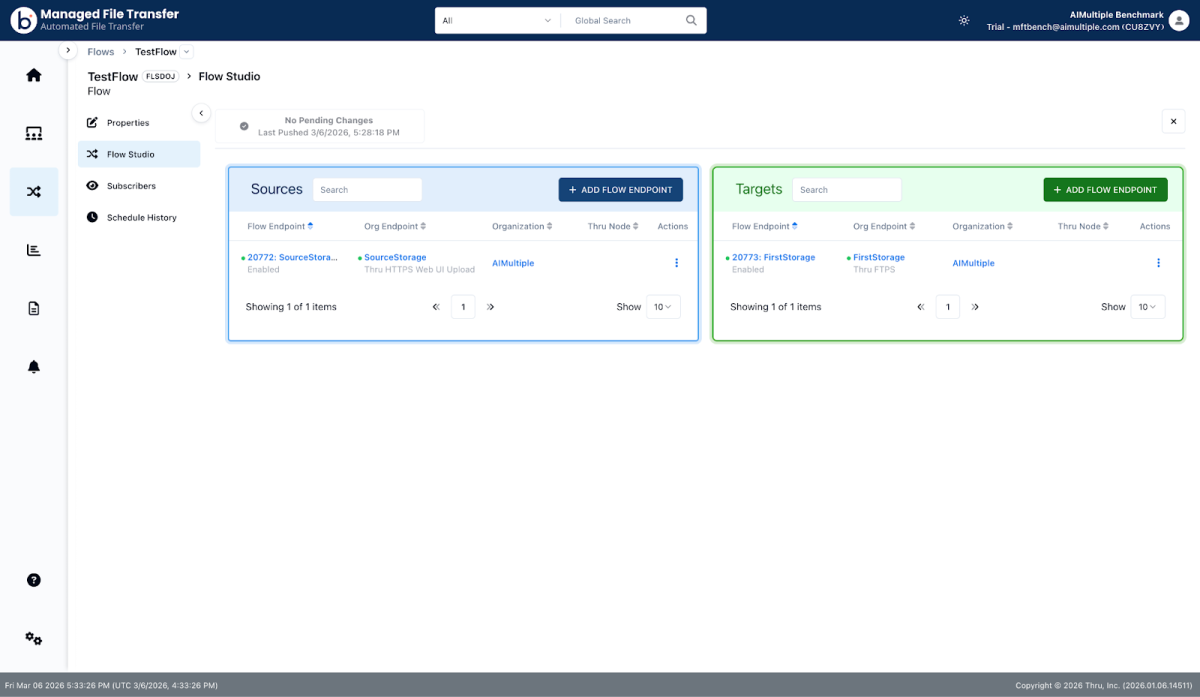
Back in the main menu, Flows is where the platform’s actual transfer logic lives. Flows define how files move from a source endpoint to a destination endpoint, with rules, transformations, and triggers applied along the way. The list is currently empty.
We created a new flow. After saving, the flow editor opens:
Configuring Source and Target
Clicking Add Flow Endpoint on the source side opens an endpoint selector. Thru prompts you to select a storage source. We created a Web Form endpoint to use as the source. This generates a browser-based upload page for external submitters. For the target, we selected the Thru FTPS endpoint created earlier.
The flow is now live.
With both sides connected, we clicked View and Push Changes to publish the flow. From the Flows list, individual flows can be exported useful for replicating configurations across environments or backing up flow definitions.
Web Form endpoint created, adding to flow
Flow with source and target both configured
View and Push Changes confirmation screen
Flow list showing export options
Source Endpoint Settings
Clicking the three-dot menu on the source endpoint opens the Edit Flow Endpoint Settings modal. The source side has six tabs: Configuration, Processing Options, Anti-Virus, Trigger Files, Rename, and Alerts.
Configuration covers filename filtering and source path. Include and Exclude filters both support regular expressions; only the UI links to a regex reference and shows an example pattern. The source path defaults to / but can be narrowed to a specific subdirectory.
Processing Options is a single dropdown: Disabled, Encryption, Decryption, Compression, Decompression. In-flight transformation without any external tooling encrypts before forwarding, compresses before storing, or decompresses on ingest.
Anti Virus is a single toggle. When enabled, every file passing through this endpoint is scanned before forwarding. No engine details, quarantine behavior, or scan log access is exposed in the UI useful feature, thin documentation.
Trigger Files solves the partial-upload problem. The active mode a TEMP FILENAME, for each file writes incoming files under a temporary extension (e.g., example.doc.filepart) until the full transfer completes, at which point the file is renamed. This prevents a half-written file from being picked up and forwarded mid-transfer. Particularly important for large files uploaded in chunks.
Rename allows files to be renamed on ingest using configurable file pattern rules. Multiple rules can be defined; the first matching rule wins. No rules were configured during testing.
Alerts supports per-email-address notifications for Inactivity, Transfer Limit Exceeded, and Quarantined events. These feed into the platform-wide Alerts section.
Target Endpoint Settings
The target endpoint editor has the same tabs as the source Configuration, Processing Options, Trigger Files, Rename, Alerts plus two additional ones: Users and Mapping.
The Users tab shows the credentials used to authenticate with the target storage. Because FirstStorage is a Thru-managed FTPS endpoint, a service account (ftps-tgt-20773, Authentication Type: User Password) was automatically provisioned, with no manual credential setup required. For external SFTP or FTP targets, this is where you would add or manage login credentials.
The Mapping tab defines where files land on the target. Each mapping rule has three fields: Source Endpoint (the source to apply the rule to), Source Path (the originating directory), and Target Path (the destination directory on the target). The default is all sources, all paths, routed to /. Multiple mappings can be added to route files from different source directories into different target folders useful for any pipeline that needs structured output from a flat or mixed input.
Web Form Embed
The source endpoint in this flow is a Thru HTTPS Web UI Upload type a hosted upload form. Clicking the three-dot menu on this endpoint reveals an Embed Thru Upload Component option.
The embed modal provides two code blocks: a set of CDN-hosted <script> and <link> tags to import the Thru web component library, and a custom element tag (<thru-upload>) pre-populated with the flow endpoint ID and API URL. An API Key must be selected from a dropdown to activate the snippet. The API-key attribute is populated once a key is chosen.
The component was embedded on an external test server. Every request failed in practice due to CORS errors. No CORS configuration was found in the trial interface, though one may exist elsewhere in the platform. The Thru staging API blocked cross-origin requests from the test domain because it lacked an Access-Control-Allow-Origin header. The feature is well-designed in concept, but blocked at the integration layer without either a support request or an undiscovered configuration.
The File Upload modal, accessible via the three-dot menu directly in Flow Studio, worked without issue for internal testing. A PDF was uploaded to the source endpoint and completed successfully at 100%.
Activity
The Activity section is a fully filterable transfer log. Available filters: Flow, Organization, Endpoint, Flow Endpoint, Date Range, Filename (with wildcard support), Processing Status, Transfer Status, View Type (Source & Target, Source only, Target only), and Show Purged Files. The filter panel can be pinned or hidden.
The PDF uploaded moments earlier appeared in the log immediately. The row shows Type (Source), Flow (TestFlow), Flow Endpoint (20772: SourceStorage, Thru HTTPS Web UI Upload), Organization (AIMultiple), Thru Node (Cloud), Filename, File Size (148.5 KiB), Delivery count (0/1), and Last State Update (Completed).
Clicking the file record opens a File Download modal that shows file details, the total successful and failed download counts, and a full download history. Two action buttons are present: Download File and Share….
The Share button opens a Share Configuration popover directly within the modal. Settings: Active for and Max downloads (integer). Clicking Generate Share Link produces a time- and count-limited download URL. This is a practical ad hoc distribution feature no separate file hosting step needed.
The Export button in the Activity view triggers a report generation job. The Export Reports page (accessible from the main Reports menu) shows the job status, generation time (177ms in this case), and a retention timestamp. A toast notification in the bottom-right confirms when the export is ready with a direct Download button. Reports are plain activity log exports; no custom analytics builder was observed.
Alerts
The Alerts page aggregates system-generated alerts across all flows. The table columns are: Source, Alert Type, Created, Severity, Alert ID, Organization, State, Details, and Actions. Filter and Clear All Alerts buttons are available.
During testing, no alerts had triggered, so the list was empty. The value of this view becomes apparent at scale rather than navigating into each flow’s configuration to check alert history, all triggered alerts across every flow and organization surface here in one place with filterable severity and state.
Admin
The Admin section is accessible from the bottom of the left navigation and covers platform-level configuration. The Admin sub-menu contains: Users, Roles, Retention, Audit Log, MFA, Thru Nodes, Feature Flags, and SSO Mappings.
The Users screen lists all platform accounts, including their last login timestamps, statuses, and ban flags. Role management, file retention policies, and SSO mappings cover the standard enterprise administration requirements. The Audit Log provides a complete record of platform actions —who did what and when which is a baseline requirement for SOC 2, HIPAA, and similar compliance frameworks. MFA and SSO Mappings indicate enterprise identity integration is supported.
The Help menu provides documentation for both end users and developers, including API reference. The quality and depth of the documentation were not evaluated in detail during this benchmark, but the presence of a developer-specific section is relevant for teams planning API-based integrations.
Performance and throughput benchmarks are out of scope for this evaluation and will be covered separately.
Solarwinds Serv-U
We downloaded and installed SolarWinds Serv-U MFT Server from scratch, set up the admin panel, and explored the management interface, including server configuration, user management, and event handling.
Getting Started
The trial process starts on the Serv-U product page. Clicking the Download Free Trial link opens a form asking for first name, last name, business email, country, zip code, phone number, and company name, more fields than Cerberus requires. Submit it, and you’ll be redirected to a download page where you can select your version.
Unlike Cerberus, which is Windows-only, Serv-U supports both Windows and Linux on the server side. We chose to install the Linux version on an AWS m6i.xlarge instance, the same size used in our Cerberus test.
Installation
We connected to the server via SSH, downloaded the installer with wget, extracted the archive, and ran the binary. The installer asks four questions: confirm the installation, choose the installation directory, install as a service, and start now. Four yes responses, and the installation was complete in about five seconds.
The installation note printed to the terminal is important: a listener is created on port 8443, and the default admin credentials are username admin and password admin. The startup log file will show all IP addresses and ports on which Serv-U is listening.
Web-Based Admin Panel
Navigating to the server’s IP on port 8443 opens a login page. This is a meaningful difference from Cerberus: Serv-U’s admin panel is a web interface accessible remotely from any browser. Cerberus has no equivalent; managing it requires connecting directly to the server machine via remote desktop, which is less convenient.
After logging in with the default credentials, Serv-U prompts to set up multifactor authentication. The recommended apps are Google, Microsoft, LastPass, and Authy. Setup involves scanning a QR code. You can skip this step.
Dashboard
After skipping MFA setup, the dashboard loads. It shows Session Statistics, Login Statistics, and Transfer Statistics across the entire server. Current sessions, total sessions, login count, average session duration, last login time, and download and upload speeds are all visible at a glance. A live server log is displayed below the stats, with controls for Freeze Log, Clear Log, and Filter Log. Two additional tabs show Active Sessions and a link to the THWACK community.
The left sidebar lists: Dashboard, Server Details, Users, Groups, Directories, Limits & Settings, and Server Activity under the Global section, followed by a Domains section currently showing Admin Domain.
Server Details
The Server Details section has seven tabs: IP Access, Serv-U Gateway, Database, Events, License Information, Program Information, and Server Identity.
The IP Access tab manages server-wide connection rules. Each rule takes an IP address, name, or mask and assigns either allow or deny access, with an optional expiration date and description. Supported formats include exact match, wildcard, range, CIDR notation, and single character wildcard. Rules can be imported and exported.
The Serv-U Gateway tab configures an optional reverse-proxy component that terminates file-transfer connections in the DMZ, preventing inbound connections from the DMZ to the internal network and keeping data out of the DMZ entirely. Configuration requires a gateway address, a port (default 1180), and a public IP address.
The Database tab lets you connect Serv-U to an external ODBC data source for loading users and groups. The external database requires an ODBC driver installed on the system. User and group table mappings can be customized. Users loaded from the database override locally created accounts with the same name.
The Events tab is where server-level event rules are created. Each event has a type, a name, and an action. The event type shown in the creation form defaults to Server Start, but can be changed to cover other server-level triggers. Actions include Send Email with To, BCC, Subject, and Message fields as well as other action types. A Create Common Events button automatically generates a set of standard event rules.
License Information shows the current registration status, edition, number of copies, purchase date, and remaining trial days. It also includes a side-by-side comparison table of FTP Server versus MFT Server capabilities across maximum users, domains, sessions, capabilities, architecture, protocols, web and mobile, administration, and customization. The MFT edition shows unlimited across all user and session limits and adds features including automated file management, events and email notifications, Microsoft Queue events, file sharing, Serv-U Gateway, high availability, FIPS 140-2 validation, user and group statistics, remote web administration, custom web client HTML and CSS, authentication via custom library, database authentication, Windows/AD authentication, and LDAP authentication.
Users
The Users section has two tabs: Global Users and Database Users. Creating a user opens a User Properties dialog with nine tabs: User Information, Directory Access, Virtual Paths, Logging, Groups, Events, IP Access, Limits & Settings, and Multifactor Authentication.
User Information collects login ID, password, full name, home directory, SSH keys, administration privilege level, account type (Permanent or other), email address, and description. Options include locking the user to their home directory, always allowing login, and requiring a password change at the next login. An Availability button sets login time restrictions by date and day of week. A Welcome Message button configures a custom message shown to the user on login.
The Directory Access tab defines which files and directories the user can access. Rules are inherited from any groups the user belongs to, as well as from domain and server-level rules. Each rule maps a path with a set of permissions and an optional max size.
The Virtual Paths tab links physical paths outside the user’s home directory into their directory listing. The table maps physical paths to virtual paths, replacing the traditional shortcut link method.
The Logging tab controls exactly what gets recorded for this user. Log message options include: security messages, IP names, downloads, zipped downloads, uploads, file deletions, file and directory renames, directory creations, directory deletions, file shares, FTP commands, FTP replies, SSH commands, SSH replies, SSH detailed commands, SSH detailed replies, HTTP commands, and HTTP replies. Logging to a file can be enabled separately, with a configurable path, automatic log rotation, and limits on file count and size retention. Log file path tags support tokens for hour, day, month, year, domain name, login ID, and user full name.
The Groups tab shows which groups the user belongs to. A user can be a member of multiple groups, and the order of membership is significant, as it determines which group settings take precedence.
The Events tab lists user-level event rules. Events fire automatically to run programs, send emails, or show tray icon messages. A Create Common Events button automatically generates a standard set of rules.
The IP Access tab sets user-specific IP restrictions, checked last when the user attempts to log in. Rules follow the same address, access, and expiration format as server-level rules, and can be imported and exported. (Image 20)
The Limits & Settings tab shows connection-level limits for the user. The Connection limit type shows: maximum sessions per user account (20), maximum sessions per IP address for the account (20), require secure connection before login (yes), automatic idle connection timeout (10 minutes), automatic session timeout (no timeout), block anti-timeout schemes (no), block IP address of timed out session (no timeout), allow FTP and FTPS connections (yes), allow SFTP connections (yes), allow HTTP and HTTPS connections (yes), and require reverse DNS name (no). Each limit can be applied to specific days and times. Ratios & Quotas and Ratio Free Files buttons are also available. (Image 21)
The Multifactor Authentication tab shows the user’s MFA status (currently Not Configured), a Multifactor Authenticator dropdown (set to Enabled), a Company Name field, and a Reset MFA button. If set to Enforced rather than Enabled, MFA becomes mandatory, and the user cannot log in without it.
Groups
The Groups section has two tabs: Global Groups and Database Groups. Creating a group opens a Group Properties dialog with the same tab structure as users: Group Information, Directory Access, Virtual Paths, Logging, Members, Events, IP Access, Limits & Settings, and Multifactor Authentication.
Group Information takes a group name, home directory, SSH keys, administration privilege level, and description. Options include always allowing login, enabling the account, locking the user in the home directory, and applying group directory access rules first. Availability and Welcome Message buttons are available here as well. All settings available at the user level are also configurable at the group level. If a user has a conflicting setting defined at the user level, the user-level setting overrides the group setting.
Directories
The Directories section has three tabs: Directory Access, Virtual Paths, and File Management.
The Directory Access tab manages global directory access rules for all users on the server. Creating a rule takes a path and lets you set file permissions (read, write, append, rename, delete, execute) and directory permissions (list, create, rename, remove) independently. Subdirectory inheritance and a maximum directory size can also be configured. Full Access and Read Only shortcut buttons are available.
The Virtual Paths tab maps physical paths to virtual paths server-wide, the same concept as at the user level, but applied globally. A checkbox controls whether the virtual path is included in maximum directory size calculations. (Image 25)
The File Management tab lets you define automated rules for files in a specified directory. Each rule targets a directory path and chooses an action: delete files after a specified number of days, or move files to another location after a specified number of days. Serv-U evaluates each file individually based on its creation date. (Image 26)
Limits & Settings
The Limits & Settings section is the global configuration hub for the entire server. It has seven tabs: Limits, Settings, FTP Settings, Encryption, Branding Setup, File Sharing, and Multifactor Authentication.
The Limits tab lists connection limits that apply server-wide and cascade down to all domains, groups, and users unless overridden at a lower level. The Connection limit type includes: maximum sessions on server (unlimited), maximum sessions per IP address on server (unlimited), maximum sessions per user account (20), maximum sessions per IP address for user account (20), require secure connection before login (yes), automatic idle connection timeout (10 minutes), automatic session timeout (no timeout), block anti-timeout schemes (no), automatically create home directories (yes), block IP address of timed out session (no timeout), allow X-Forwarded-For to change HTTP connection IP addresses (no), require reverse DNS name (no), and maximum sessions per IP address on domain (unlimited). The limit type dropdown can be changed to show transfer, quota, or other limit categories.
The Settings tab covers three areas. Connection Settings lets you configure auto-blocking users who connect more than 4 times within 30 seconds for 15 minutes, with an option to hide server information from SSH identity. Network Settings controls packet timeout (300 seconds), PASV port range, and whether matching peer IP addresses are required for control and data connections. The Password Recovery Message section lets you customize the subject and body of the email sent to users when they request their account credentials, with template variables for name and password.
The FTP Settings tab lists every FTP command the server supports and lets you enable or disable each one individually. This level of FTP command-level control is unique to Serv-U among the platforms we tested.
The Encryption tab covers SSL certificate configuration for FTPS and HTTPS (certificate path, private key path, password, and CA certificate path), SSH private key configuration for SFTP (key type, fingerprint, and key generation), Advanced SSL options (TLS 1.2 and 1.3 toggles, cipher suite configuration), SSH Ciphers, SSH MACs, SSH Key Exchange Algorithms, SSH Key Algorithms, and a FIPS 140-2 mode toggle. The level of granularity here, selecting individual cipher suites, MACs, and key exchange algorithms, is aimed squarely at security-conscious and compliance-driven deployments.
The Branding Setup tab is split into three sections. New Login Page Branding allows you to set a custom logo, background image, favicon, login title text, background color, and login page body text. Legacy Login Page Branding supports a custom HTML container directory with separate CSS, header, and footer files for fully custom login page layouts. Web Client Branding sets the logo displayed in the file management interface, with a 400×100-pixel dimension requirement and a CSS-only background customization field.
The File Sharing tab configures how domain users can send and receive files with external guests. Settings include the domain URL, the file sharing repository path, how many days after expiration shares are automatically removed, and the invitation email subject and body templates, both editable and supporting variables for expiration date, share URL, and comments. SMTP must be configured separately for invitation emails to send automatically.
The Multifactor Authentication tab sets the global MFA policy. The Multifactor Authenticator dropdown can be set to Disabled, Enabled, or Enforced. The Company Name field sets the account label that appears in authenticator apps when users scan the QR code.
Server Activity
The Server Activity section has four tabs: Sessions, Statistics, User & Group Statistics, and Log.
The Sessions tab lists all currently active sessions with columns for ID, type, user, IP address, hostname, server address, location, last command, and client. Clicking a session populates the Active Session Information panel below with detailed real-time data: user, privilege level, IP address, speed, average download and upload speed, time on, idle time, since timestamp, downloaded, uploaded, location, and last command. Disconnect, Abort, Broadcast, and Spy & Chat buttons are available at the bottom.
The Statistics tab shows server-wide session, login, and transfer statistics since the last reset. Displayed fields include statistics start time, current sessions, total sessions, 24-hour sessions, highest number of sessions, average session length, longest session, login count, average duration logged in, last login time, last logout time, most logged in user, currently logged in count, download speed, upload speed, downloaded total, uploaded total, average download speed, and average upload speed.
The User & Group Statistics tab shows the same session, login, and transfer statistics broken down per user or per group. You select either User Statistics or Group Statistics, then choose a collection and a specific user or group to view. Statistics can be saved or reset from this tab.
The Log tab shows Serv-U’s own application log startup messages, library loading status, port binding confirmations, and errors. This is the server process log, not user activity logs. User-level activity is logged separately to a text file path configured per user in the Logging tab. There’s no built-in log viewer with filtering or audit capabilities for user activity if you need to review what a specific user did, you open the log file directly.
Domains
An Admin Domain is created automatically during installation. To test file transfer and sharing, we created a new domain using the Domain Wizard, which walks through six steps.
Step 1: Domain Details: enter a name for the domain and an optional description.
Step 2: Domain Type: choose between File Transfer Domain, File Sharing Domain, or both simultaneously. Both can be enabled at the same time.
Step 3: File Sharing: set the domain URL, select the file sharing repository folder from anywhere on the server filesystem, and optionally configure SMTP for sending invitation emails. Unlike some platforms that restrict you to a predefined directory, you can point this at any folder on the machine.
Step 4: Protocols: enable or disable each protocol and set its port. Available protocols are FTP and explicit SSL/TLS (port 21), Implicit FTPS/SSL/TLS (port 990), SFTP using SSH (port 22), HTTP (port 80), and HTTPS TLS encrypted HTTP (port 443). Different domains can run on different ports.
Step 5: IP Listeners: select which IPv4 address the domain listens on, useful when multiple IPs are bound to the server. IPv6 listeners can be created simultaneously.
Step 6: Encryption: Choose whether to allow users to recover passwords via email.
All security settings available globally and at the user level are also configurable per domain, which gives administrators granular control over each domain’s security posture independently.
Client Interface
After creating the domain and a user, navigating to the domain’s URL opens the same login page as the admin panel, followed by an MFA setup prompt. We had enforced MFA, so skipping wasn’t an option this time.
After completing MFA setup and logging in, the Serv-U client interface opens. The left sidebar shows My Storage (Home, Favorites) and File Sharing (Requested, Sent). The Home view is a file explorer that shows the server’s directory structure with the name, last modified date, and size columns. Upload, New Folder, Refresh, and More buttons are available in the toolbar.
Uploading opens a dialog with a drag-and-drop zone and a browse option. Upload progress is shown inline with a percentage bar. There’s no folder upload option only individual files, either single or multiple selections. No file preview is shown during upload.
Any folder in the file explorer can be added to Favorites from its context menu. The Favorites section in the left sidebar shows the folder name and path with a Remove from Favorites option.
File Sharing: Request
The Requested section under File Sharing lets you generate an upload link to share with someone so they can send you files. Creating a new request opens a two-step dialog.
Step 1: File share: set a title (auto-populated with an expiration timestamp), an optional description, and advanced settings, including an expiration date and time, a password protection toggle, and a file limit toggle.
Step 2: Guest & sender: enter one or more recipient email addresses (comma-separated). Options include notifying you when the file has been uploaded and sending you a copy of the upload link email. A Change sender details section is also available.
After finishing, the Requested list shows the new request with its status as Pending. A Get Link dialog displays the upload URL and its expiration date with a Copy link button.
Opening the upload link shows a Request files page displaying the subject, sender name and email, expiration date, password protection status, and the upload URL. Below that is an upload area with drag-and-drop and a browse option.
Once the recipient uploads through the link, the file appears in the Requested list in your panel with the sender and upload details visible.
File Sharing: Send
The Sent section works in the opposite direction: you upload a file and generate a download link for a recipient. Creating a new send request follows the same two-step pop-up structure as requesting files: first, set a title, description, expiration, password, and file limit options, then enter the recipient’s email address.
After completing the steps, Serv-U generates a download link and presents it to you directly; no email is automatically sent to the recipient. You copy the link and share it yourself.
The recipient opens the link and uploads the file or in the send case, downloads it from a minimal page with no branding or context beyond the link itself.
Overall, the file sharing and request flows work, but the UX is noticeably rough. Each action requires navigating through multiple pop-ups, the interface provides minimal feedback, and the recipient-facing pages are sparse. Compared to Cerberus’s web client, which has a proper file manager, inline video preview, and a reasonably polished interface, the Serv-U client feels like it was built as an afterthought. The admin panel is where Serv-U clearly invested its effort; the end-user experience got considerably less attention.
Cite this research
Pick the format that matches where you're publishing. Pasting the link version into your CMS preserves the backlink.
@misc{dogan2026,
  author = {Dogan, Sedat and Sezer, Sena},
  title  = {{MFT Benchmark: Files.com, Thru, Cerberus FTP, and Serv-U Tested}},
  year   = {2026},
  month  = jun,
  howpublished    = {\url{https://aimultiple.com/mft-benchmark}},
  note   = {AIMultiple. Retrieved June 12, 2026}
}- Has 20 years of experience as a white-hat hacker and development guru, with extensive expertise in programming languages and server architectures.
- Is an advisor to C-level executives and board members of corporations with high-traffic and mission-critical technology operations like payment infrastructure.
- Has extensive business acumen alongside his technical expertise.


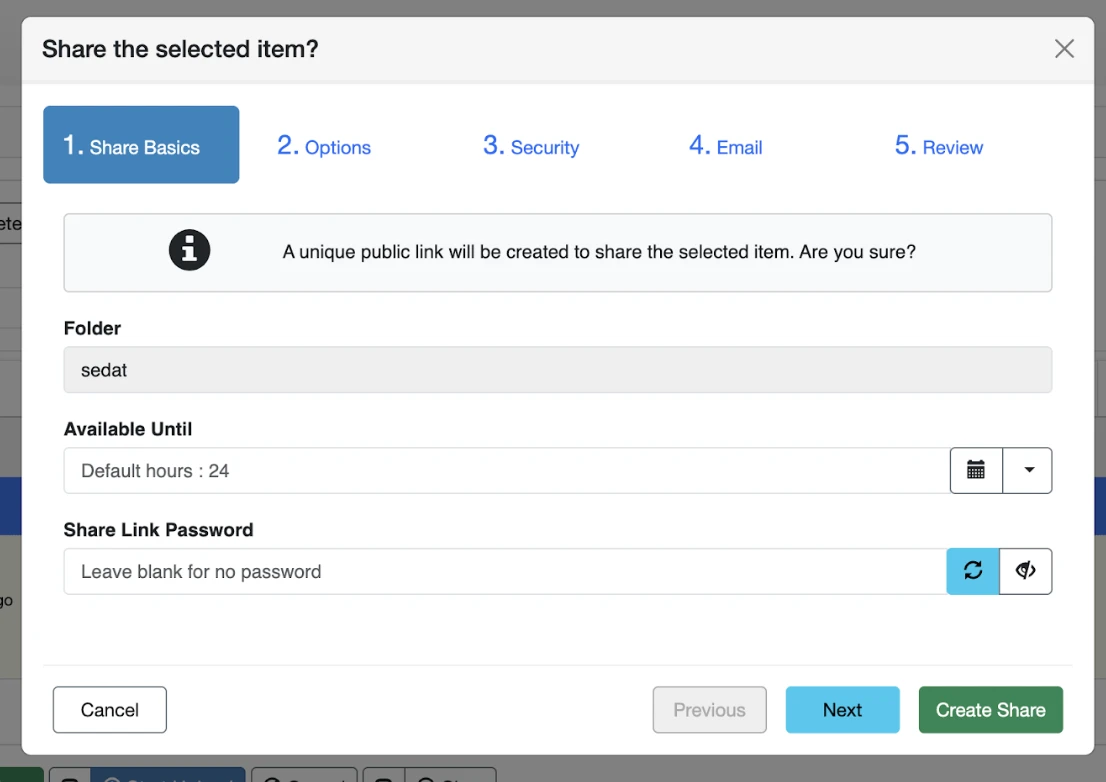
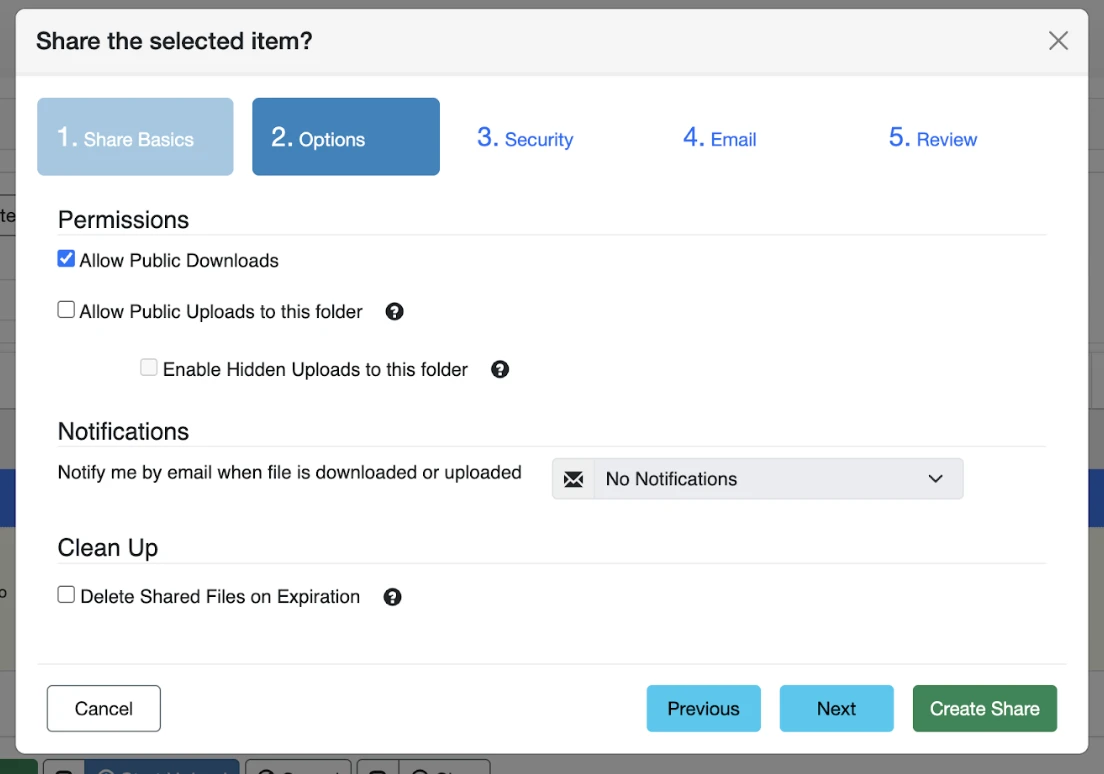
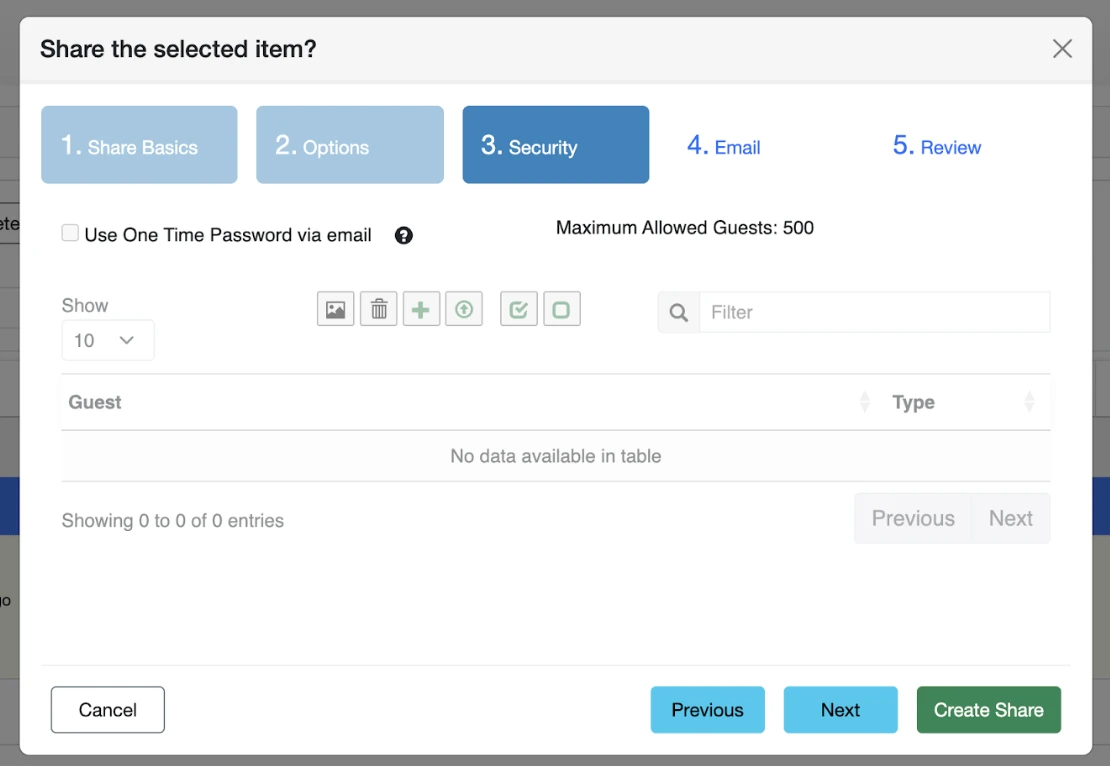
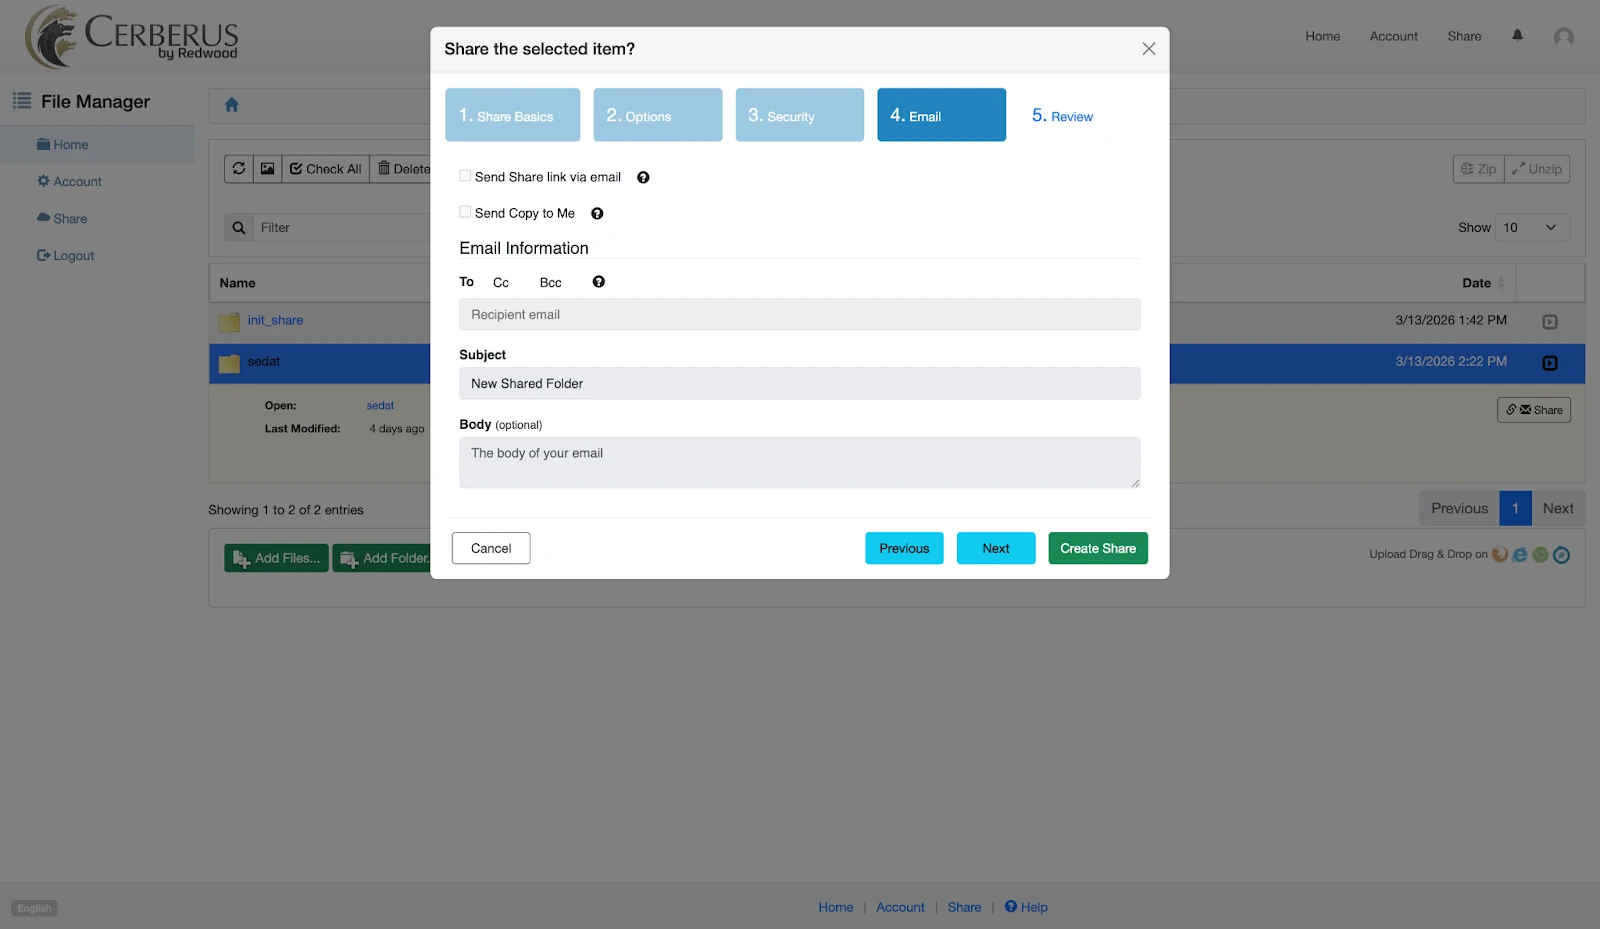
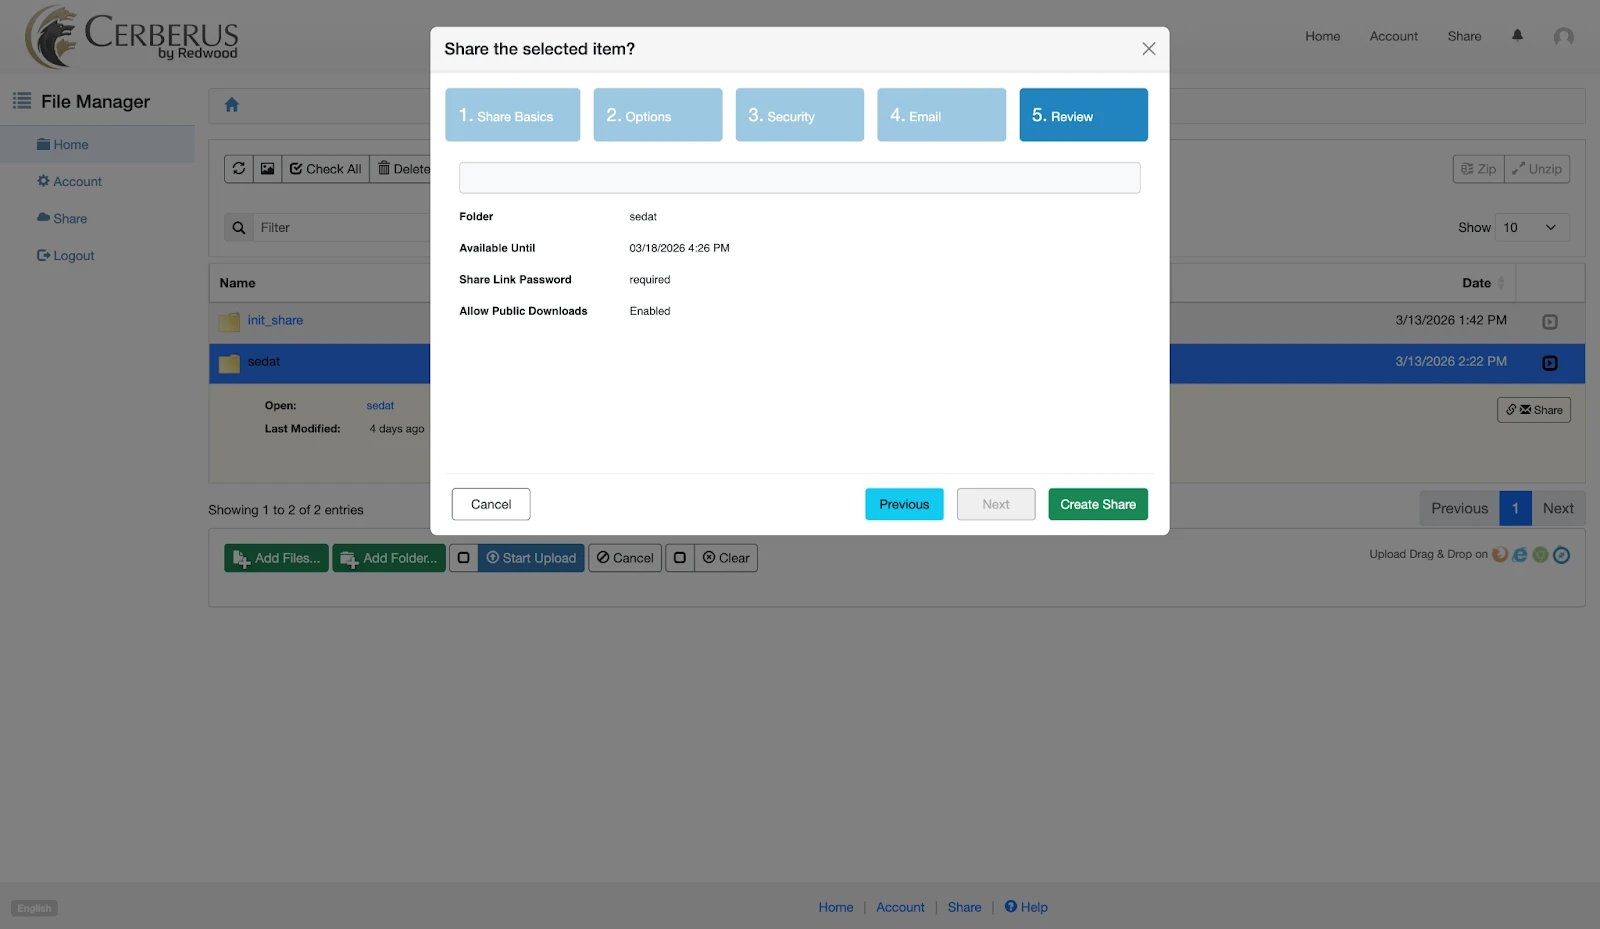
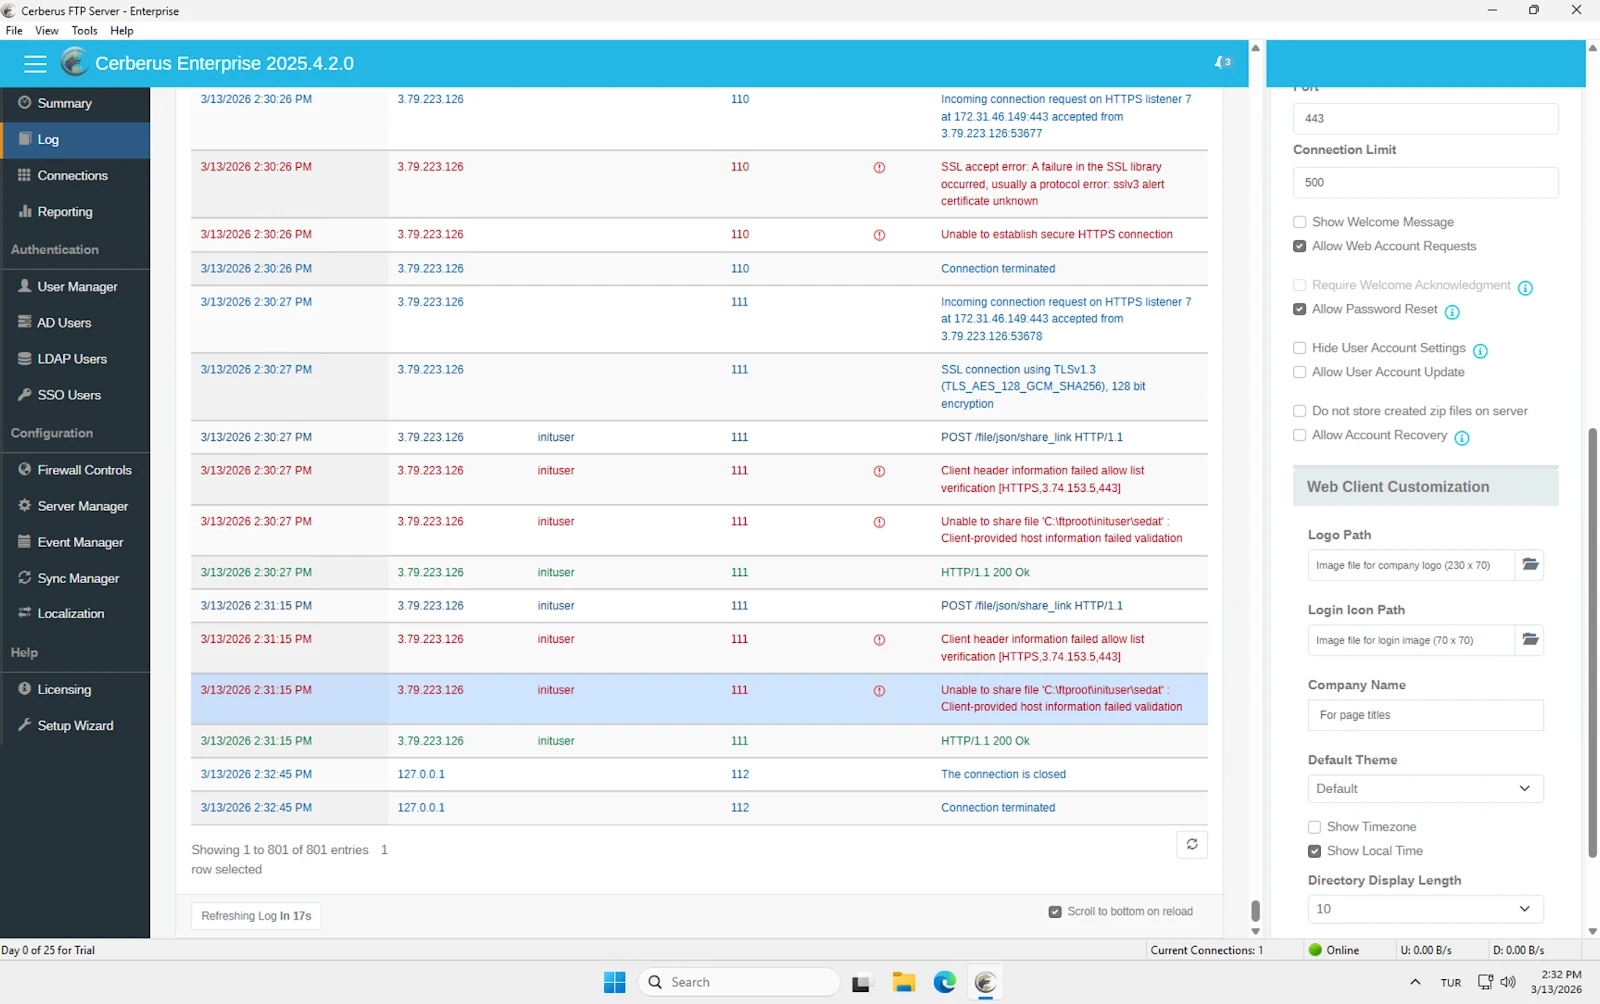
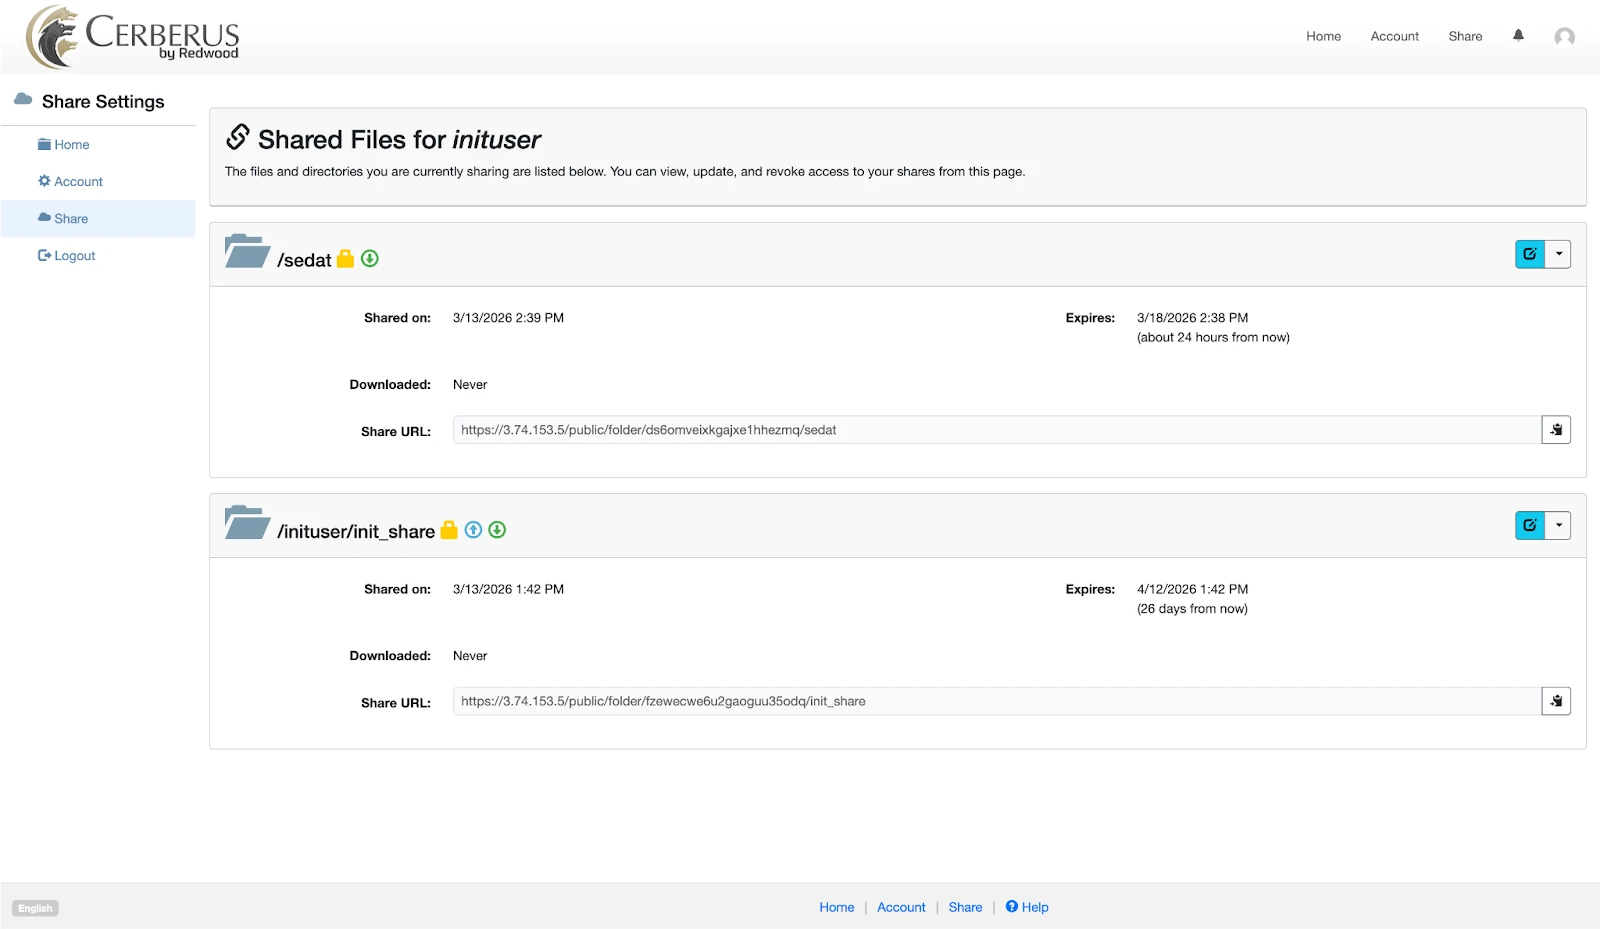


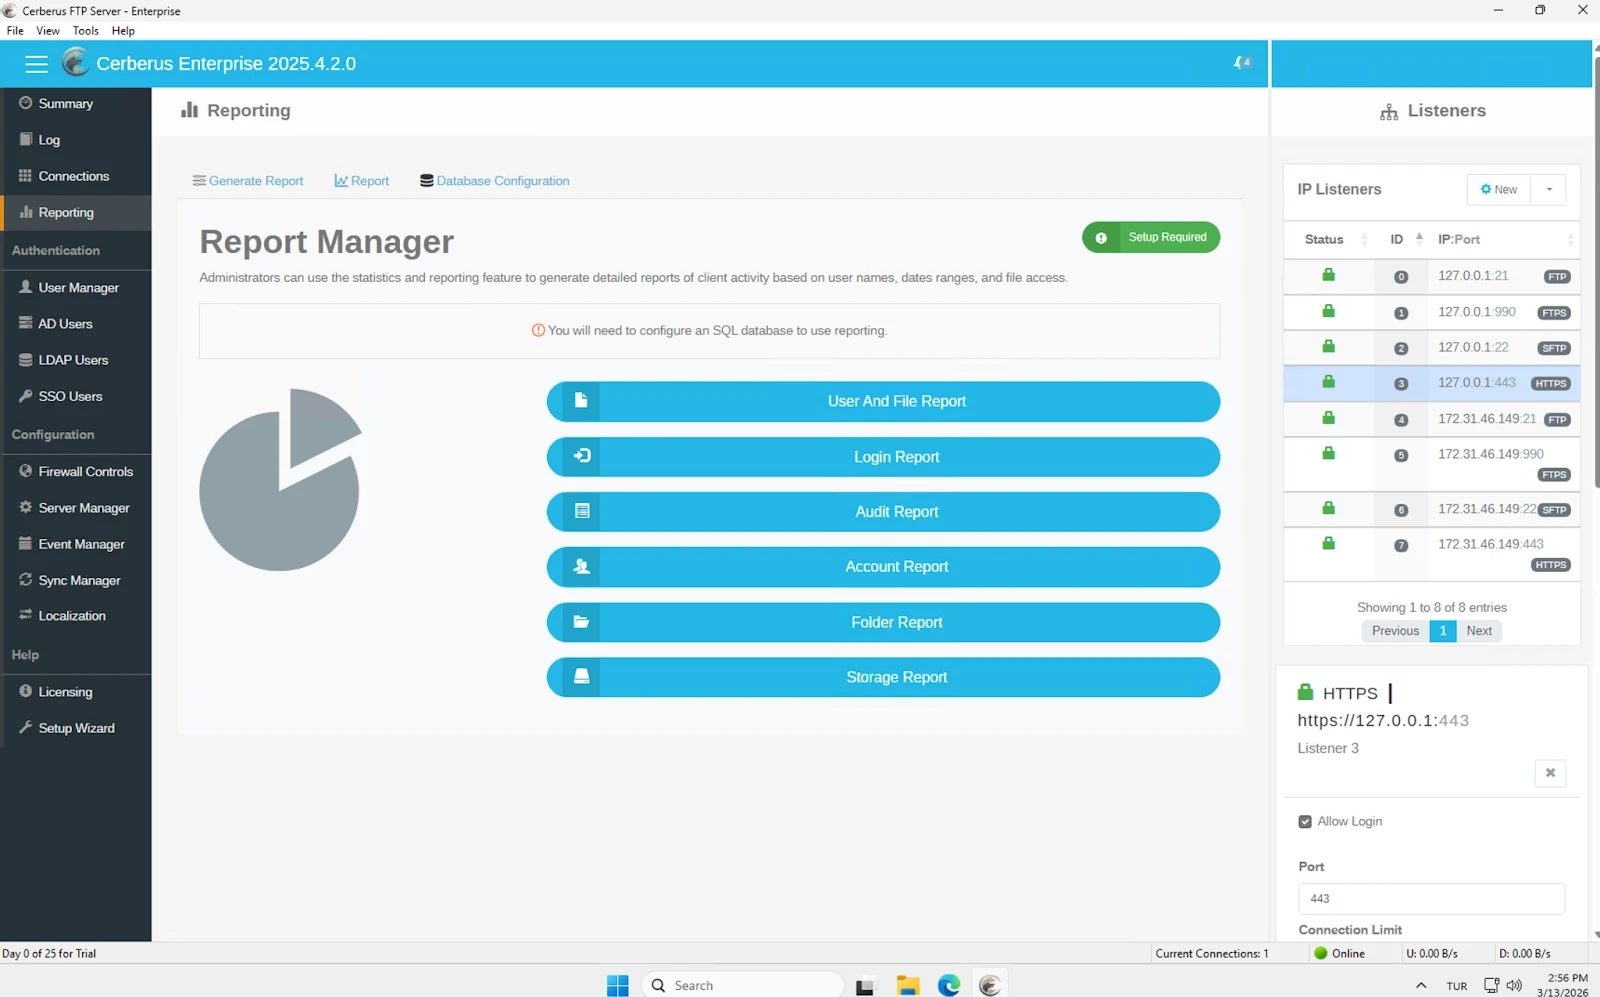

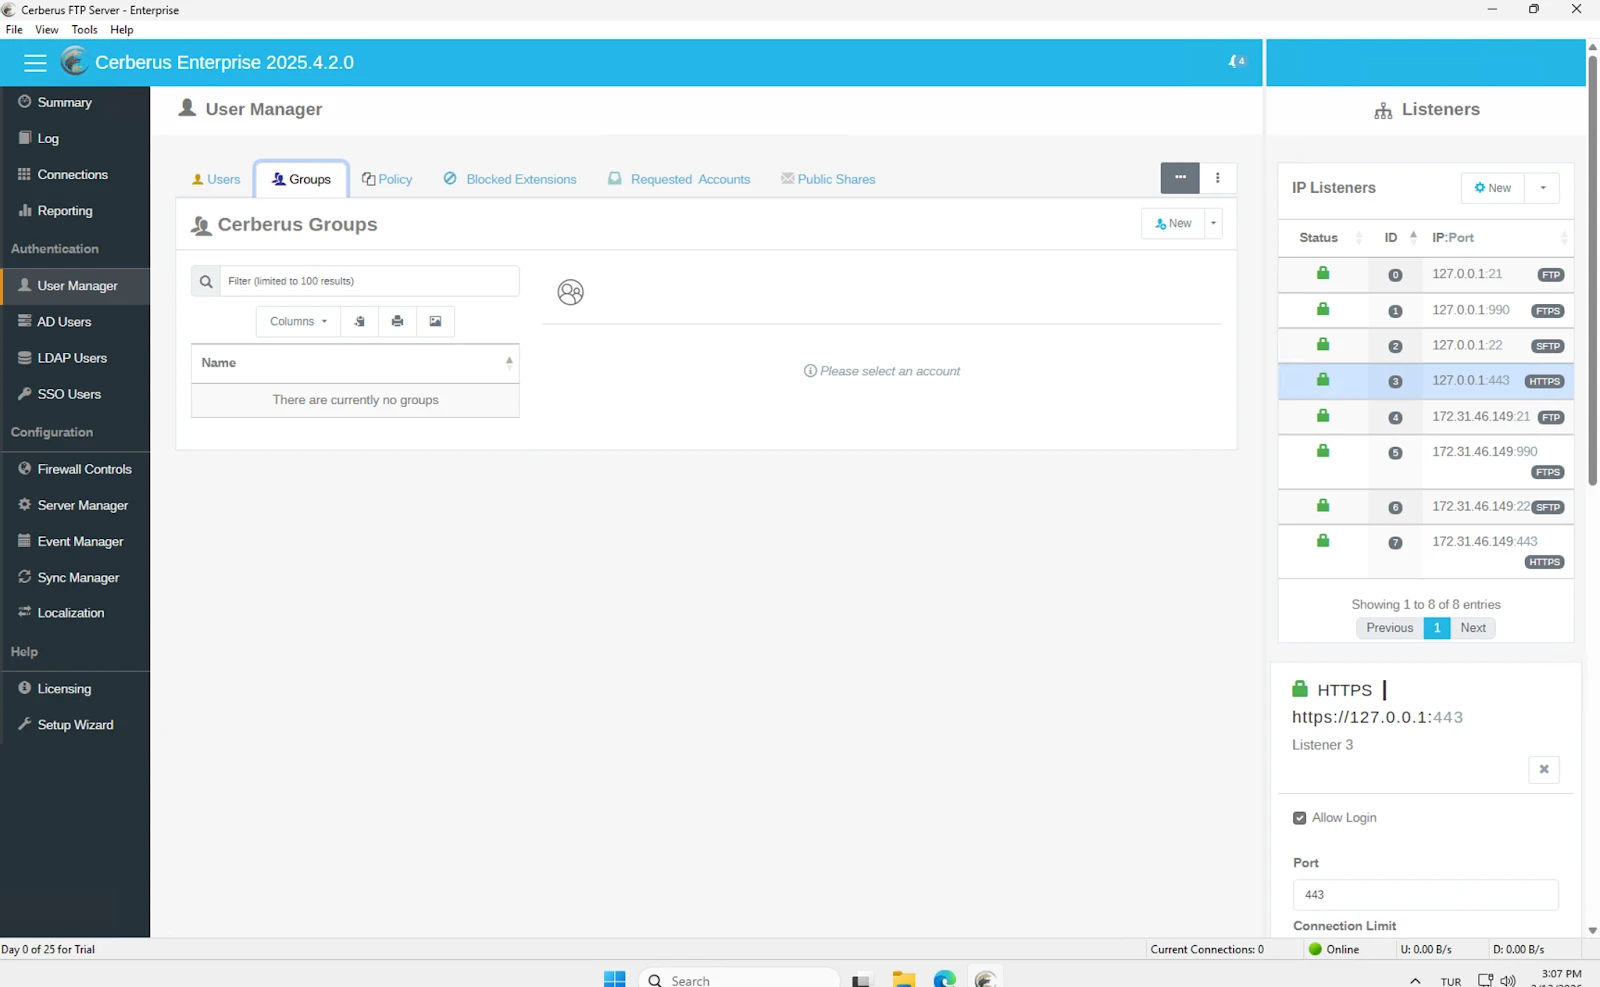
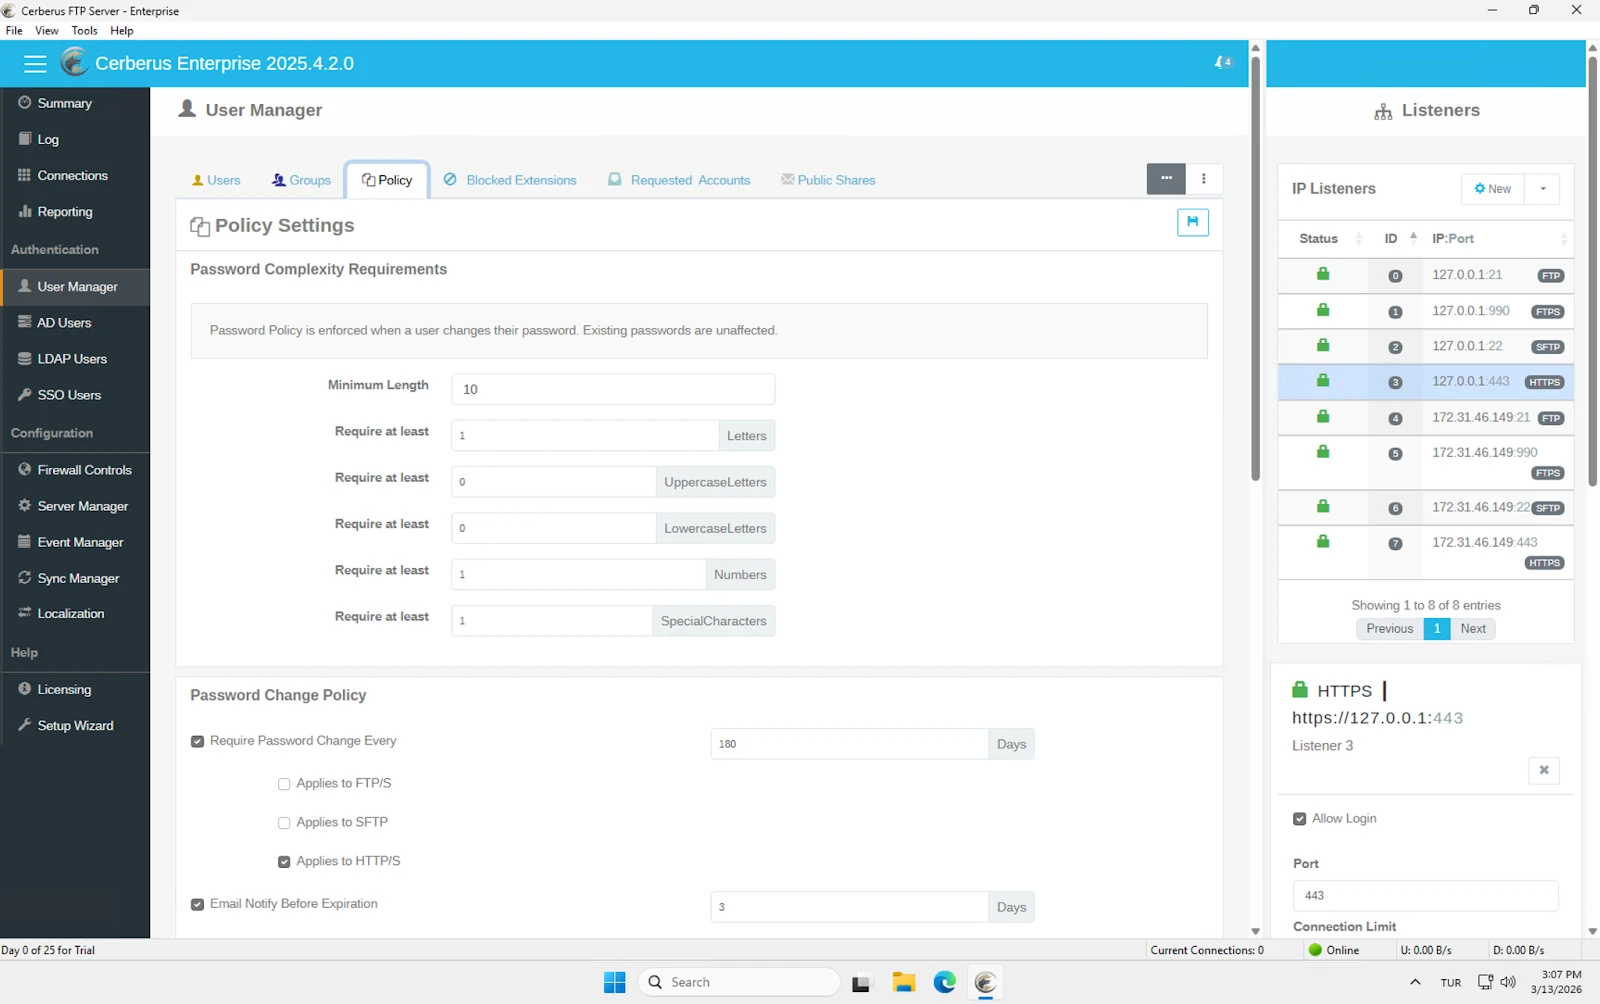
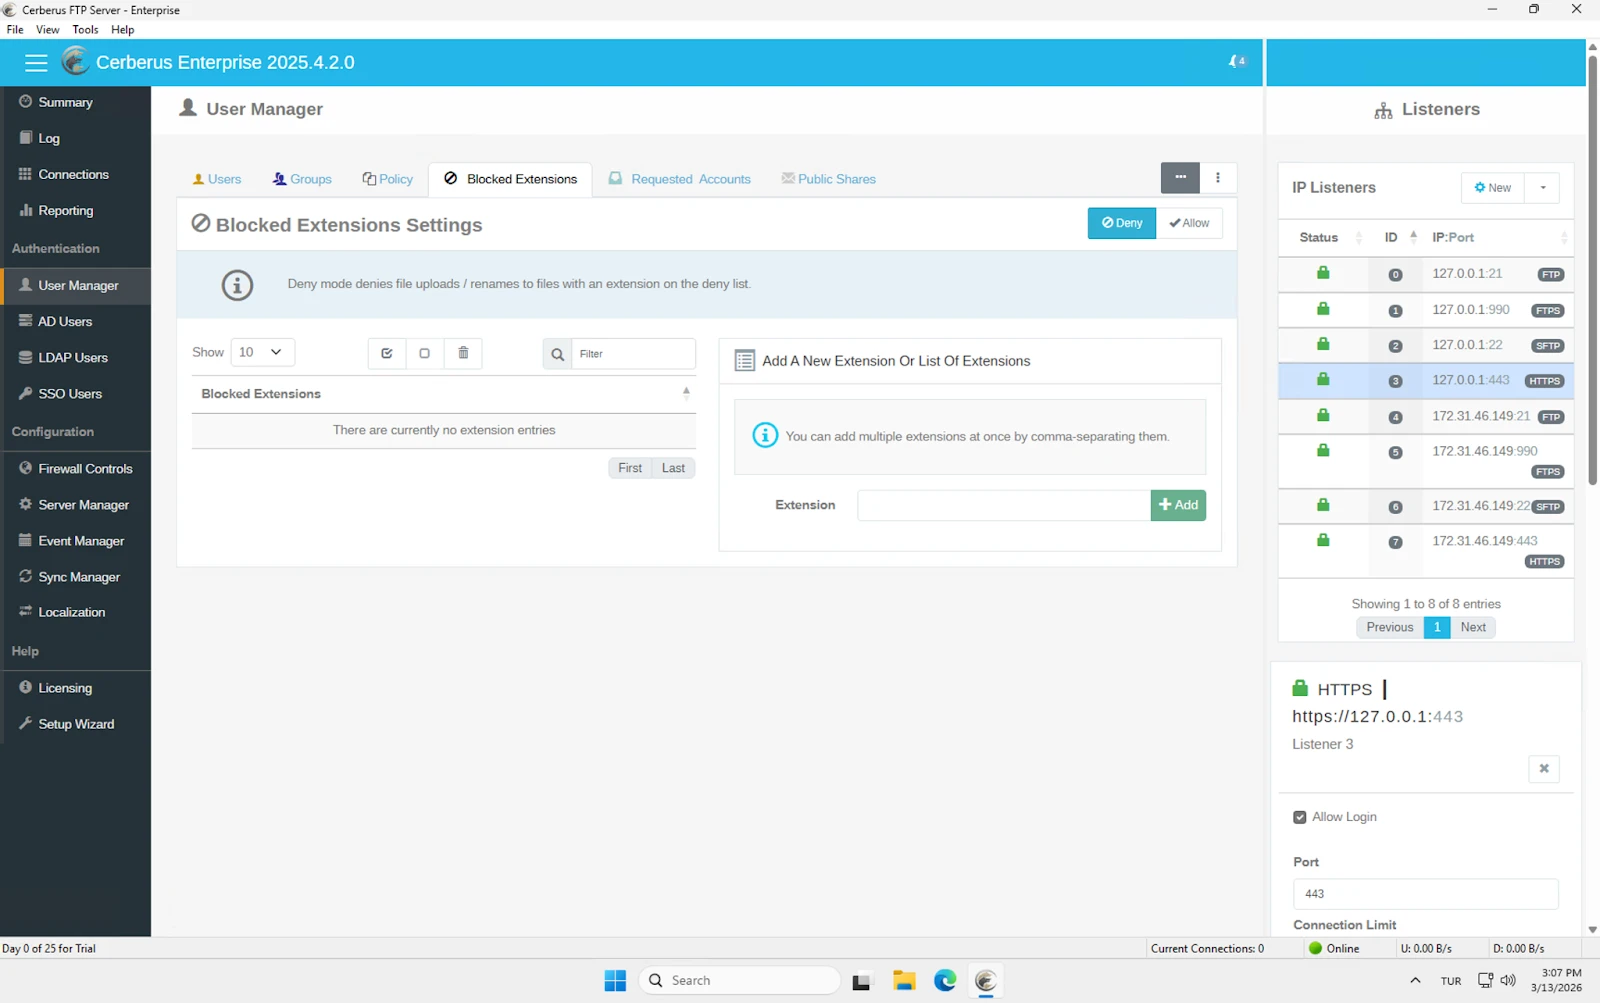
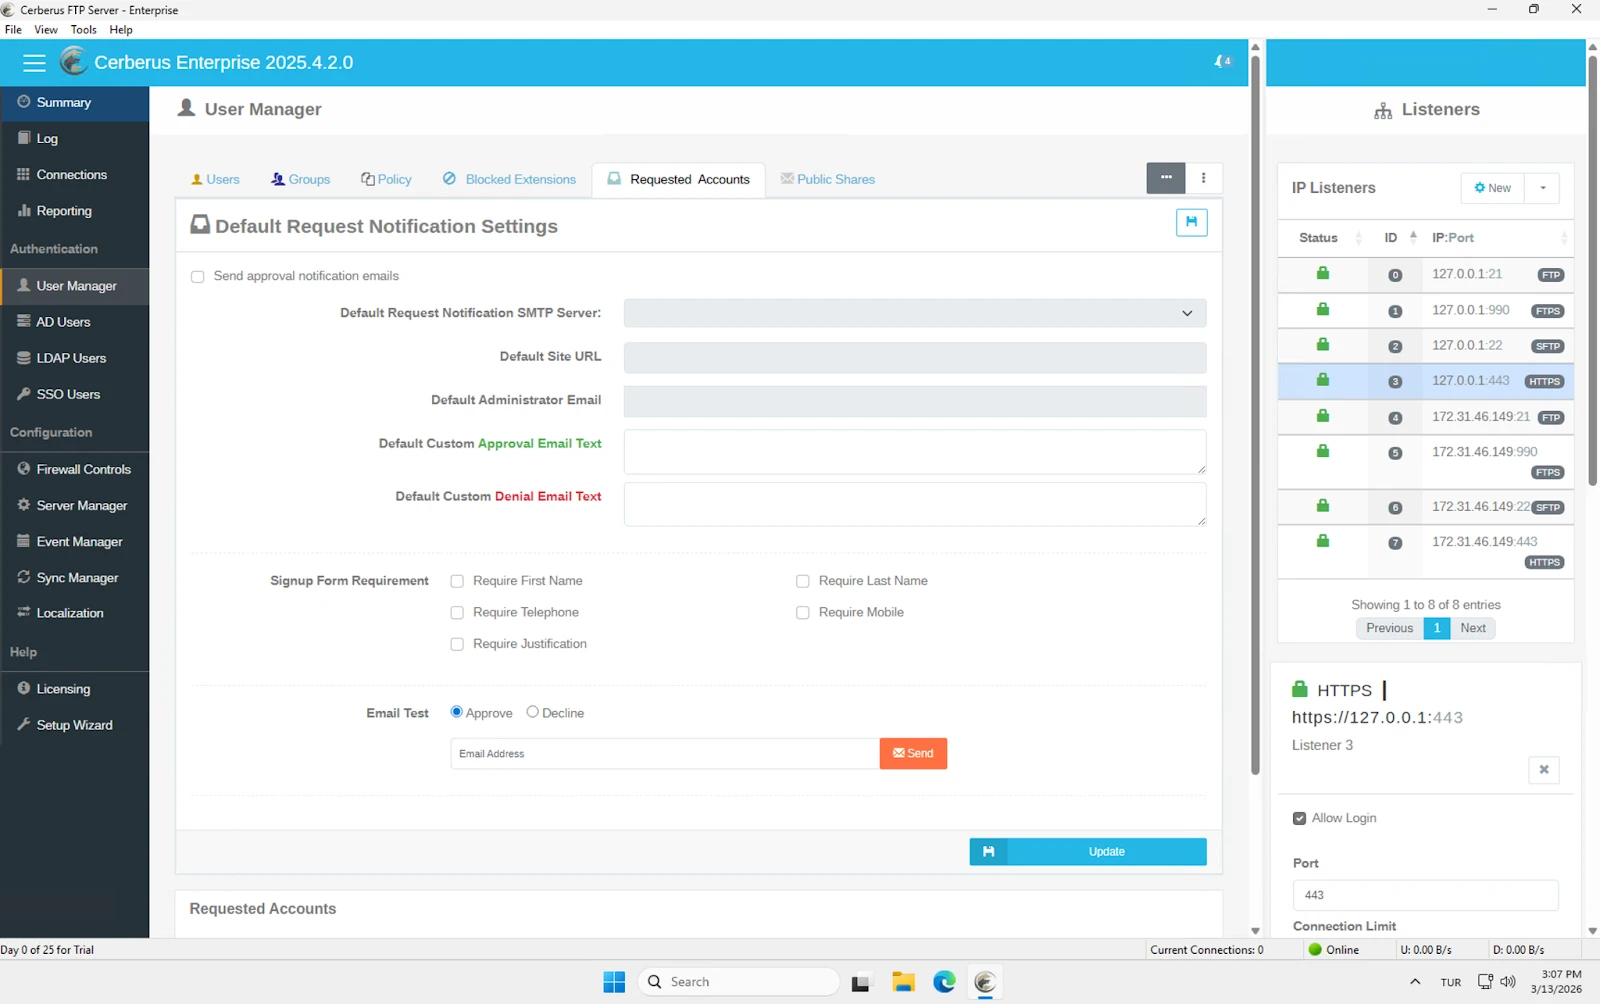
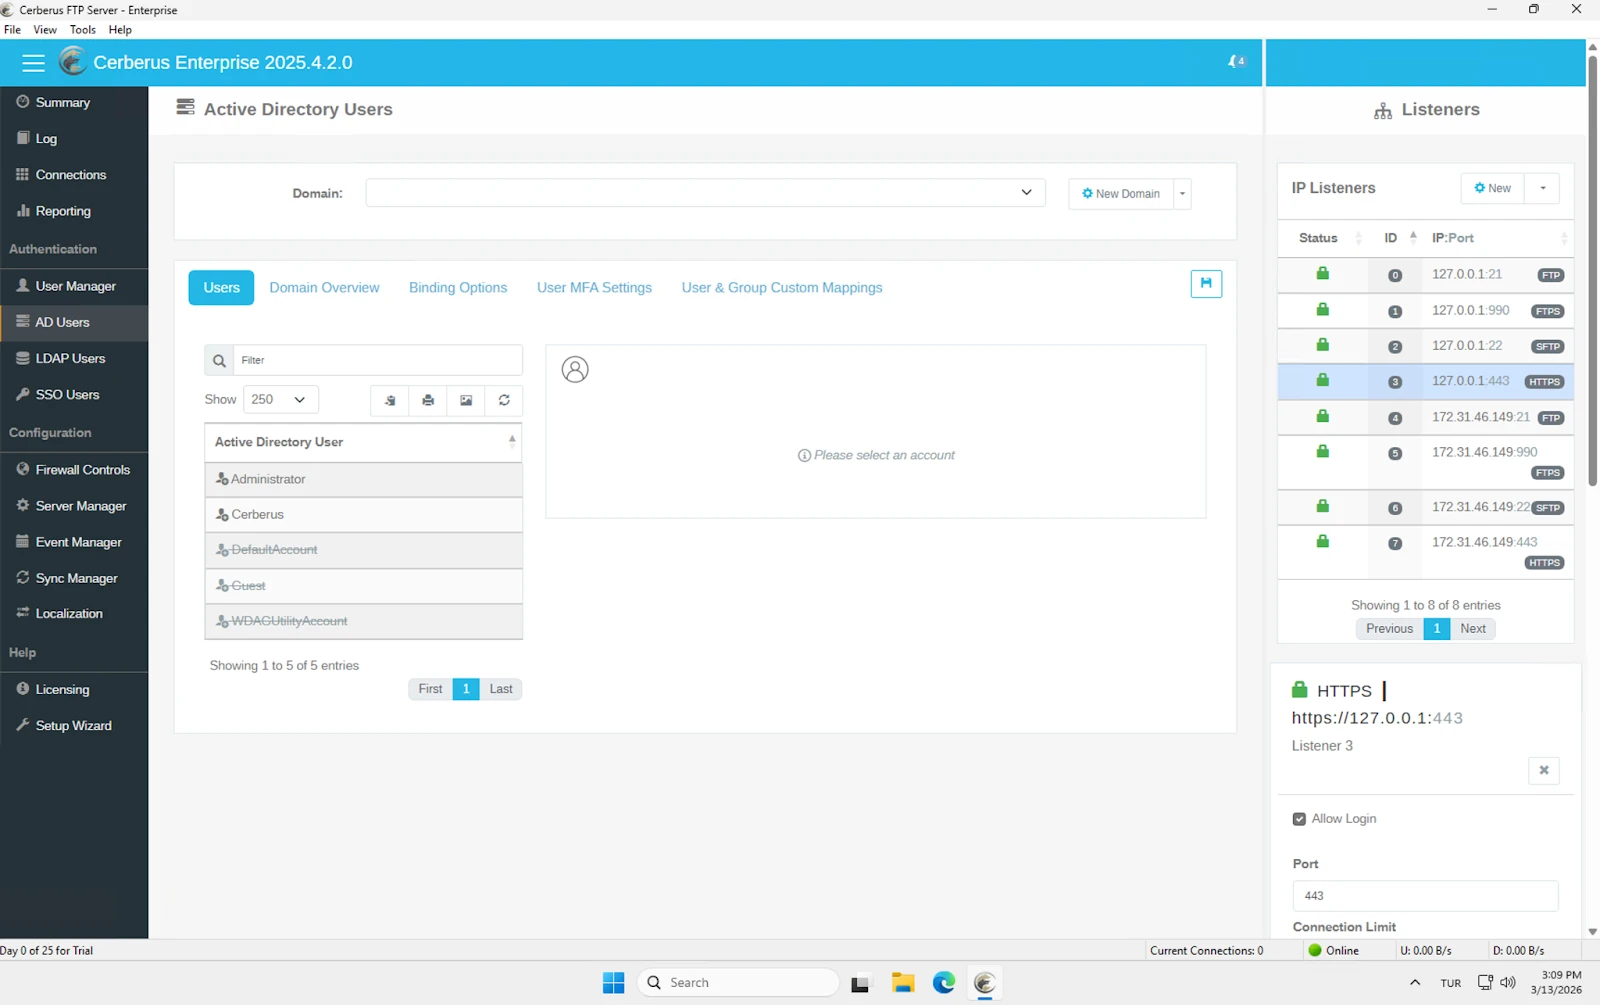
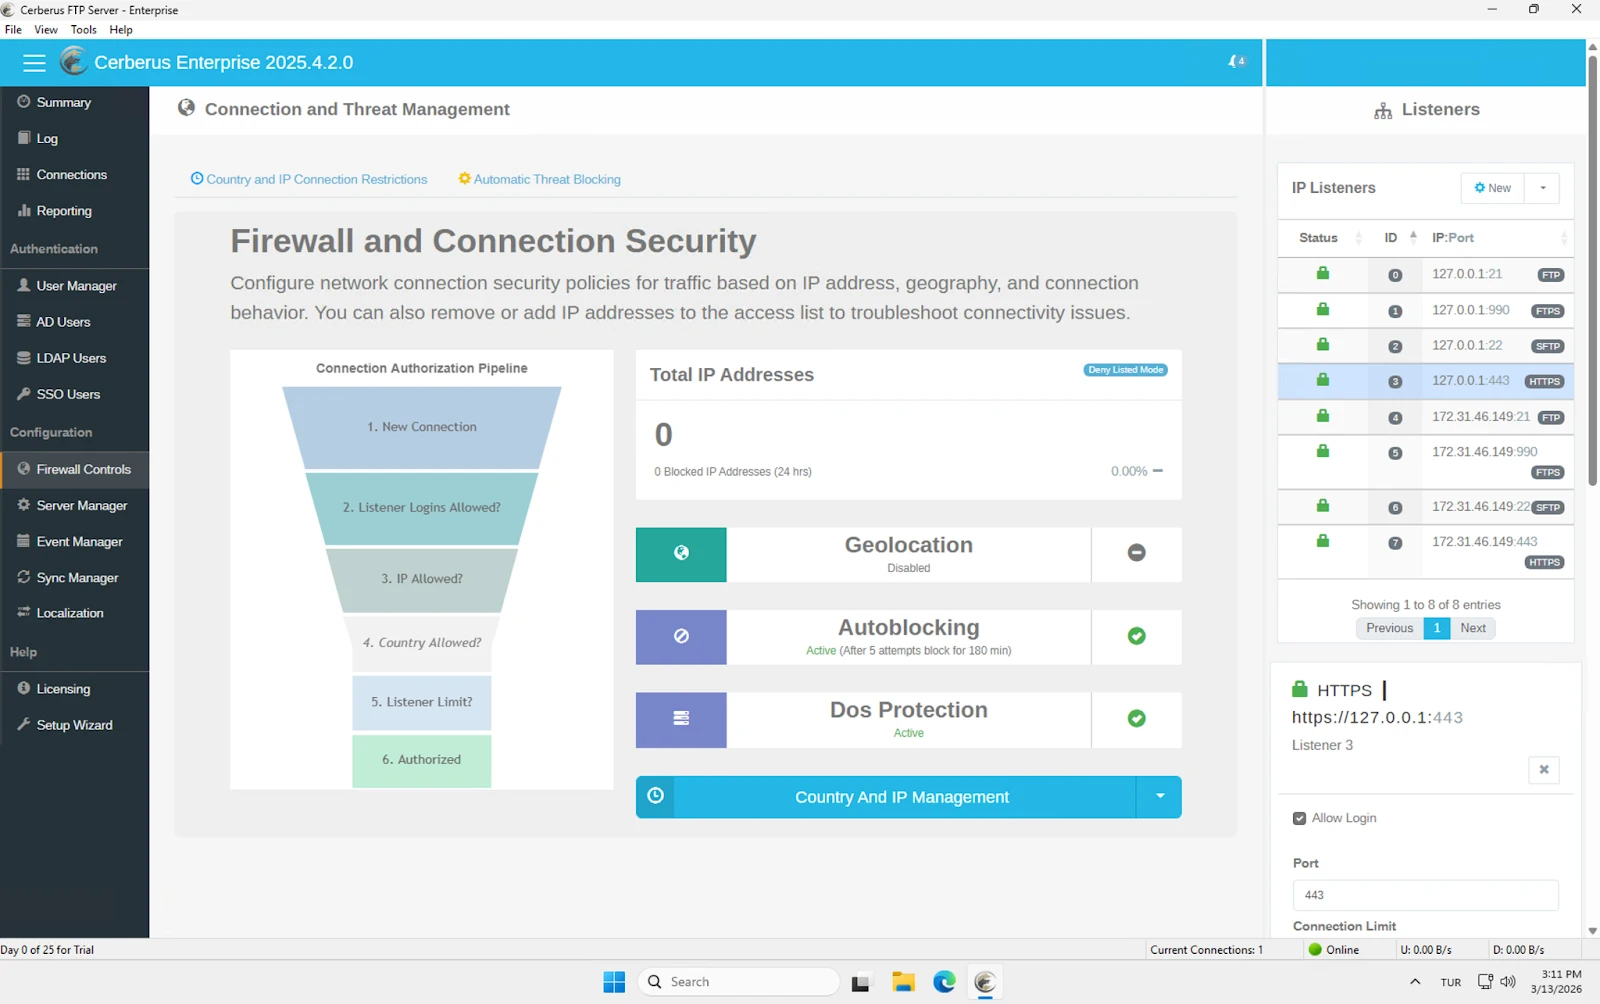

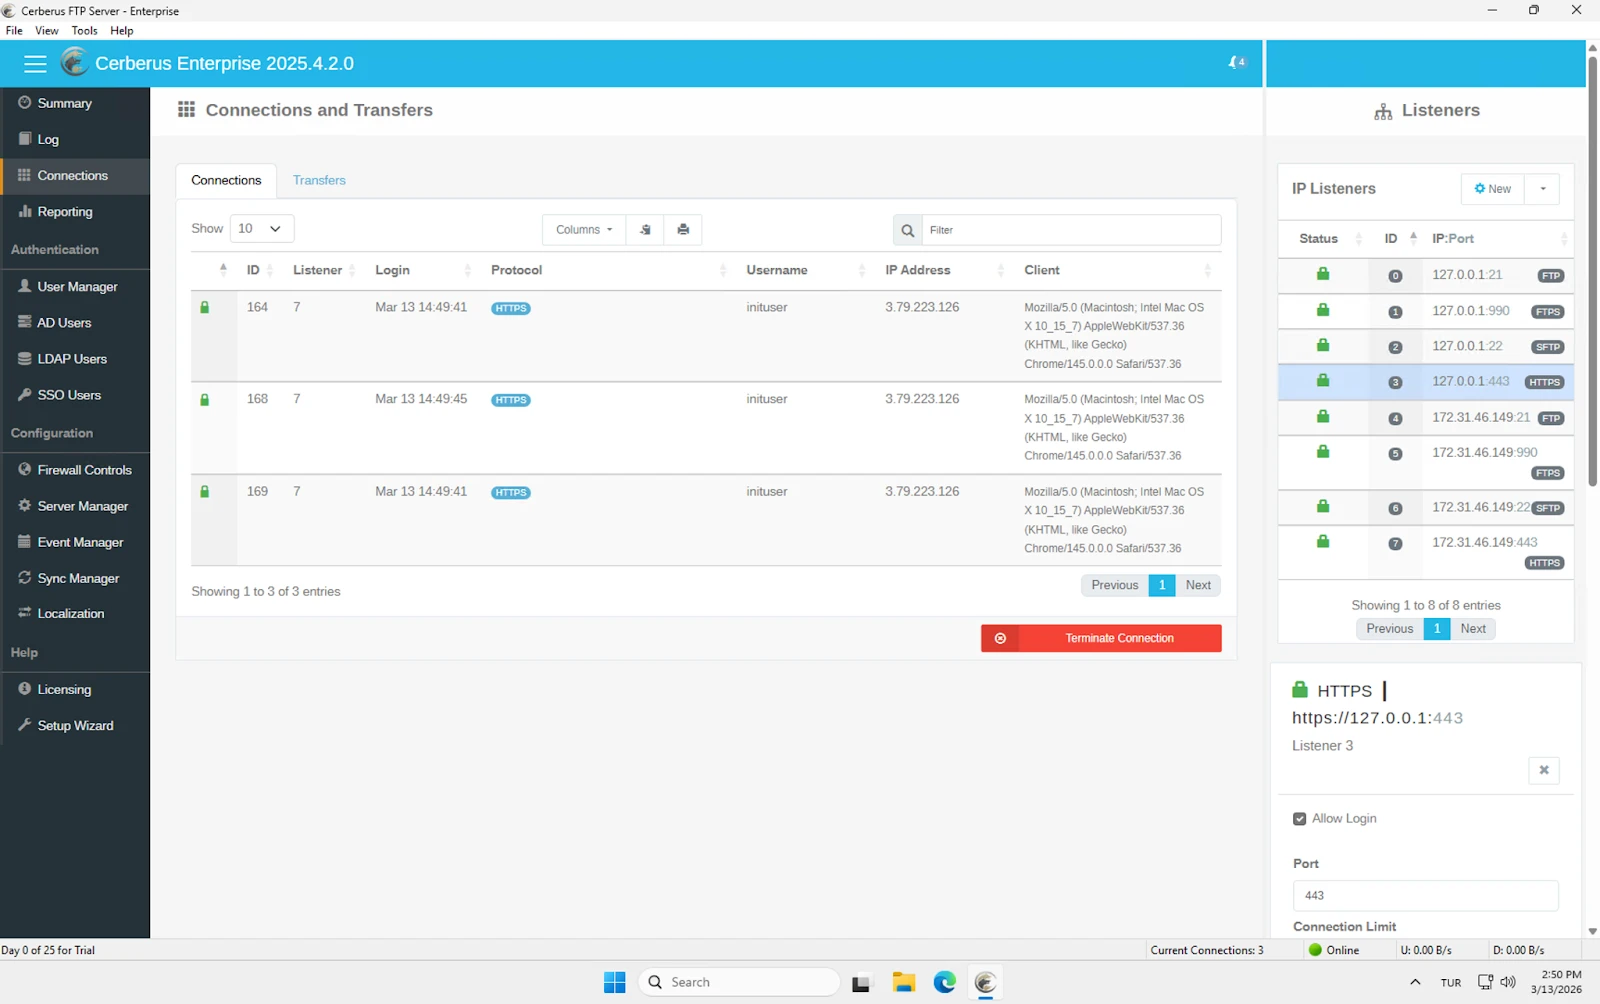
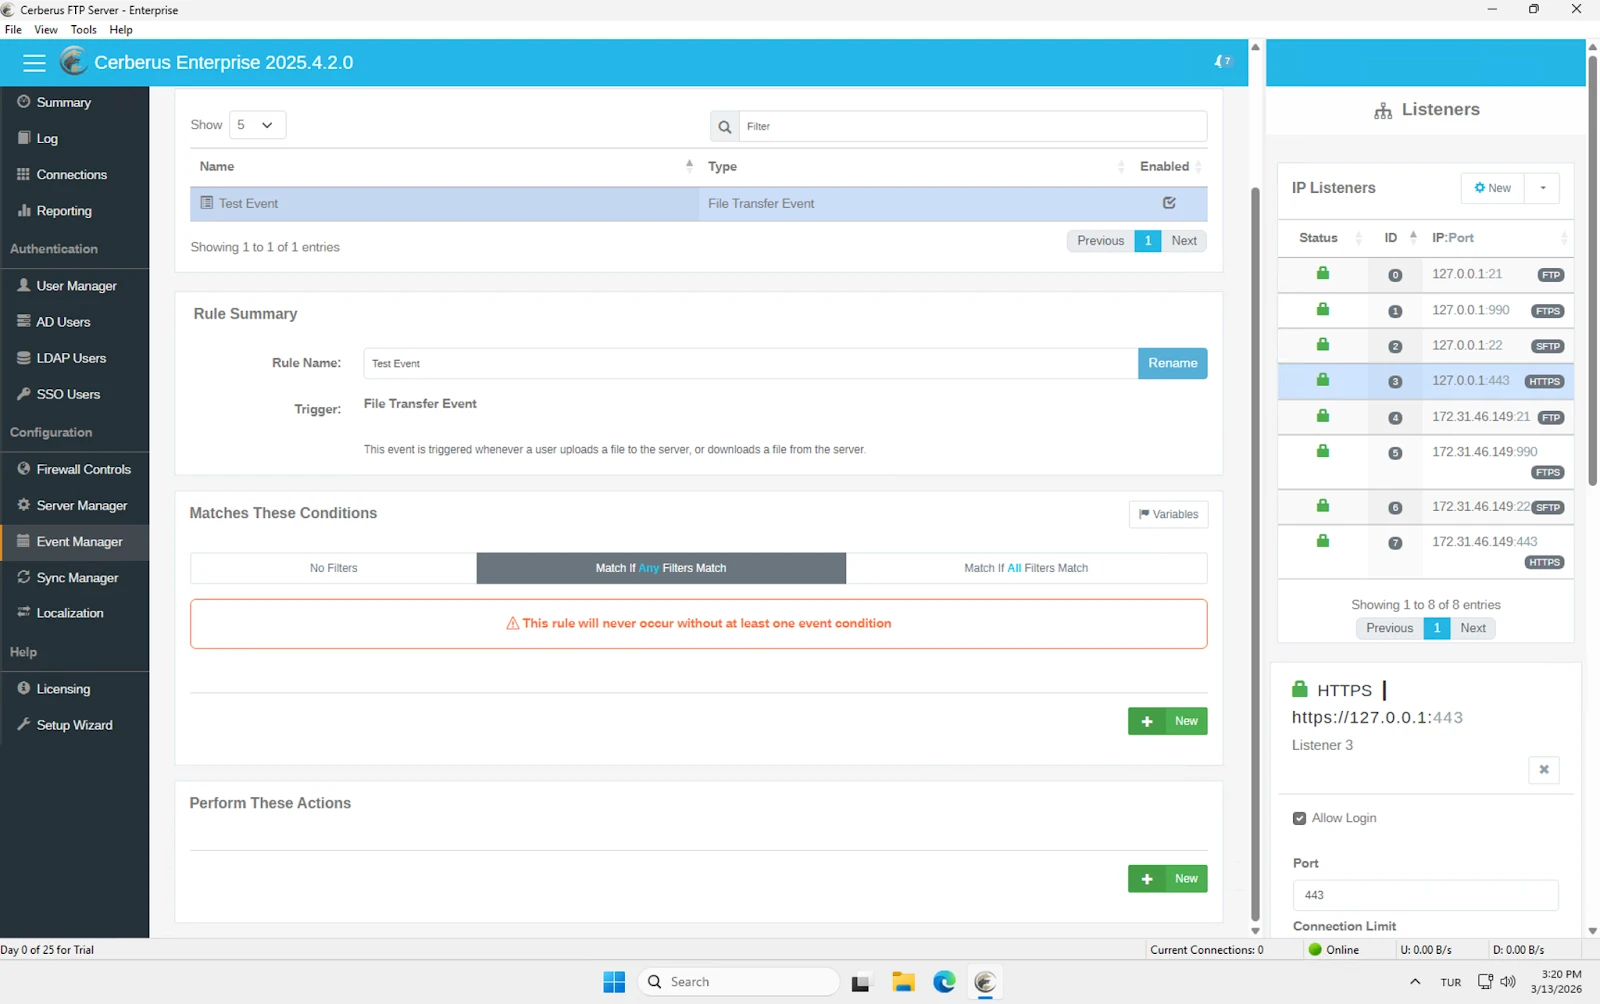
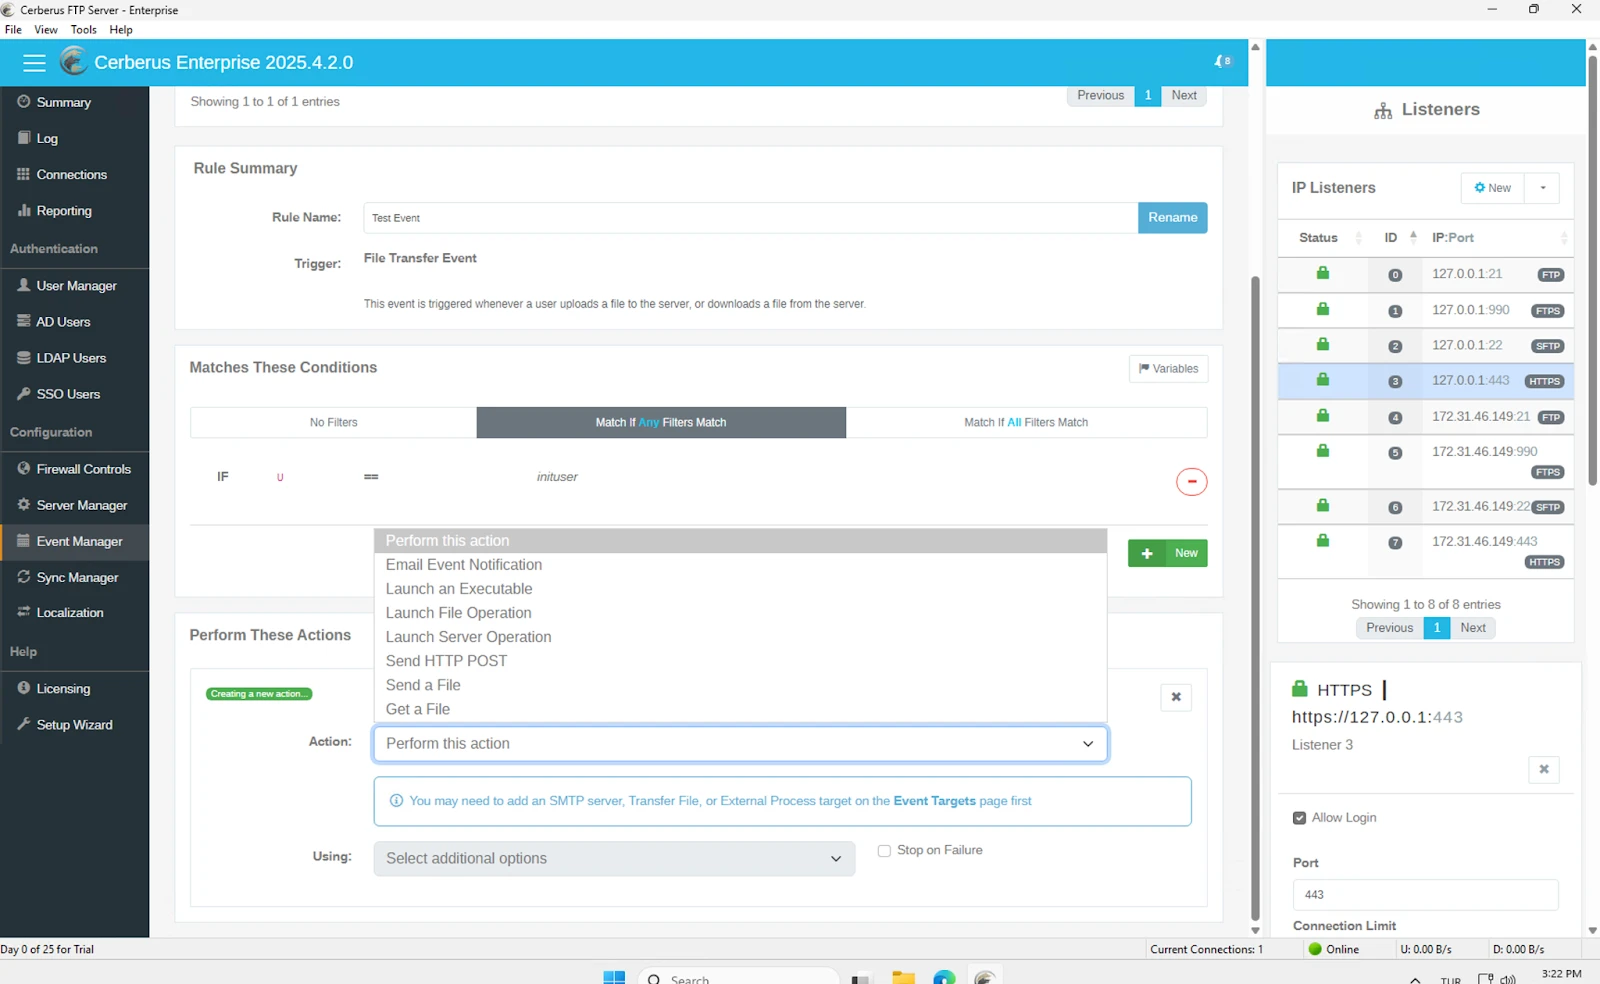
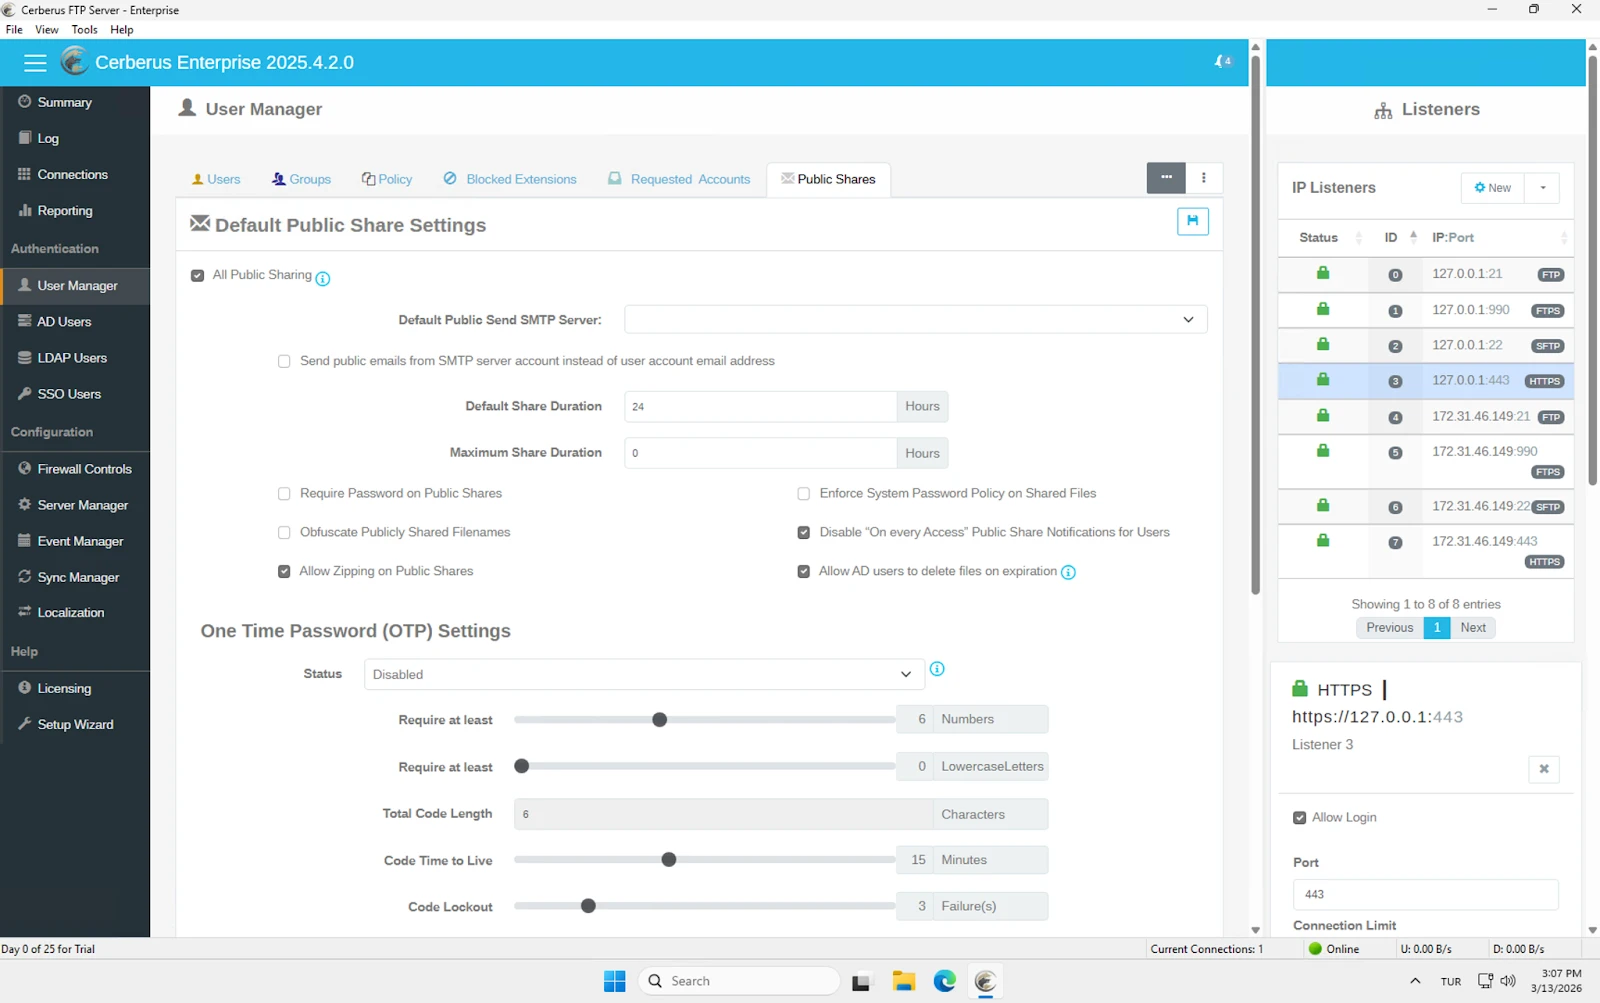
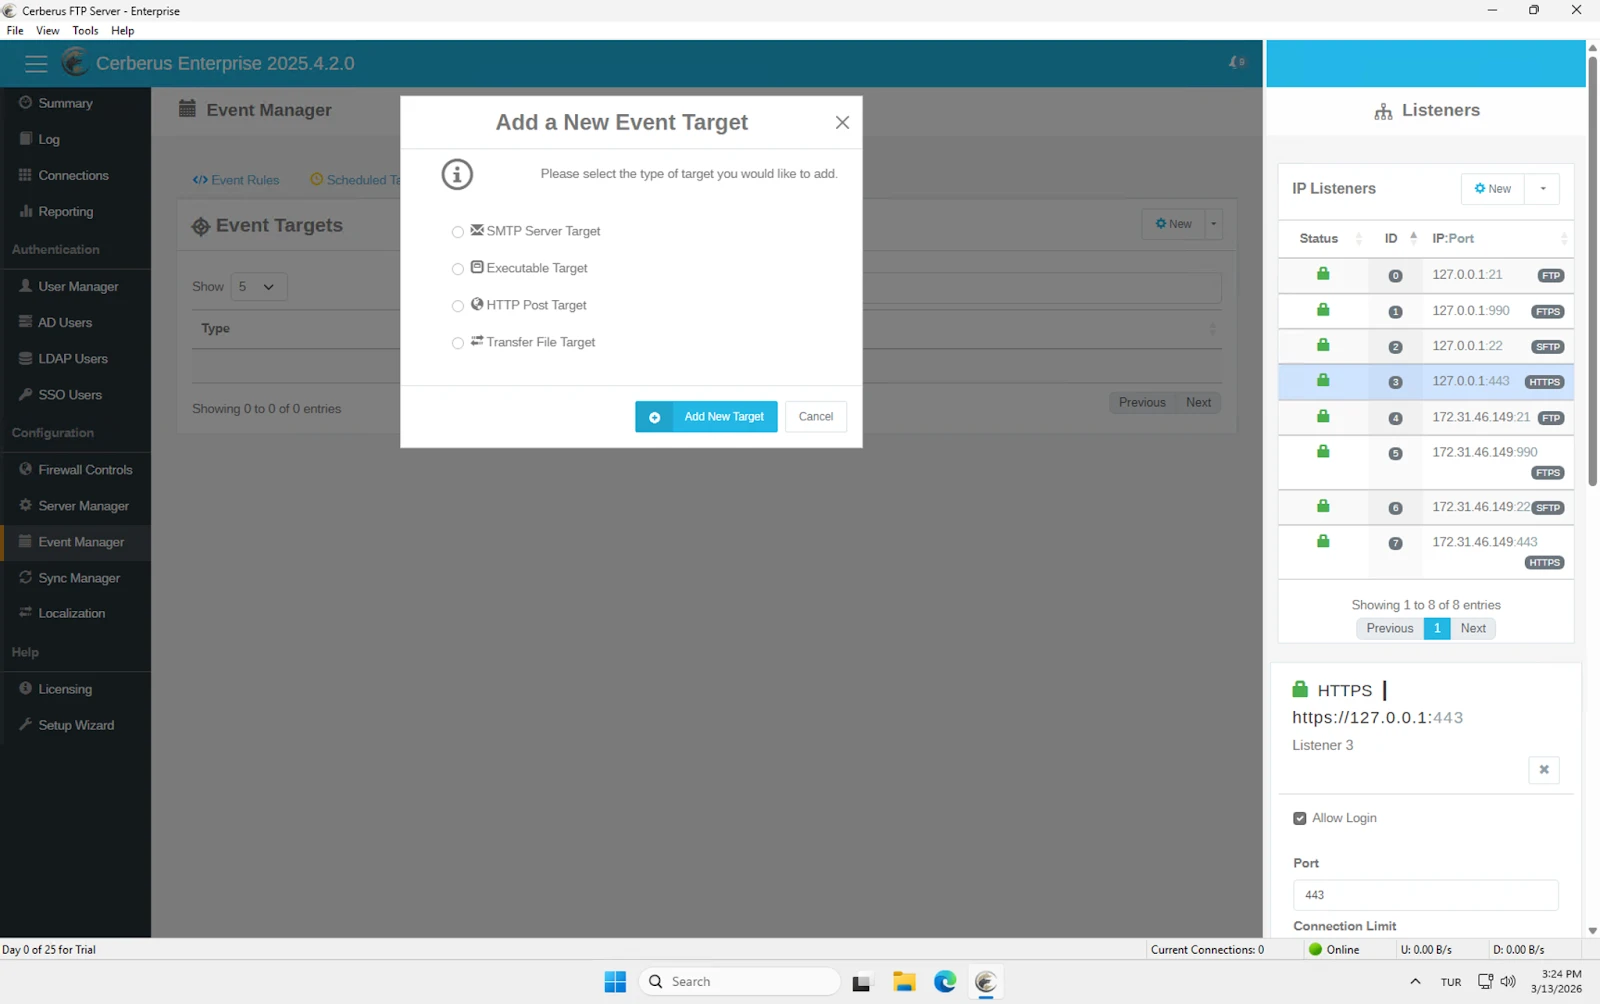
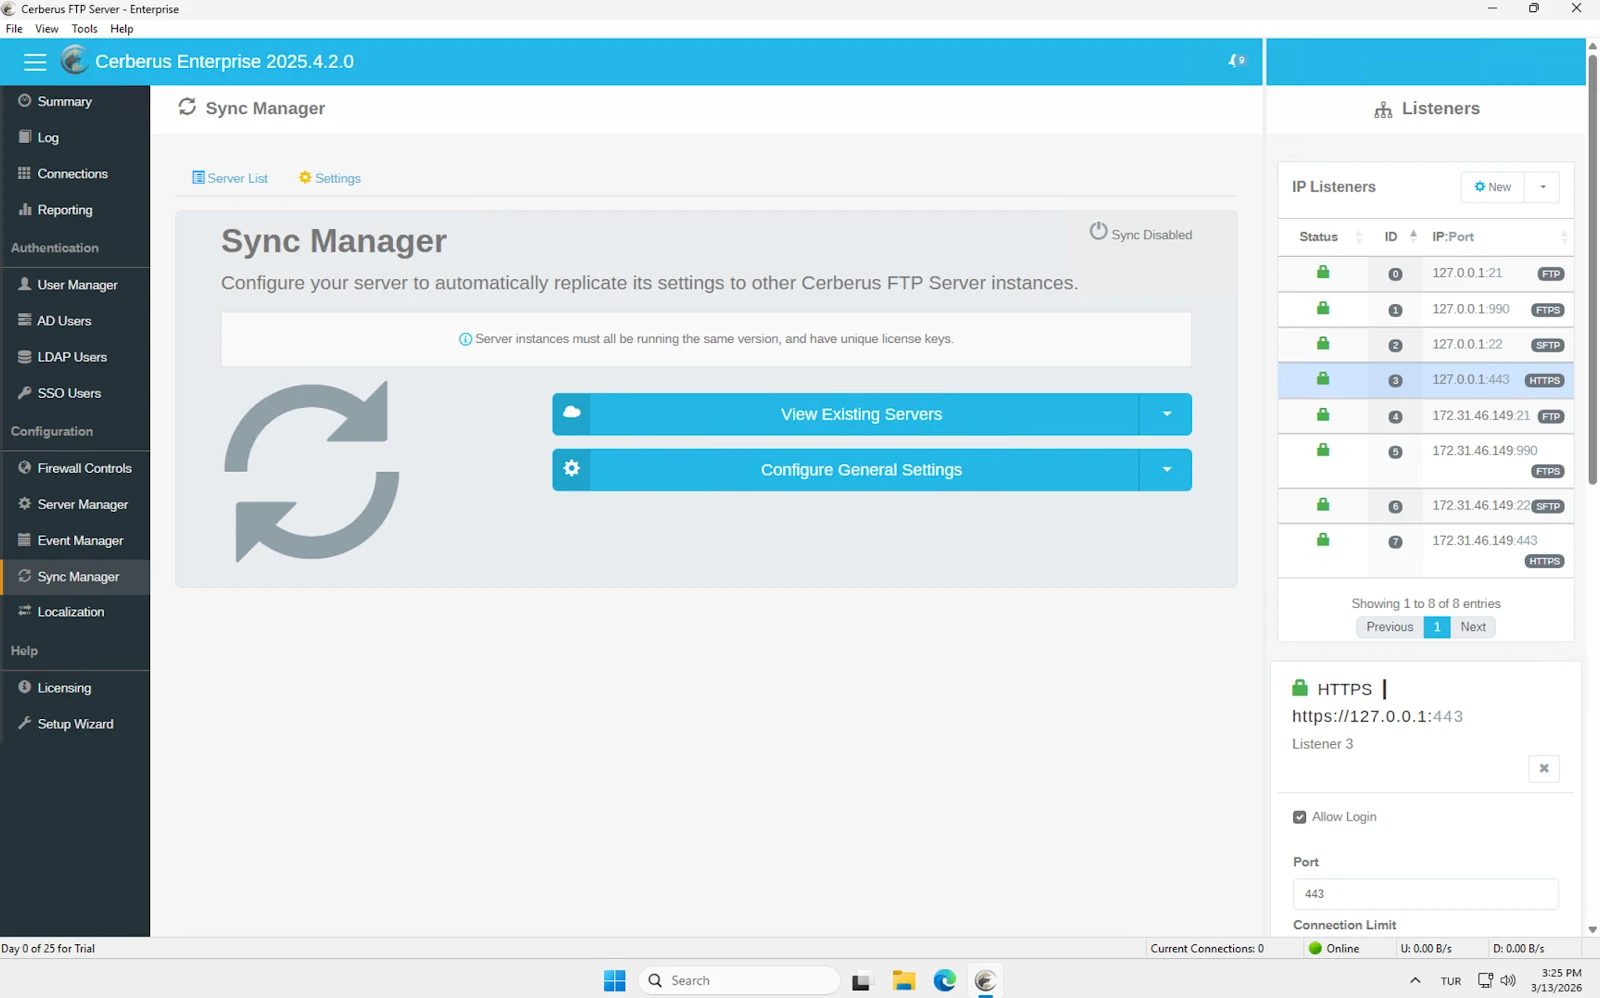
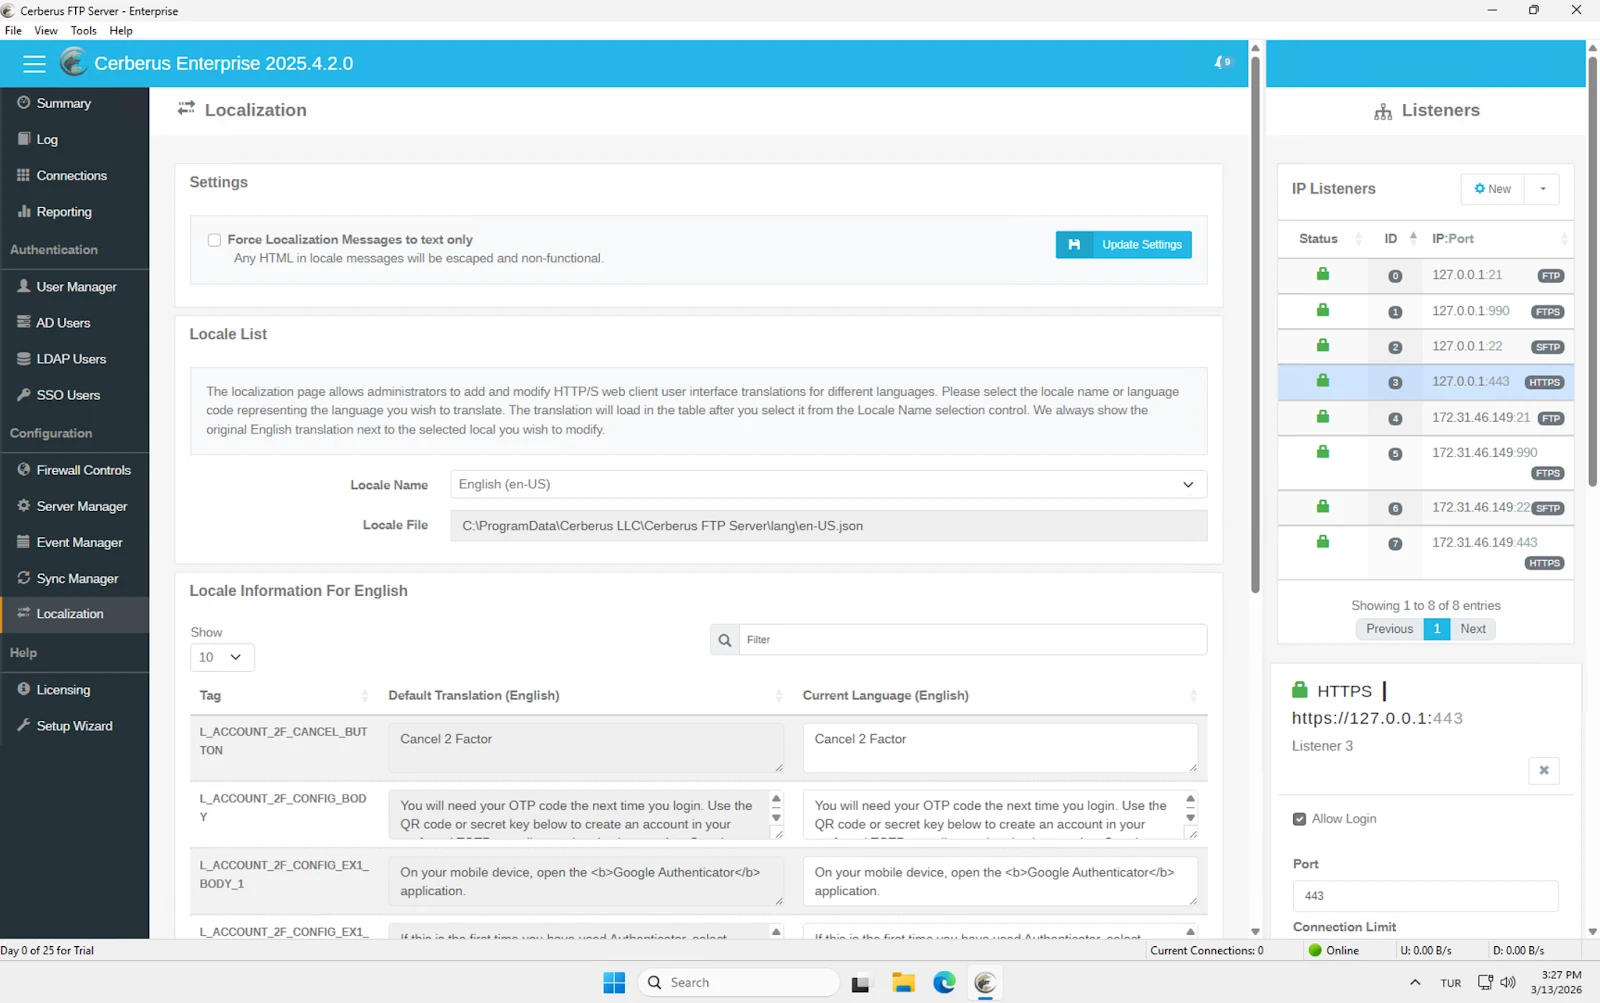


![[IMAGE 16 – Inbox form showing title "AIMULTIPLE FILE UPLOADS", URL key "aimultiple-file-uploads", and URL preview https://aimultiple.files.com/u/aimultiple-file-uploads]](https://aimultiple.com/wp-content/uploads/2026/04/16-1.png.webp "[IMAGE 16 – Inbox form showing title \"AIMULTIPLE FILE UPLOADS\", URL key \"aimultiple-file-uploads\", and URL preview https://aimultiple.files.com/u/aimultiple-file-uploads]")


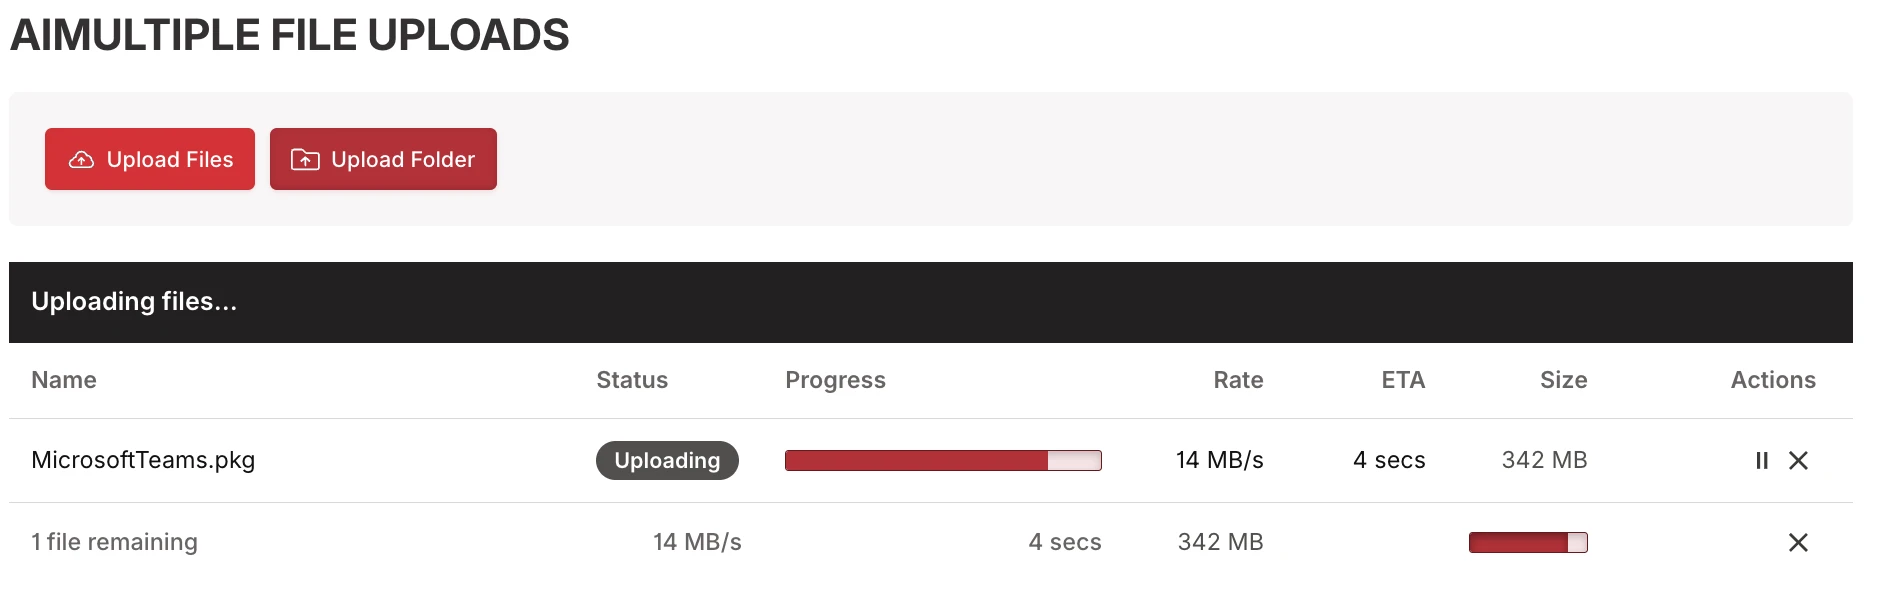


, and public key inpu")


, FTP Mode Behavior, Plain/Unencrypted FTP Support, Automatically Make Folders on Uploads, and Custom MOTD settings")


, Destination Location, Options (Keep / Delete source files), Sync Triggers, and Include/Exclude Patterns sections")


 to Files.com")
, Storage 0.02 GB, Billable User Count 1, Site Usage over Time chart with Storage/Transfer Usage/Users/API tabs, and Export Site Usage by Folder section")
, Password Restrictions (min 10 chars, requires letter/number/symbol/upper+lowercase, no last 10 reuse), Prevent Use of Breachable Passwords (on), Password Expiration (disabled), Apply password rules to Shares/Inboxes/Publicly Served Folders (on), Brute Force Protection")
, 2FA Methods (SMS, TOTP, Hardware Key, Yubikey Native), and Allow FTP/SFTP/WebDAV Users to Bypass 2FA toggle (off)")


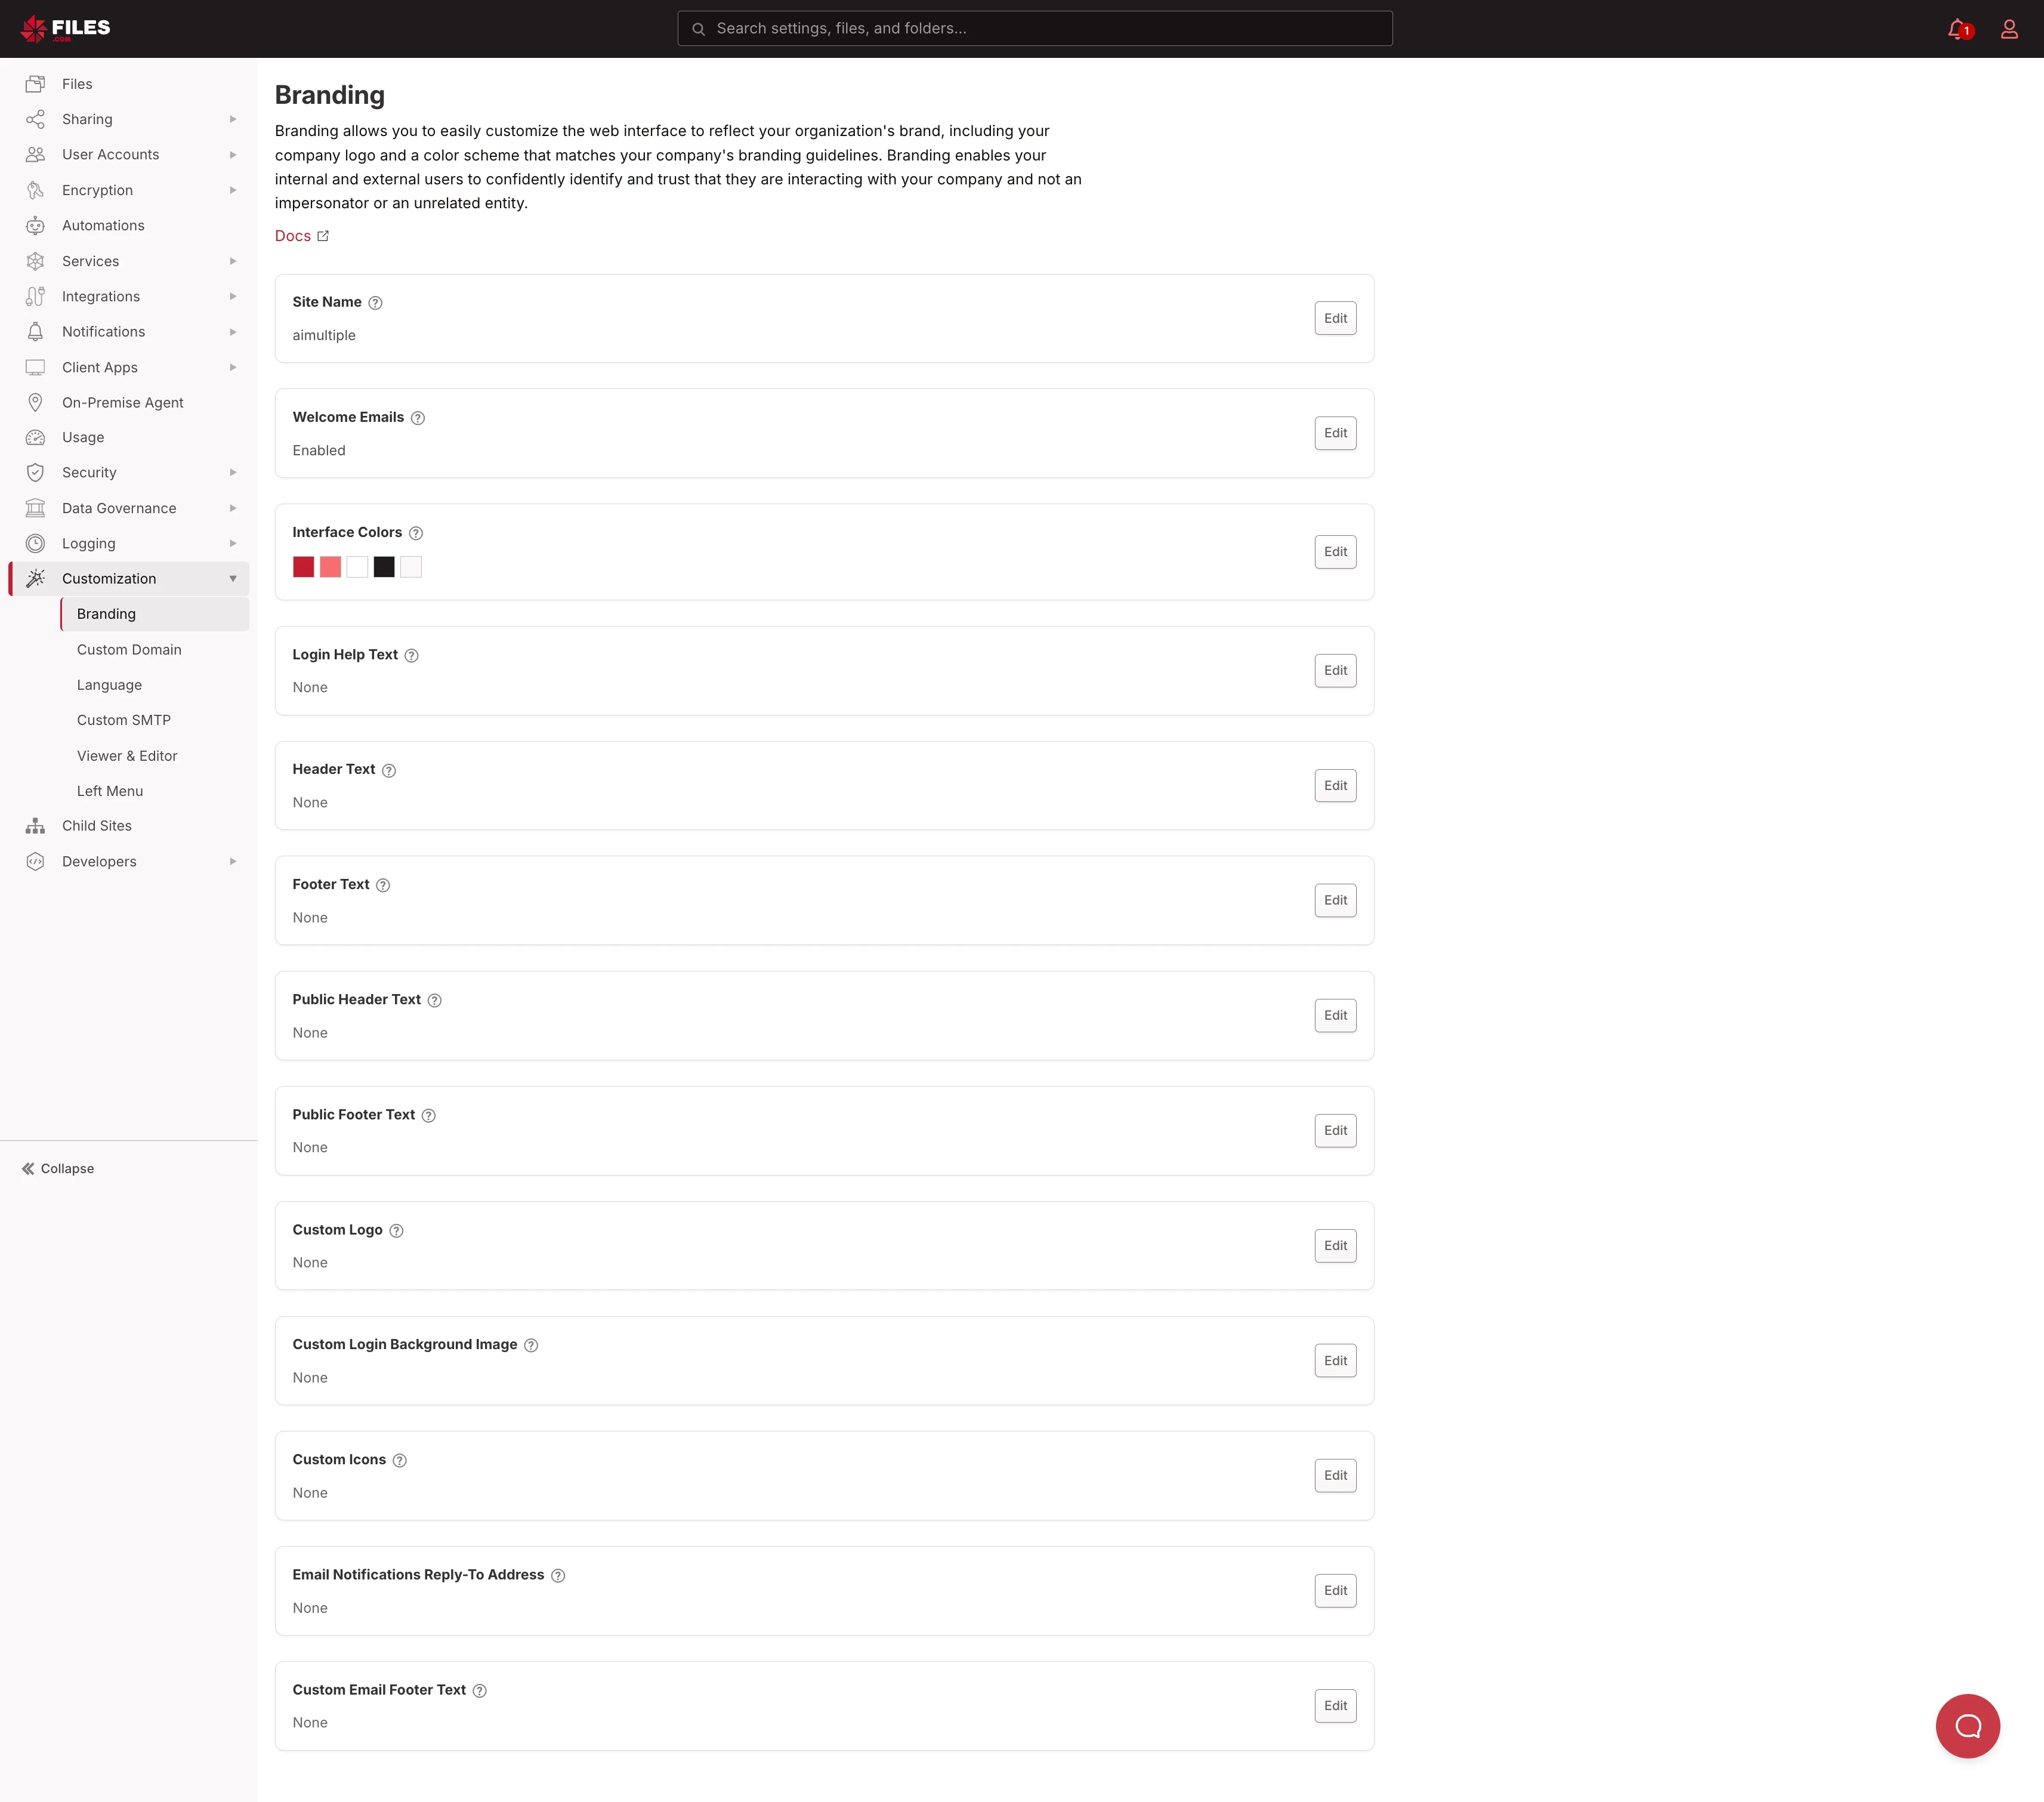
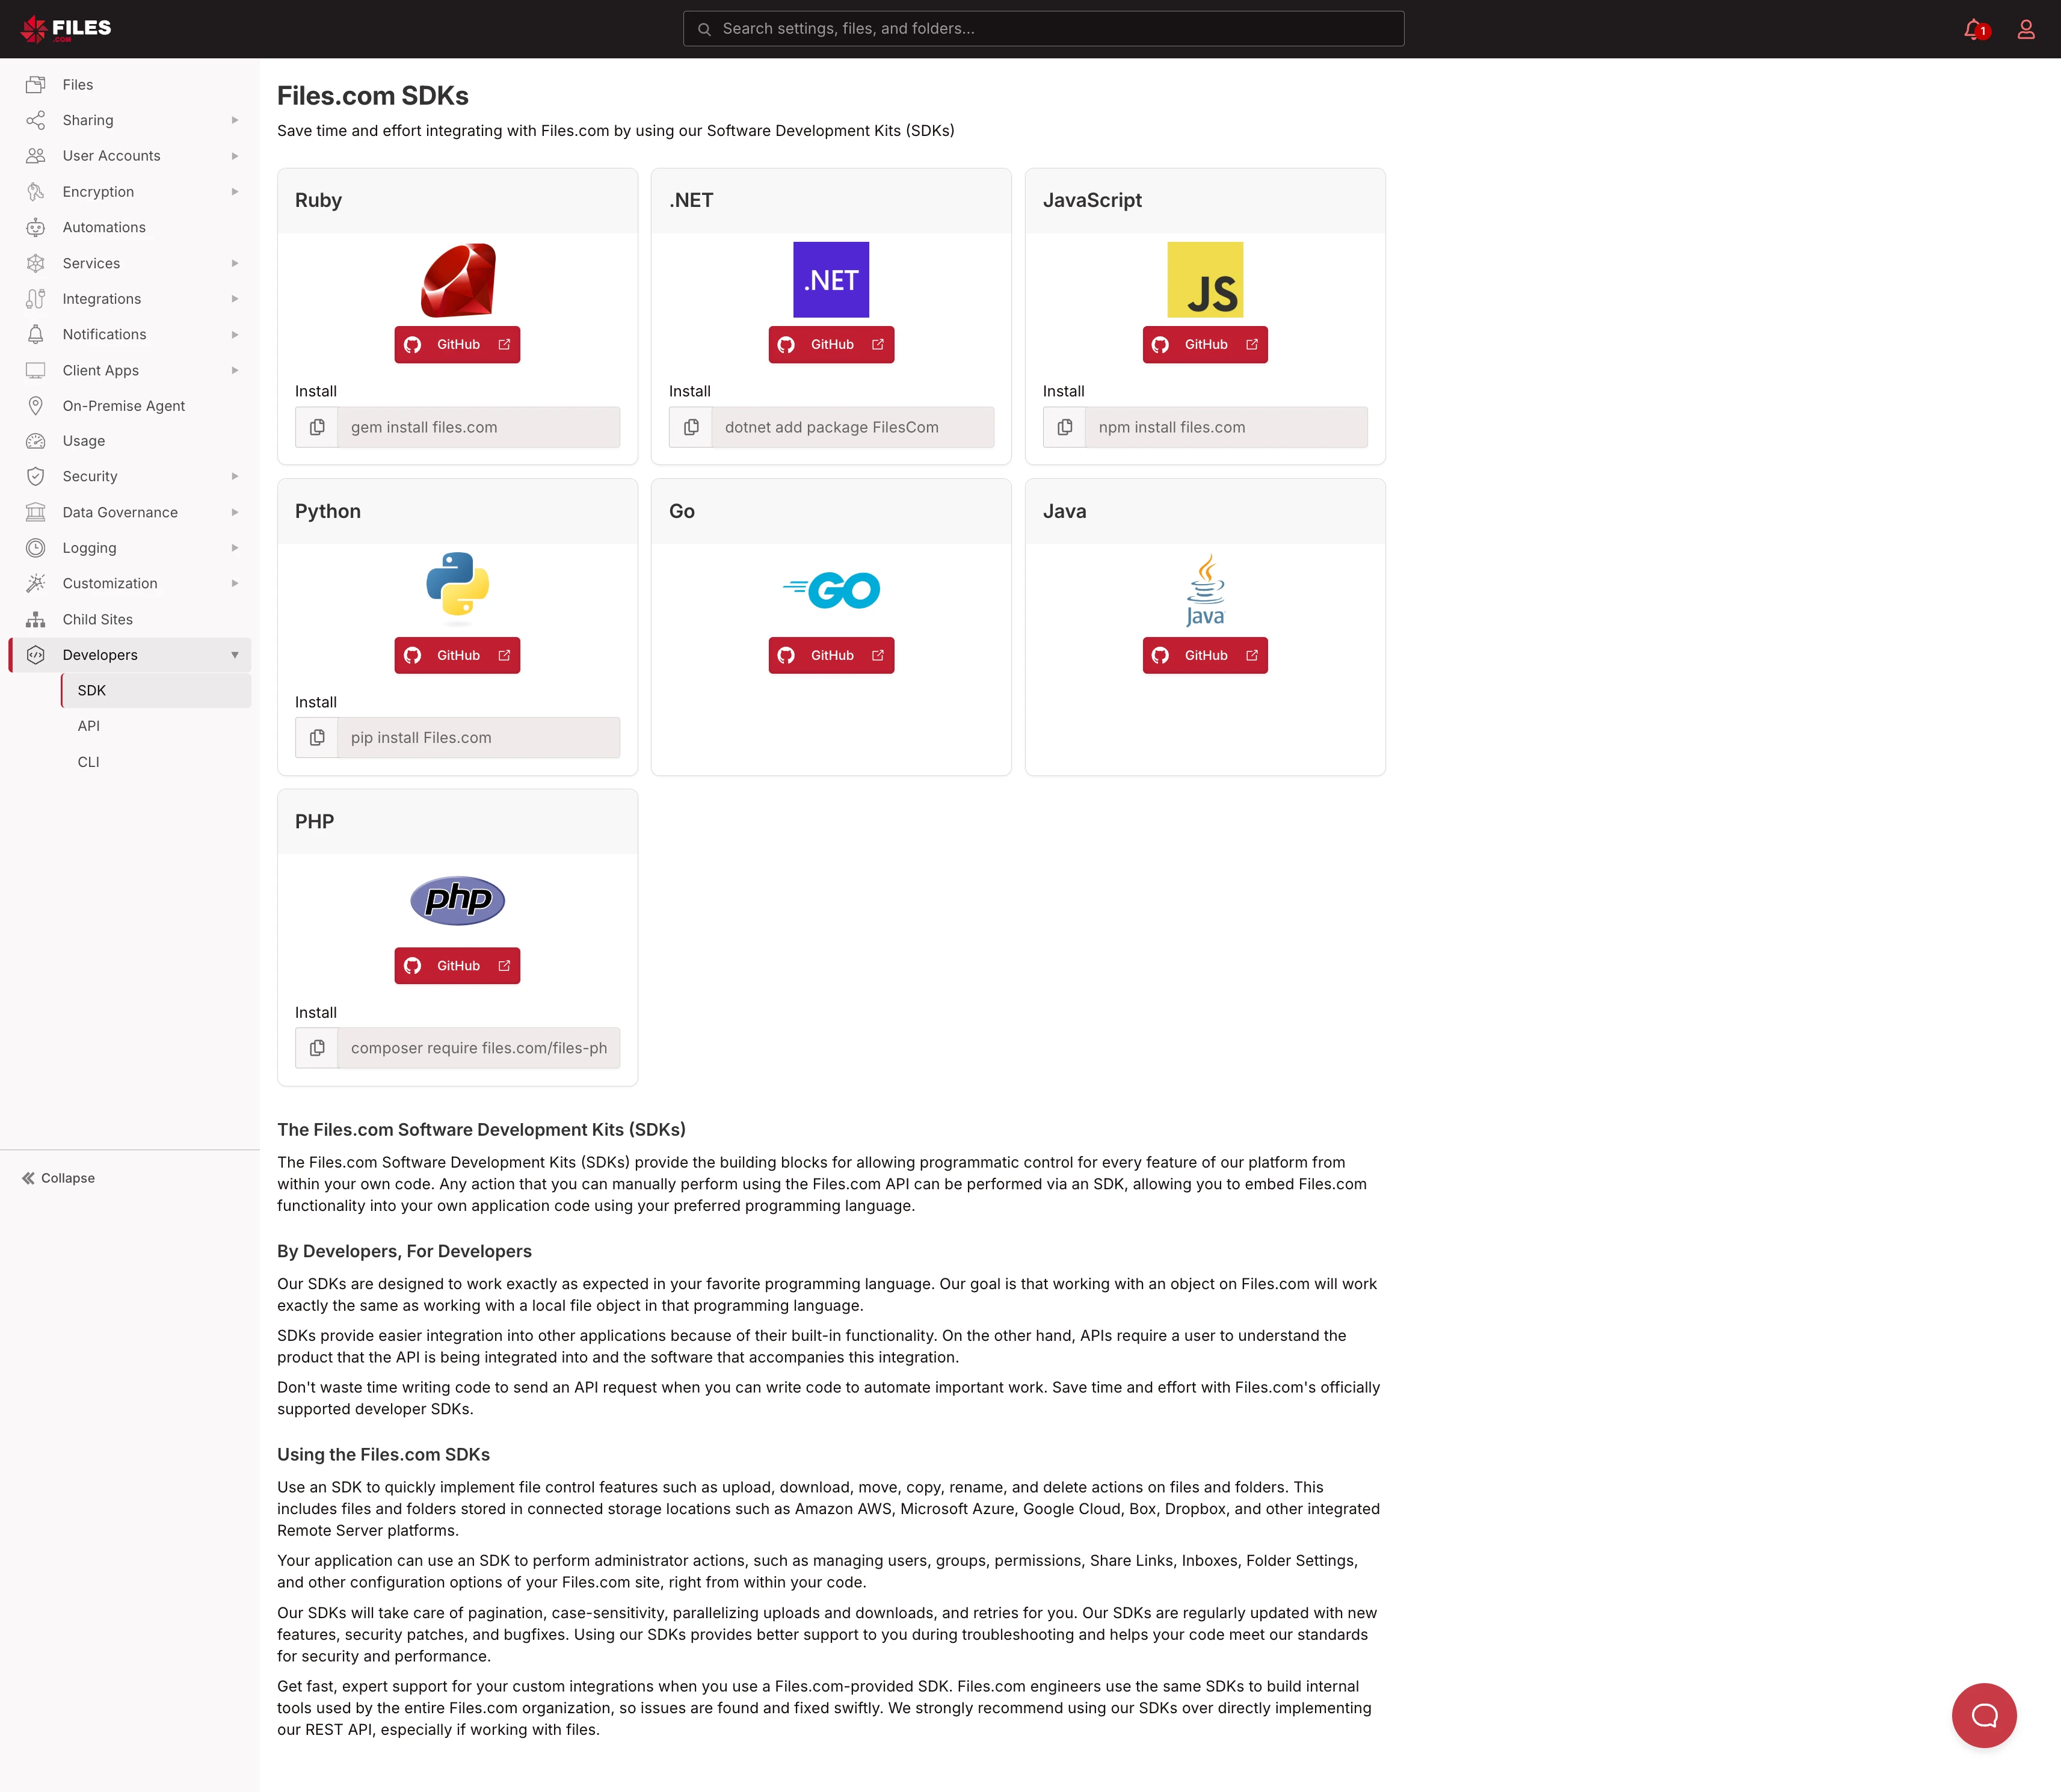

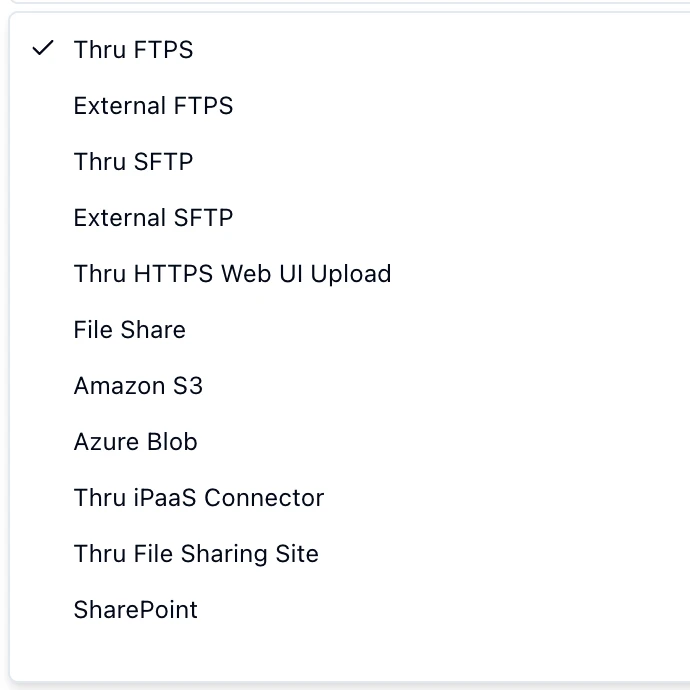
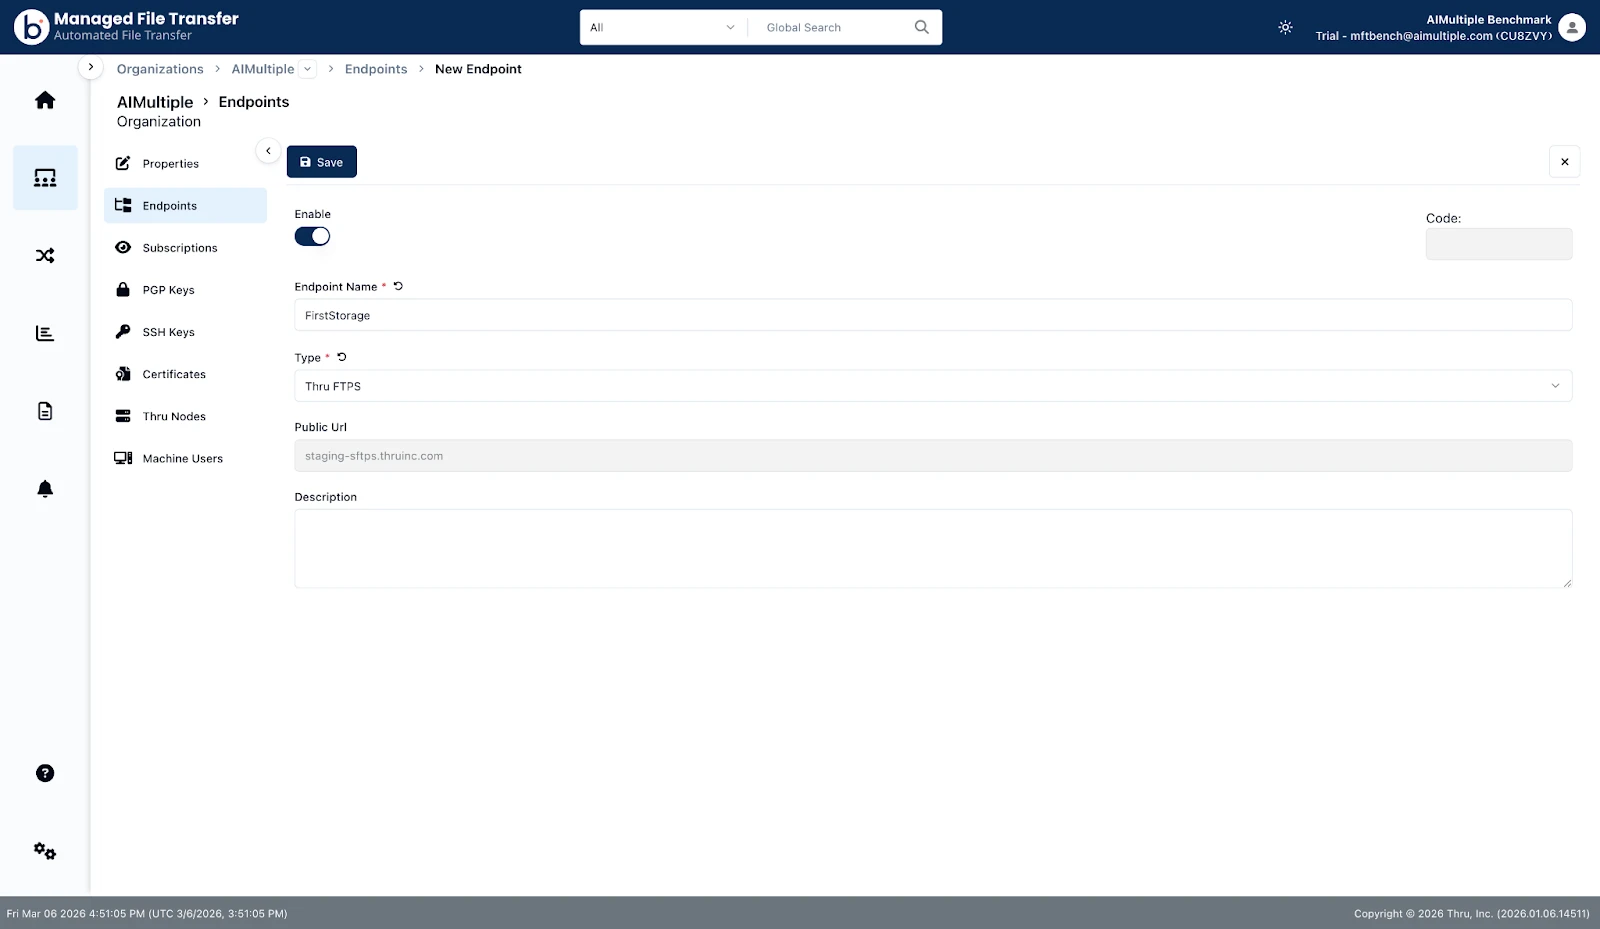
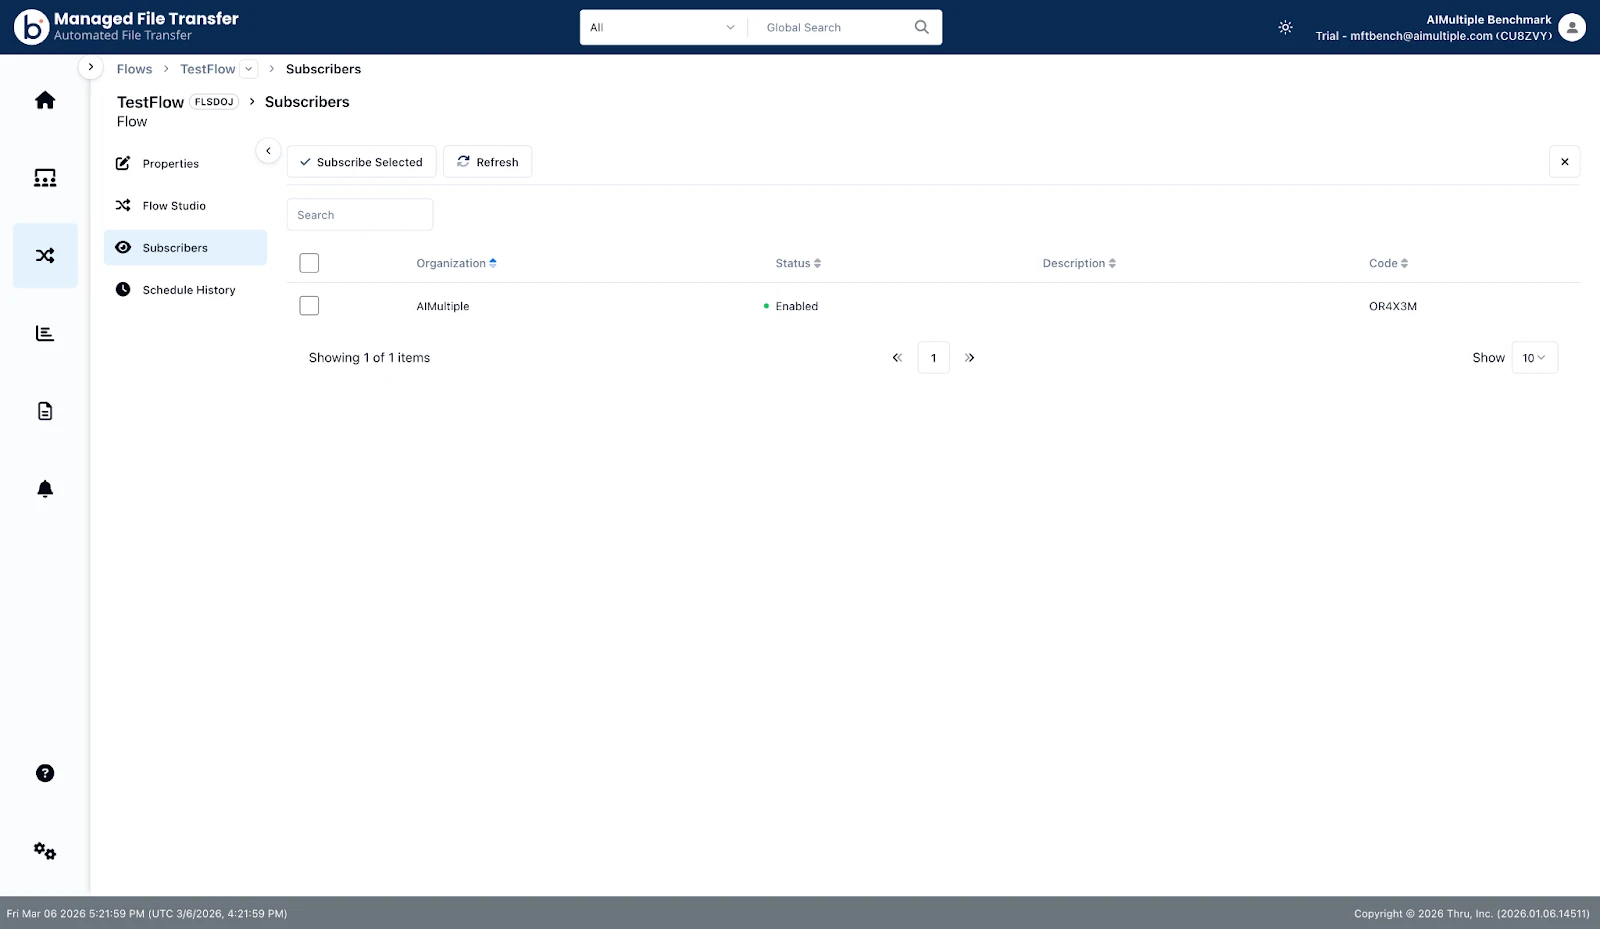
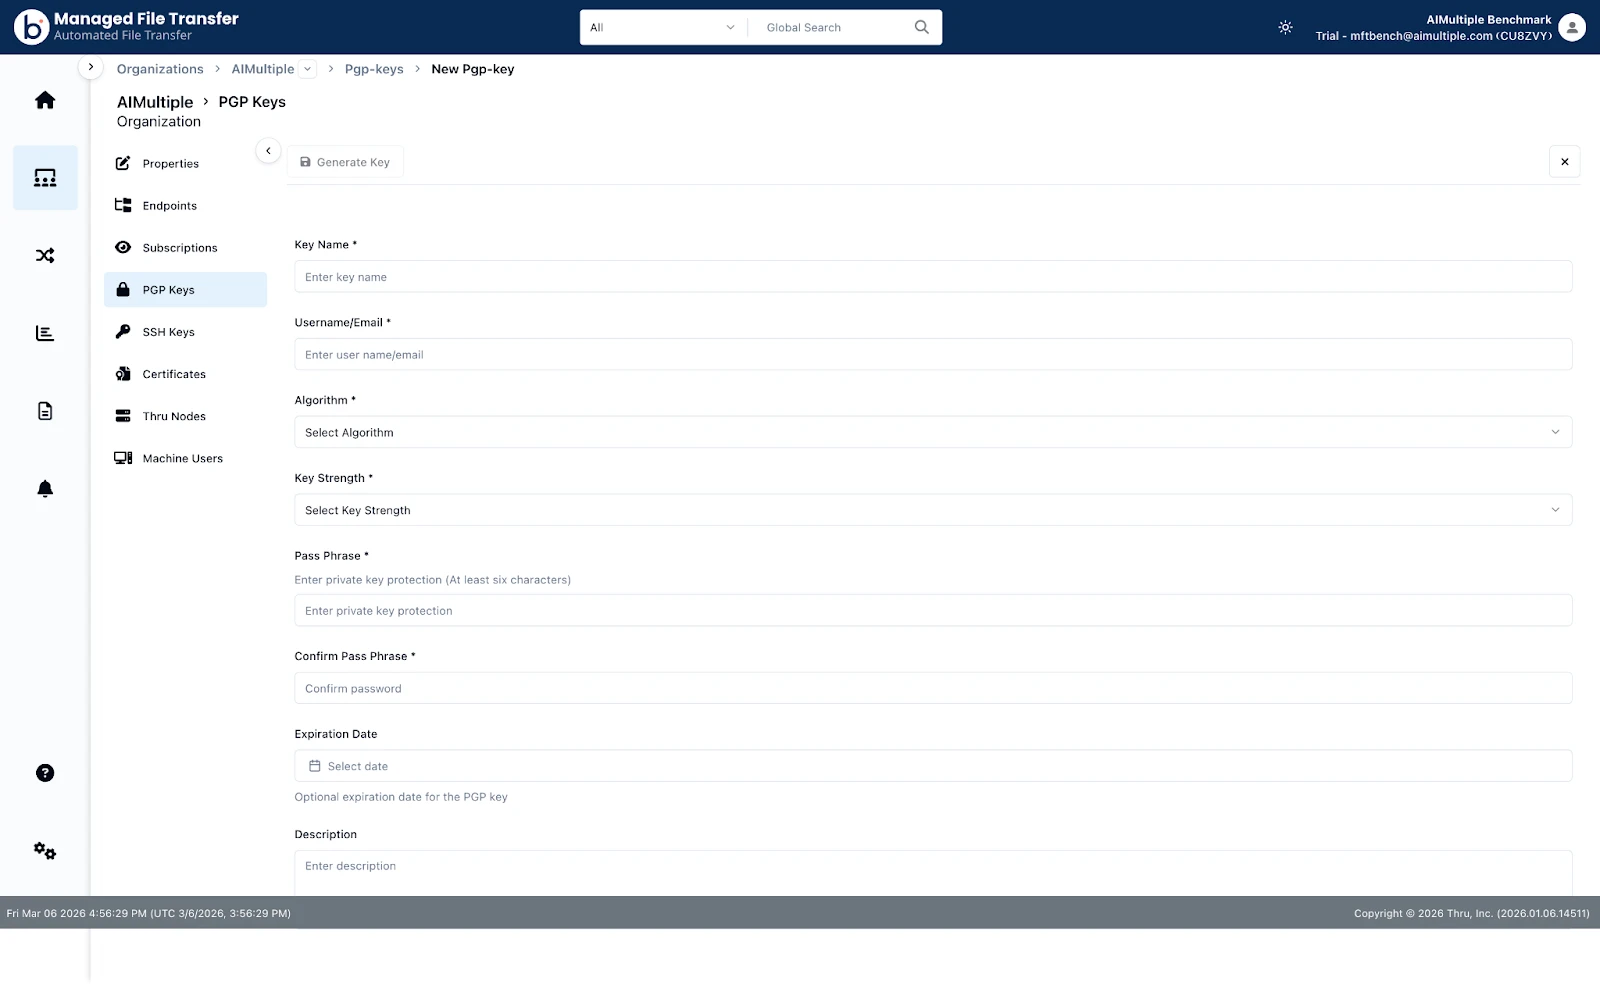
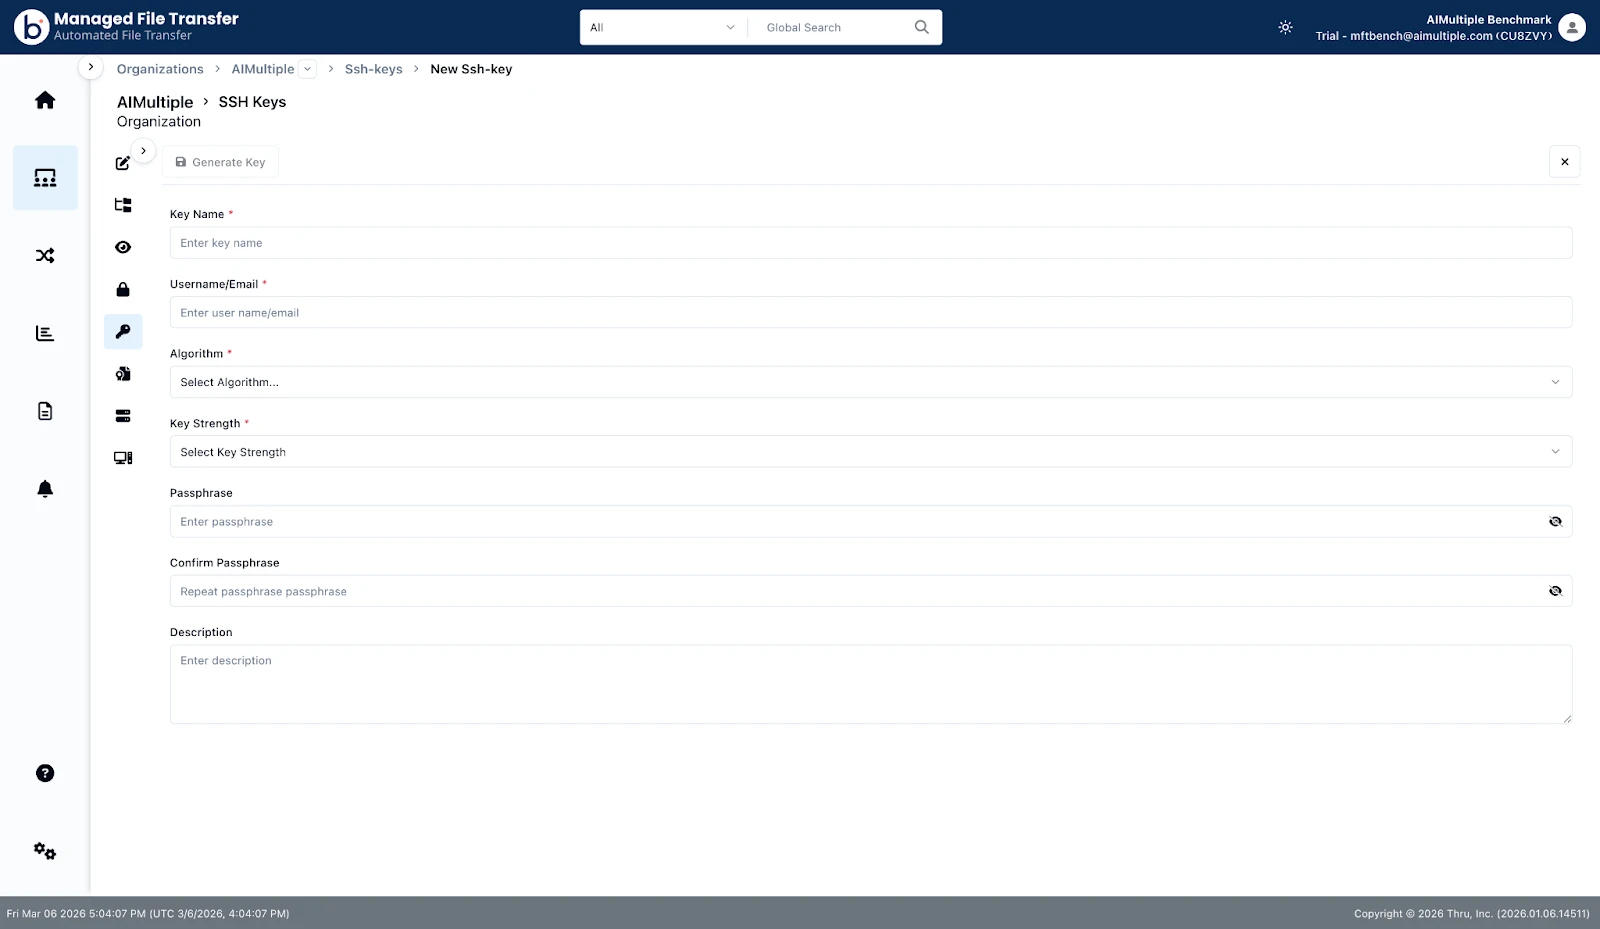
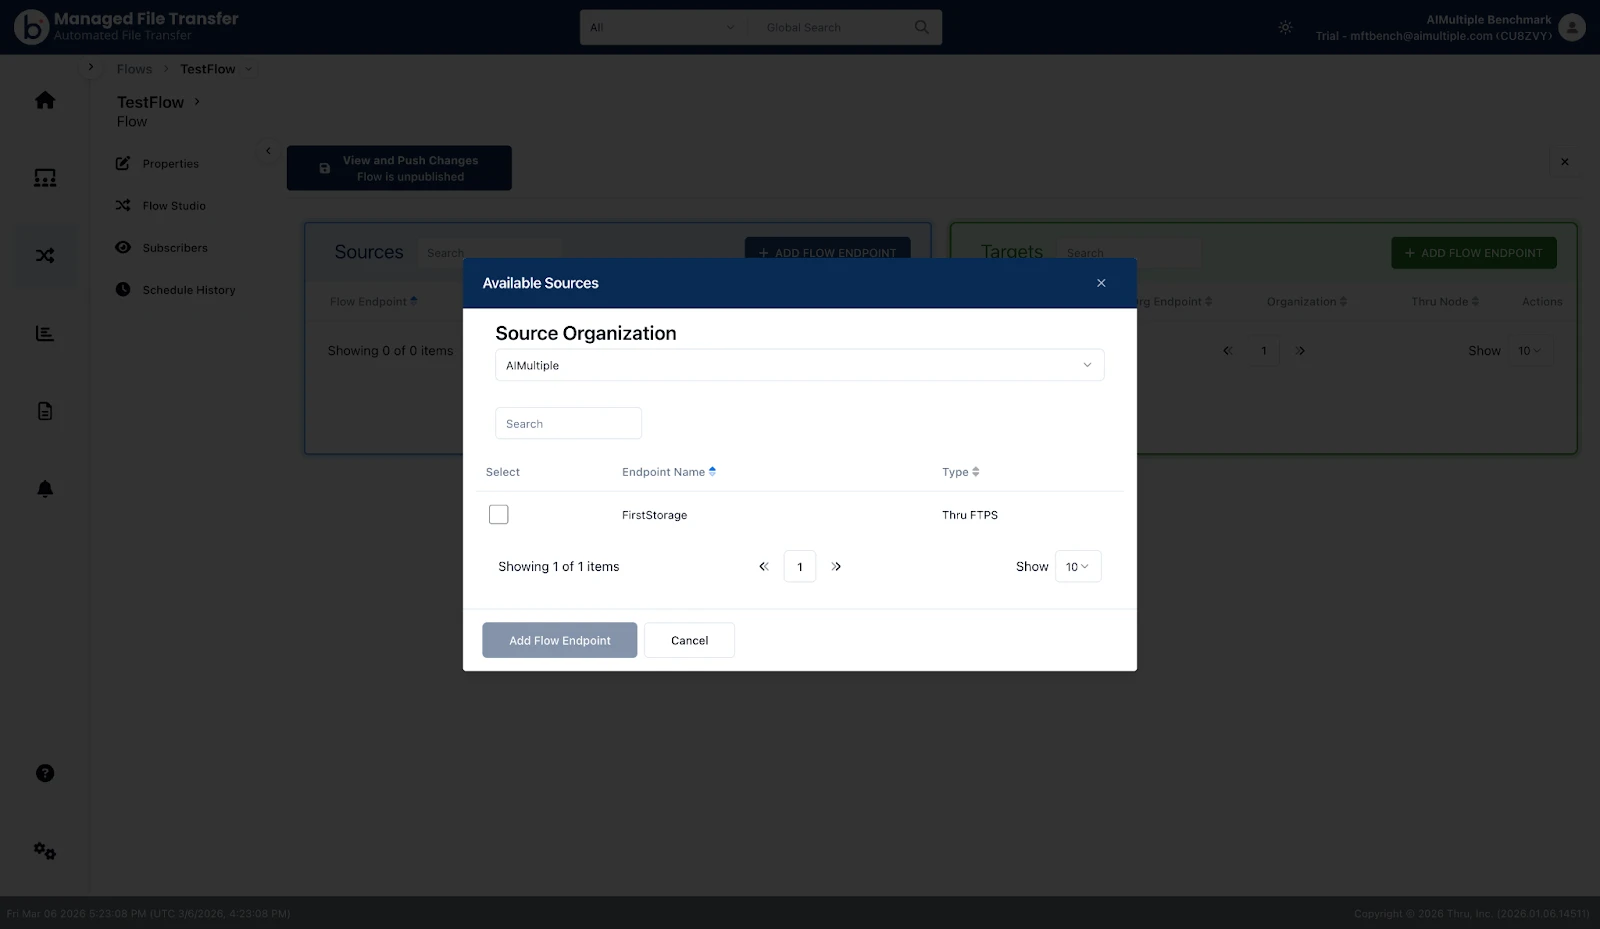
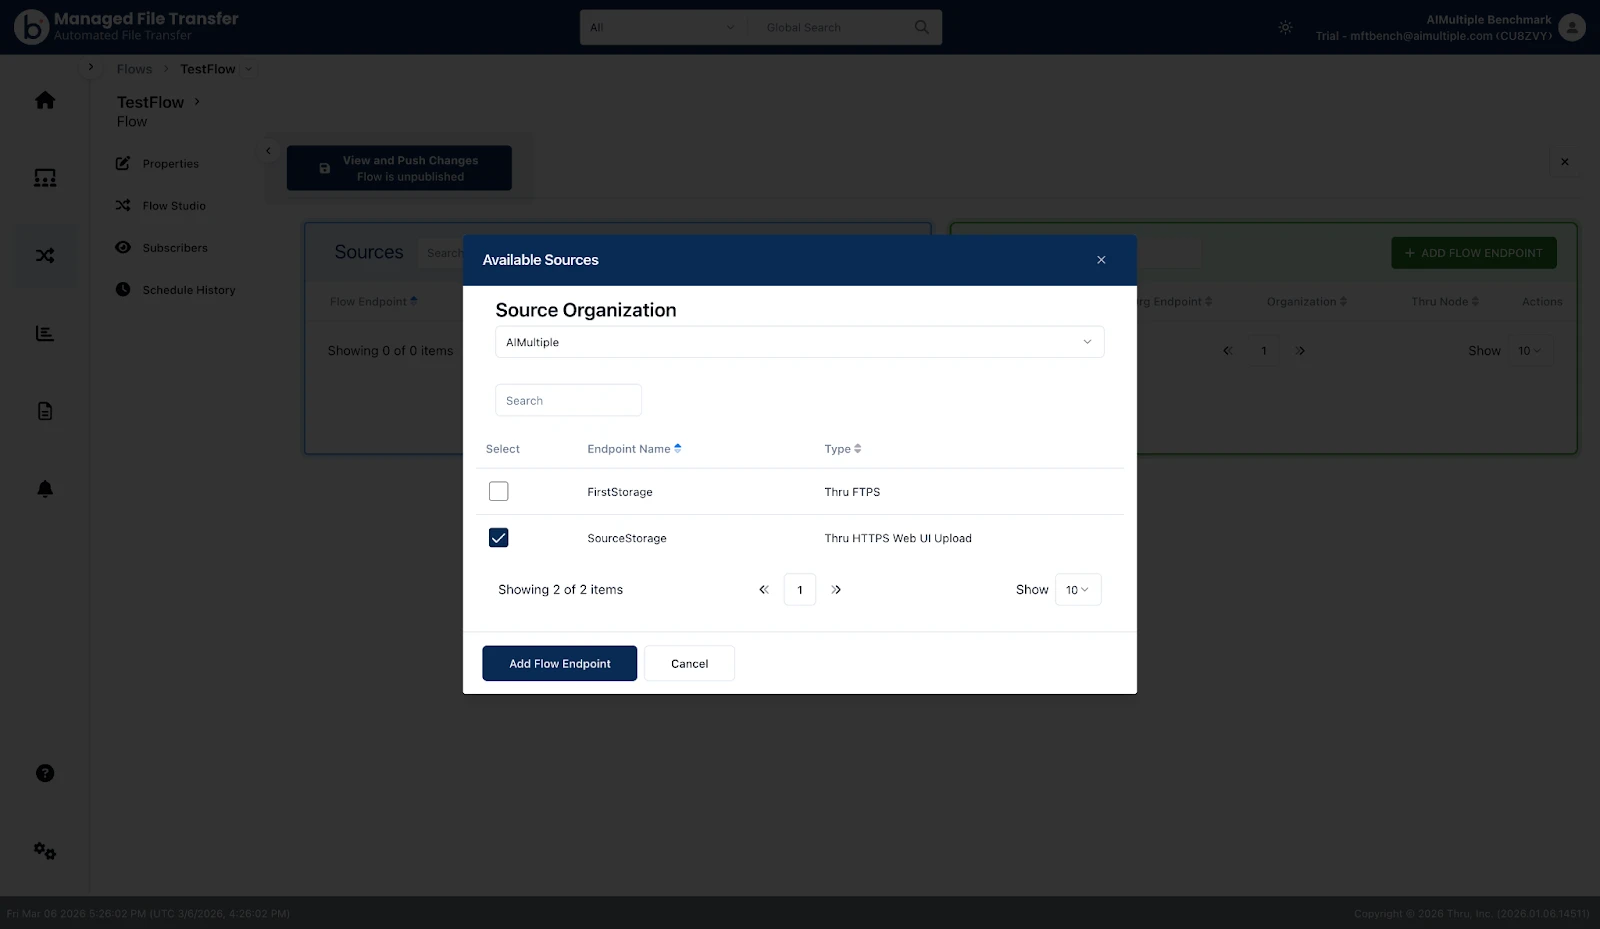
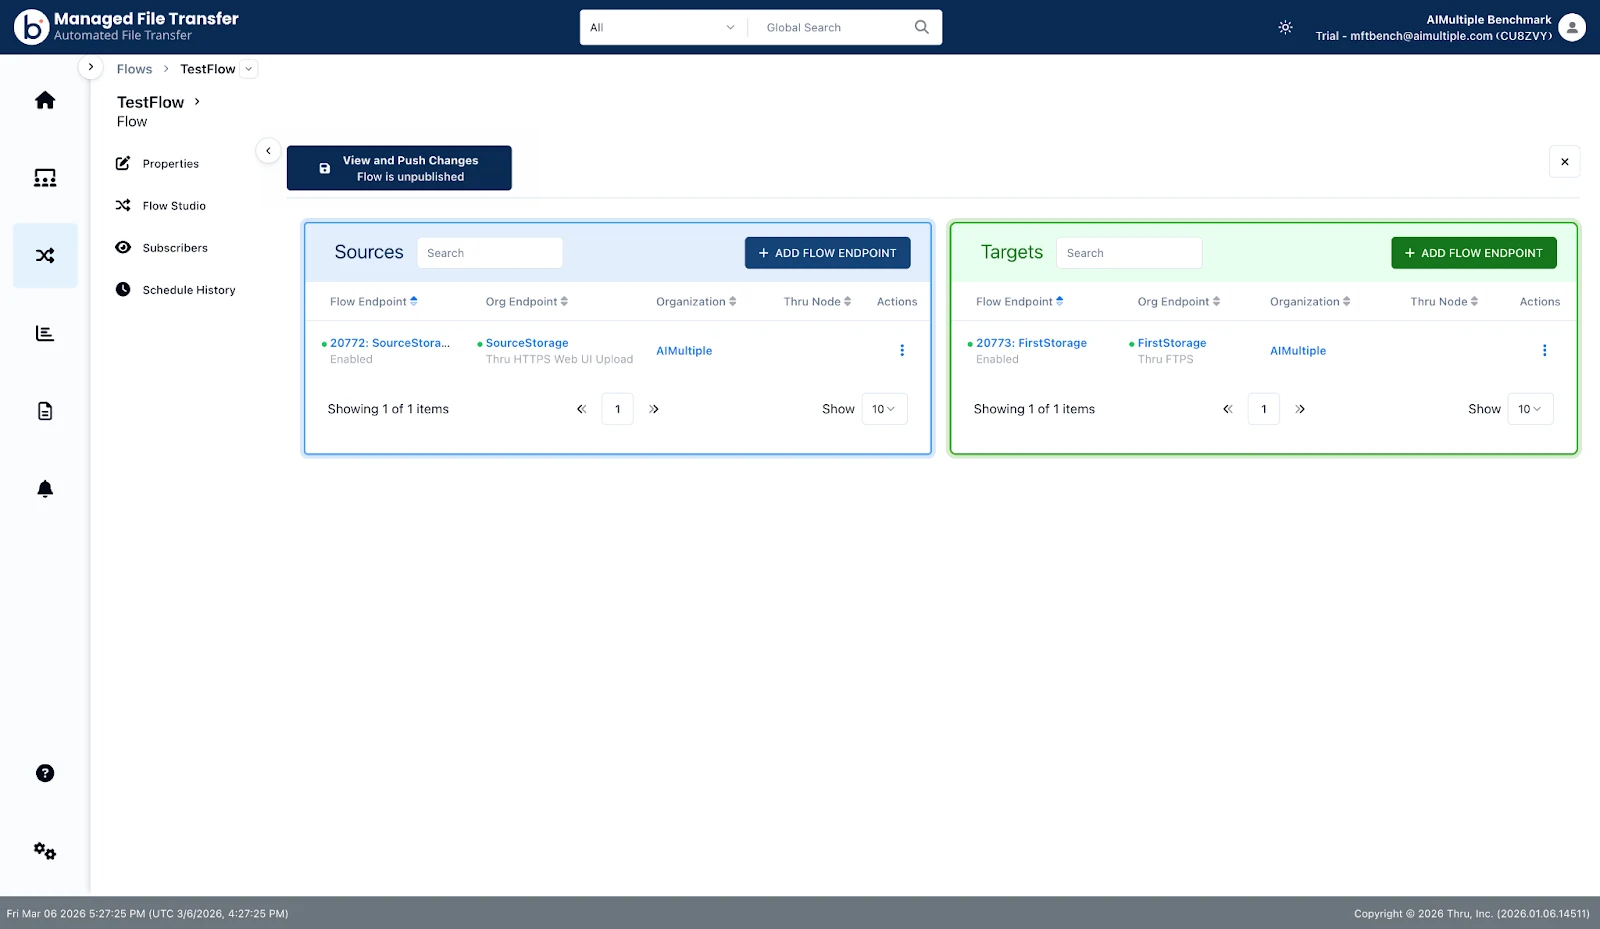
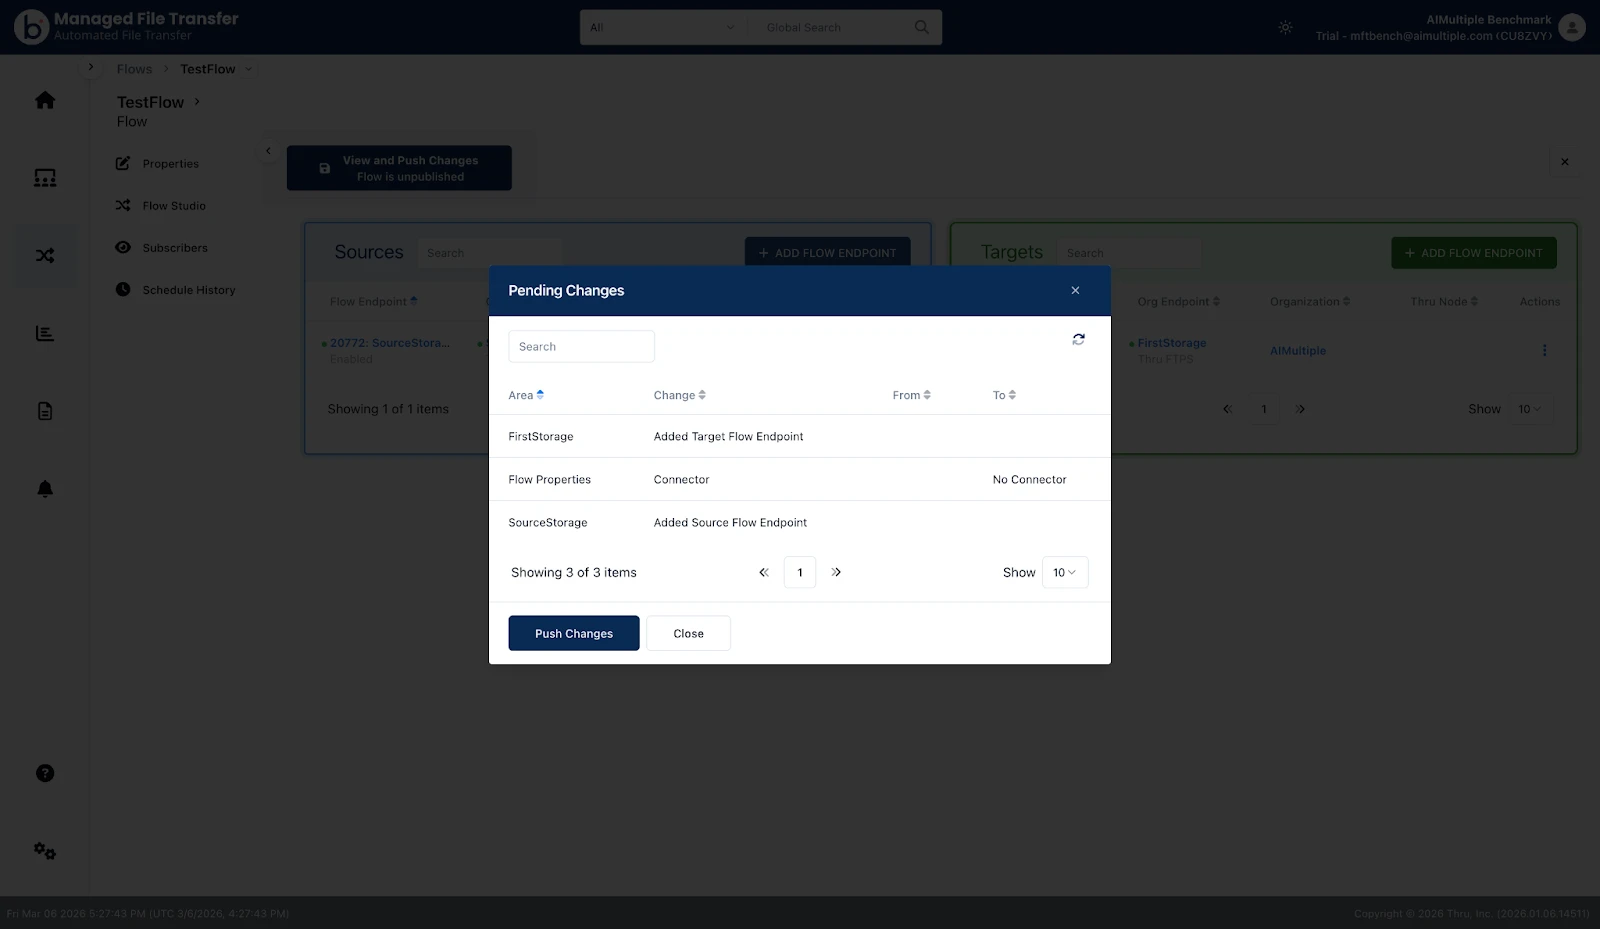
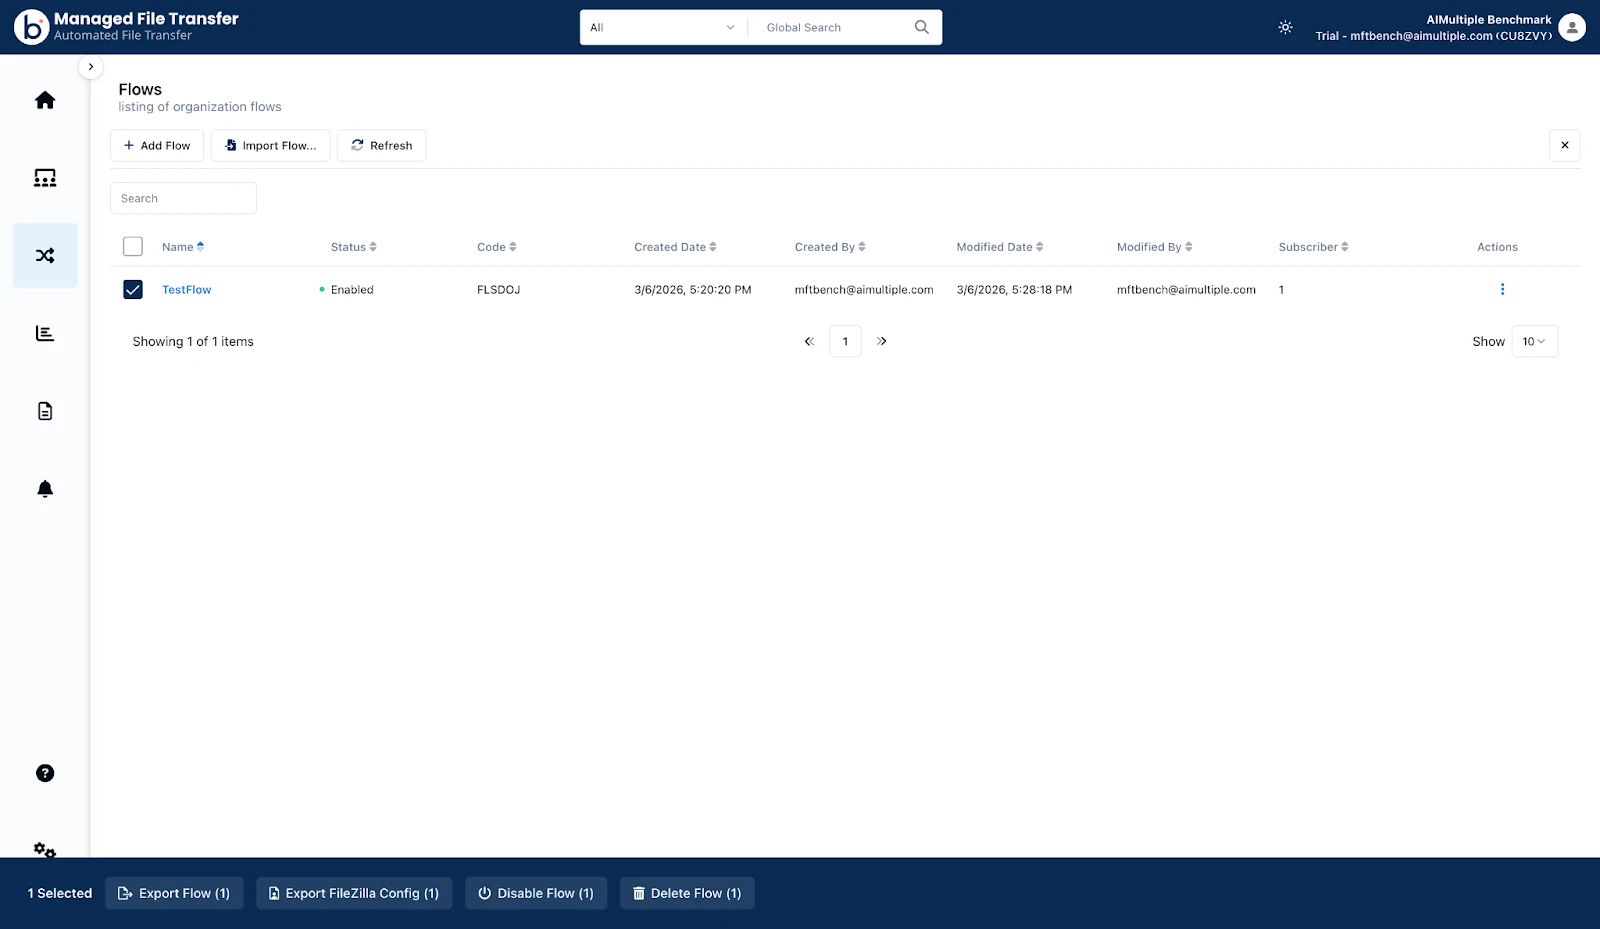
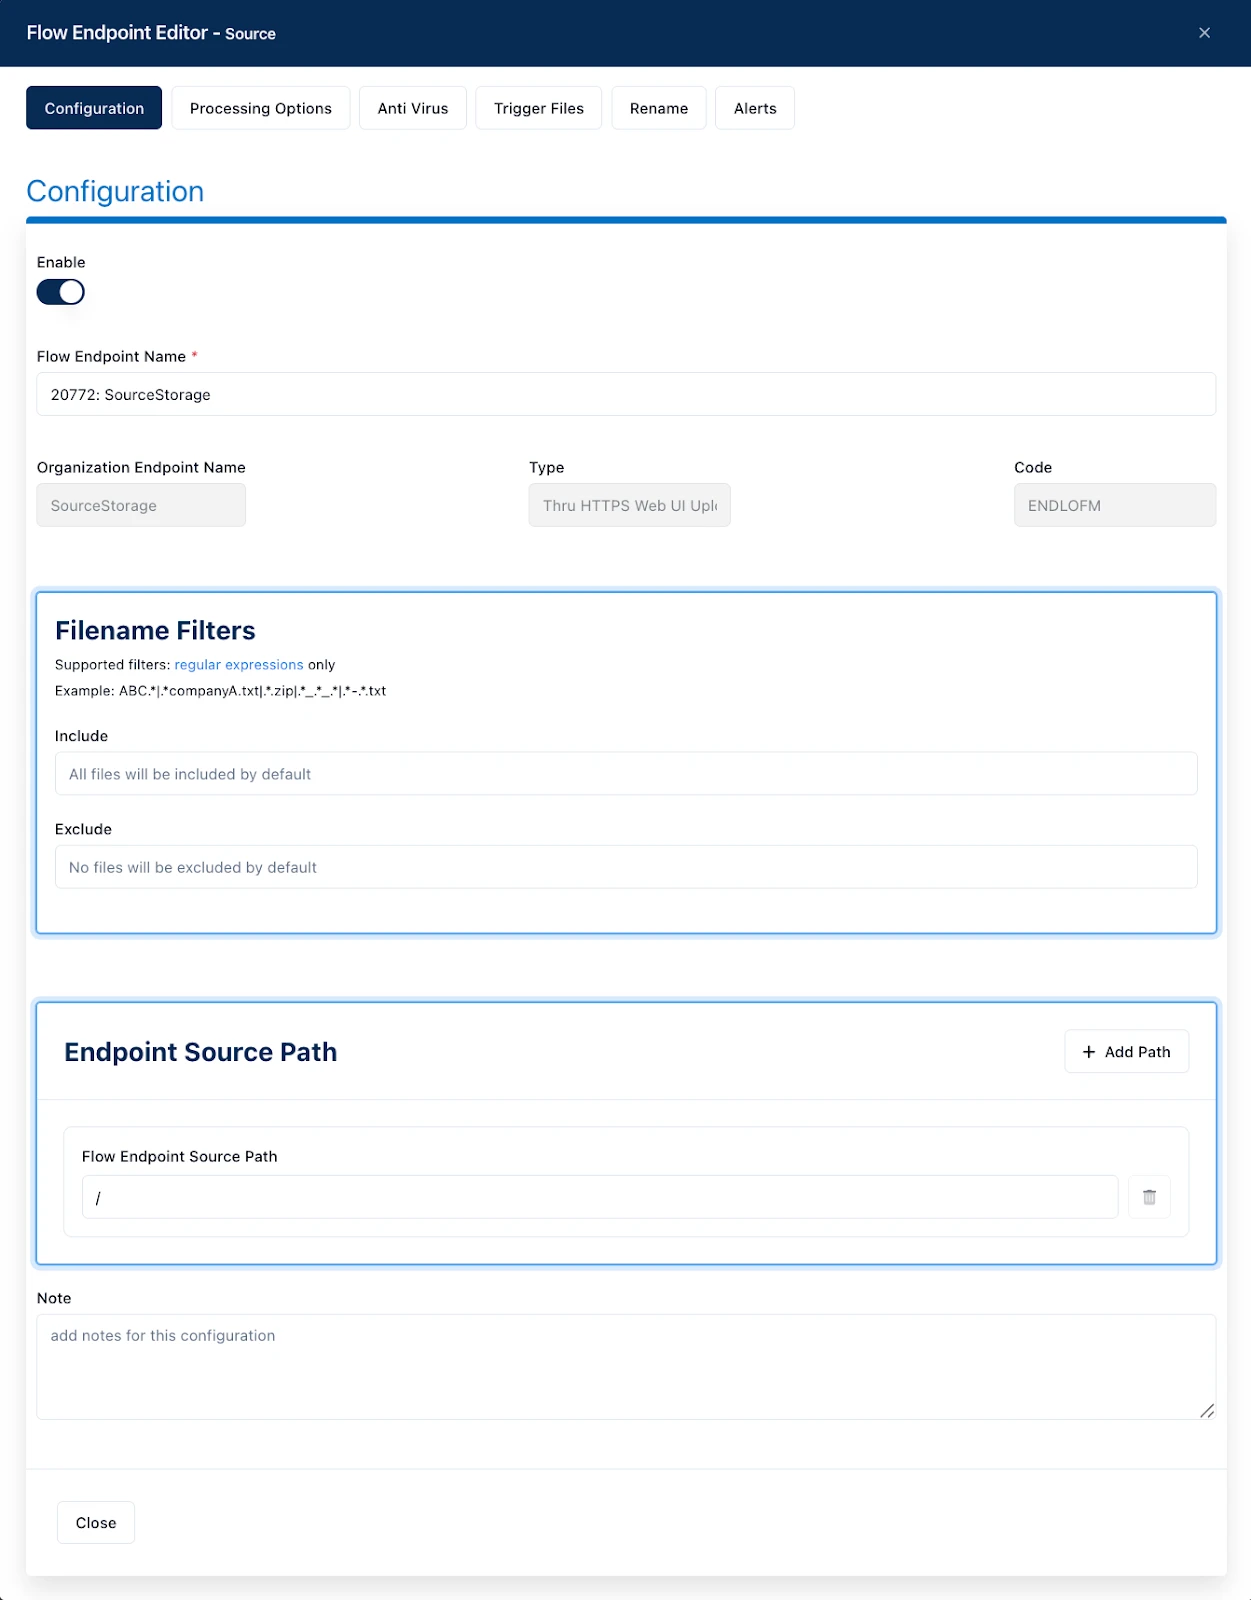
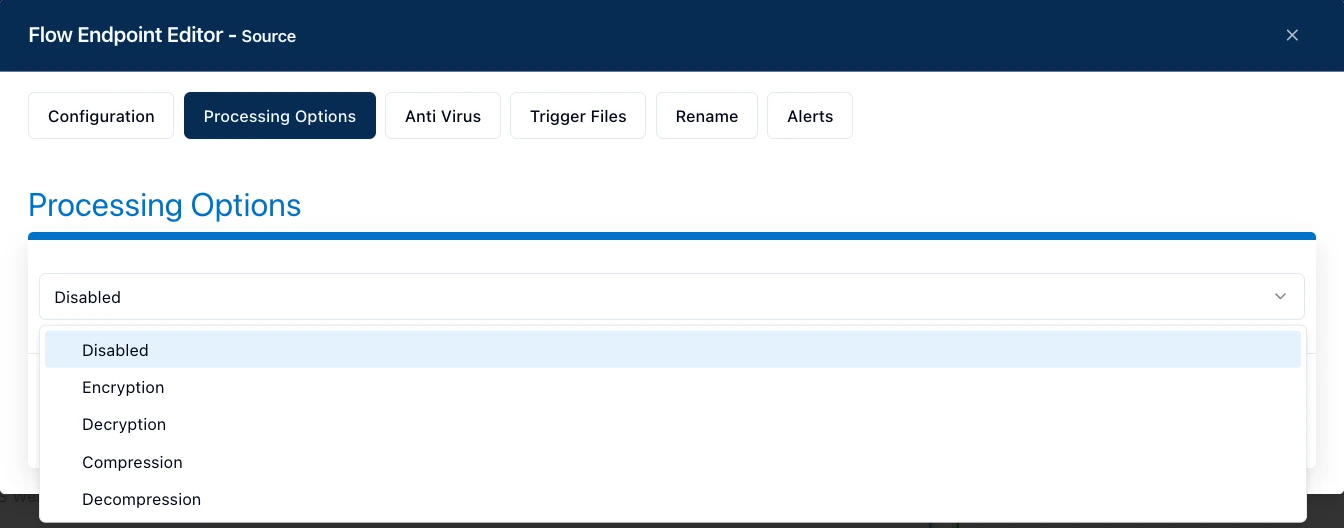

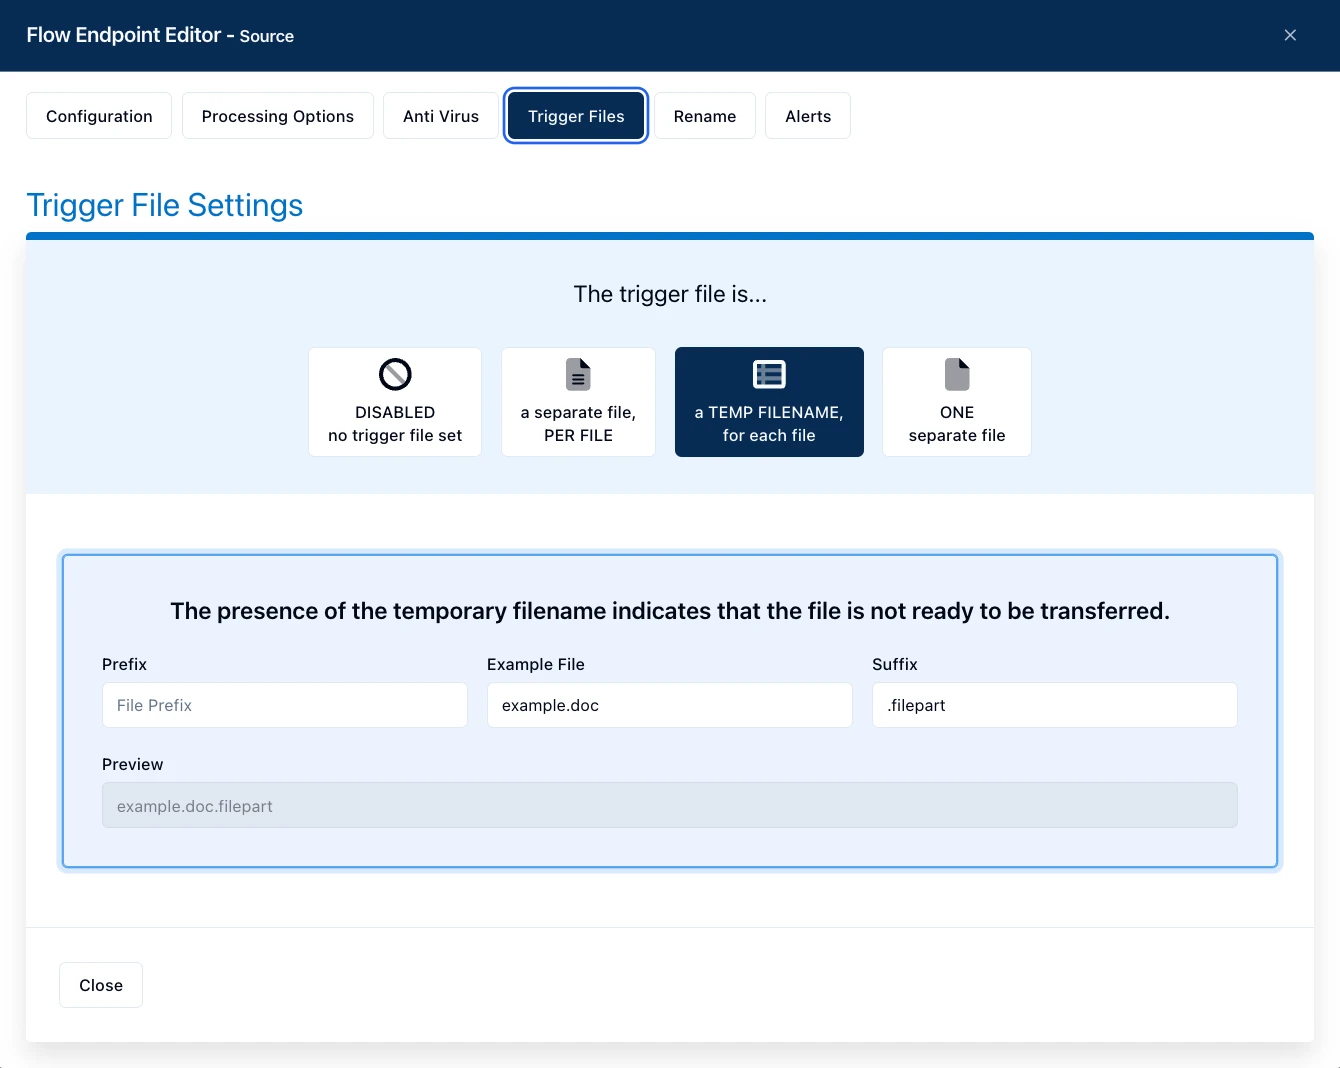
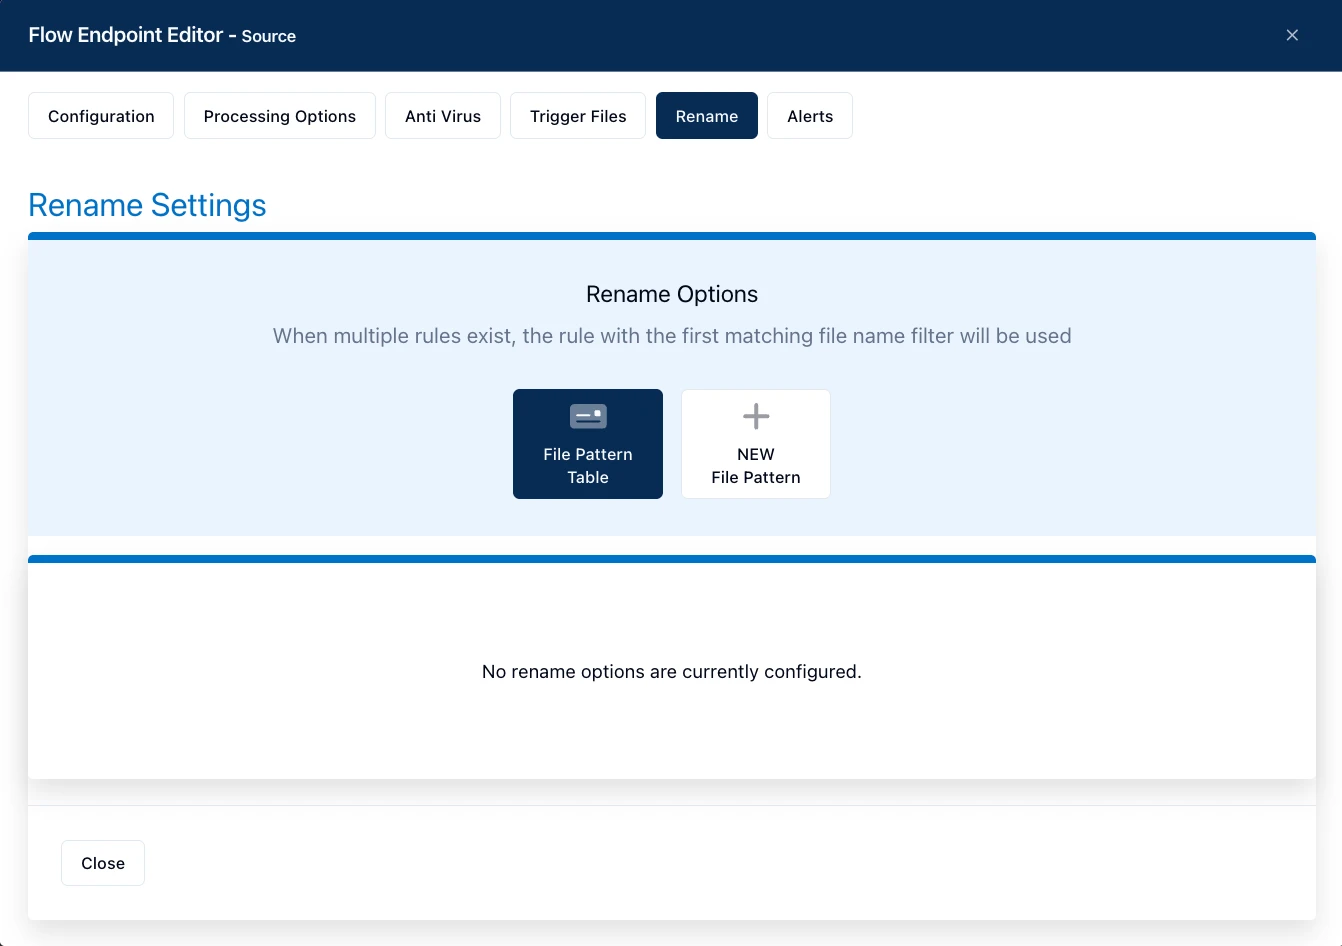
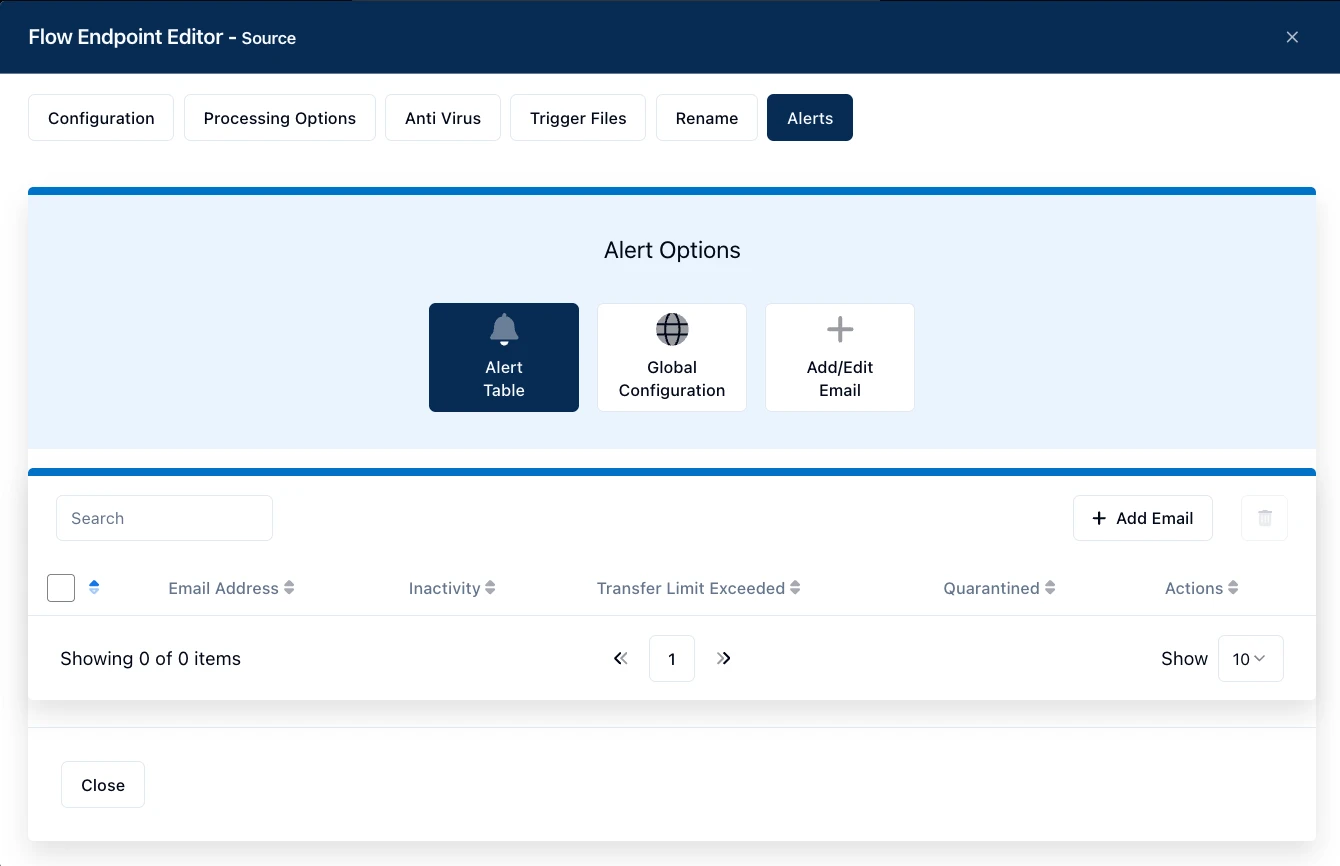
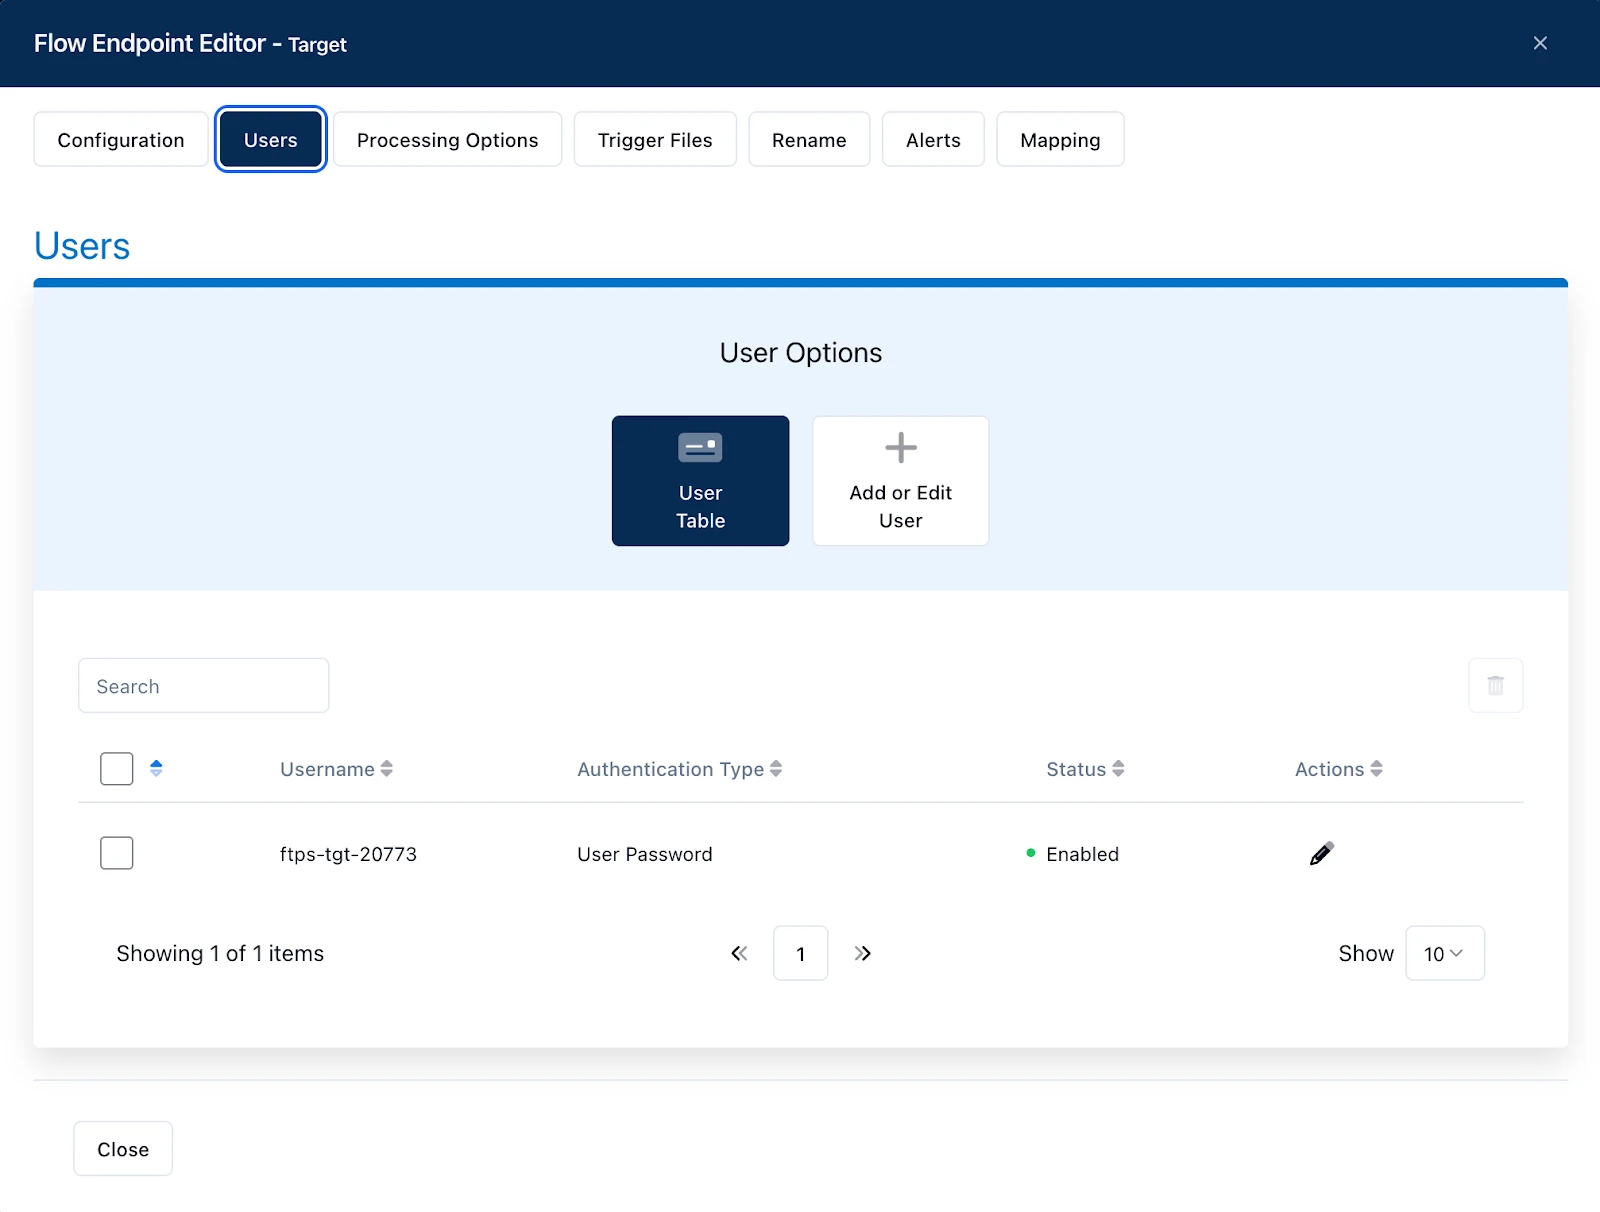
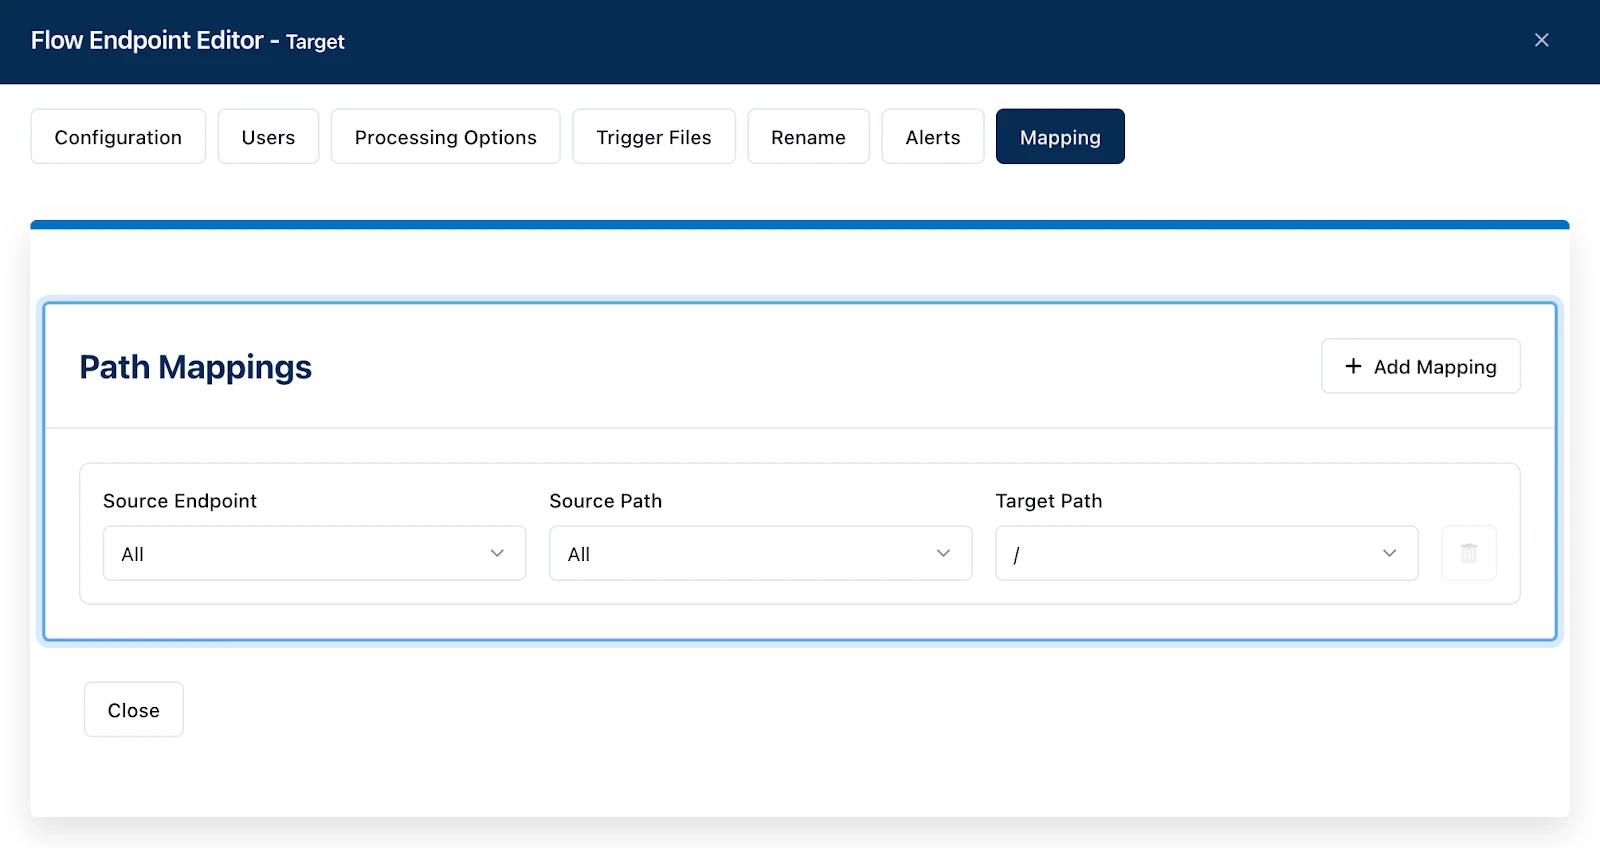
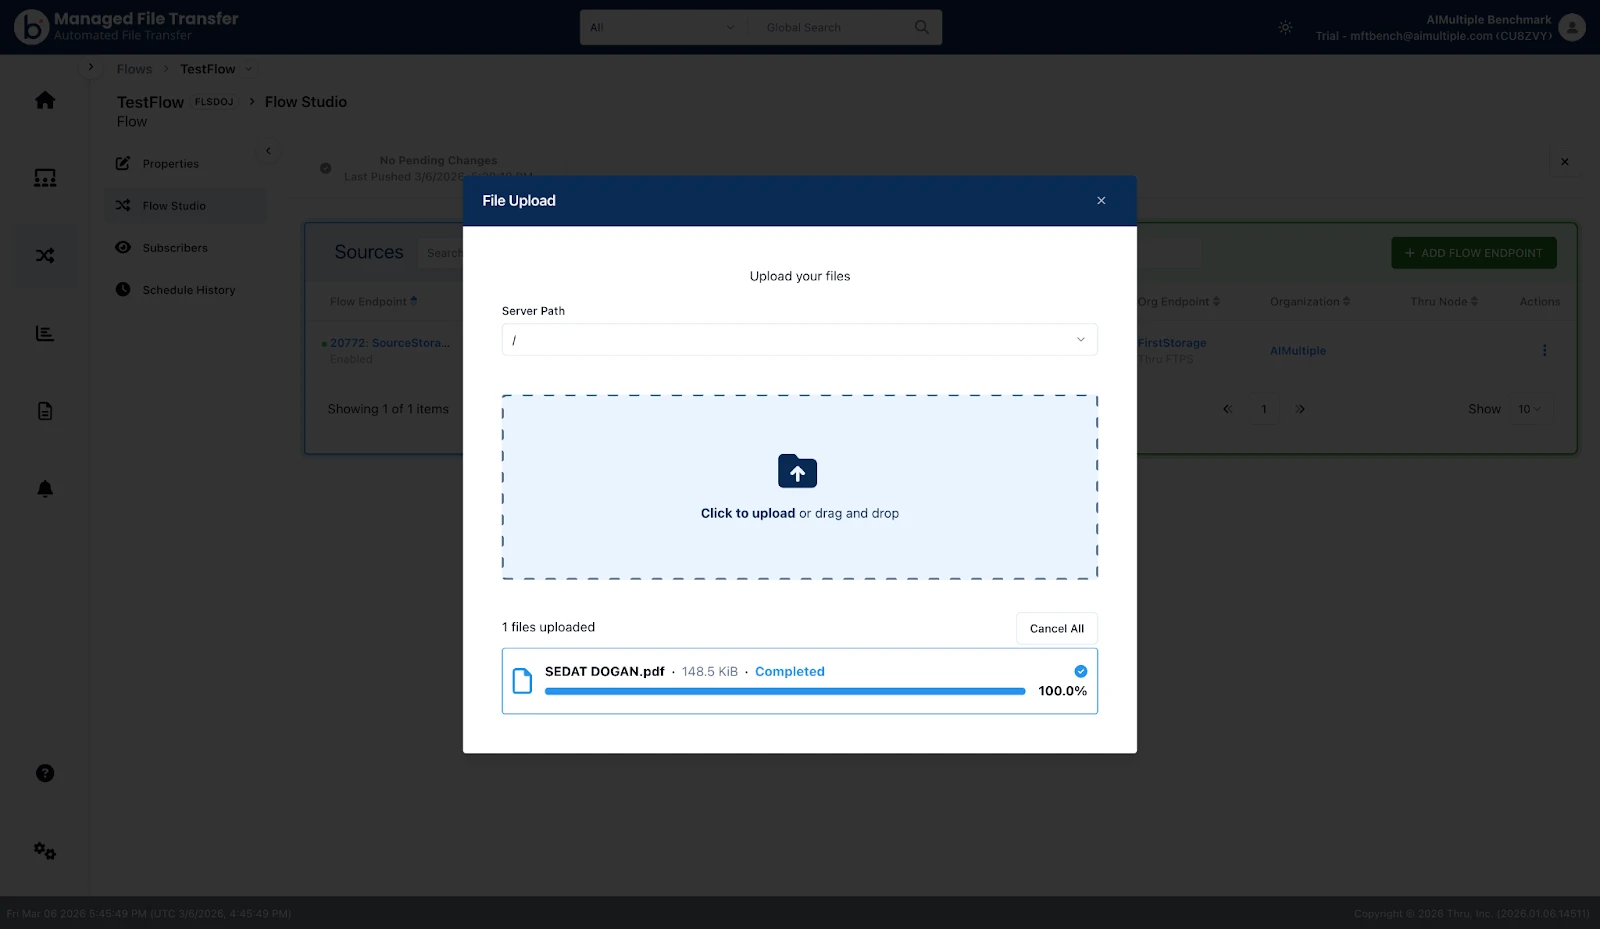
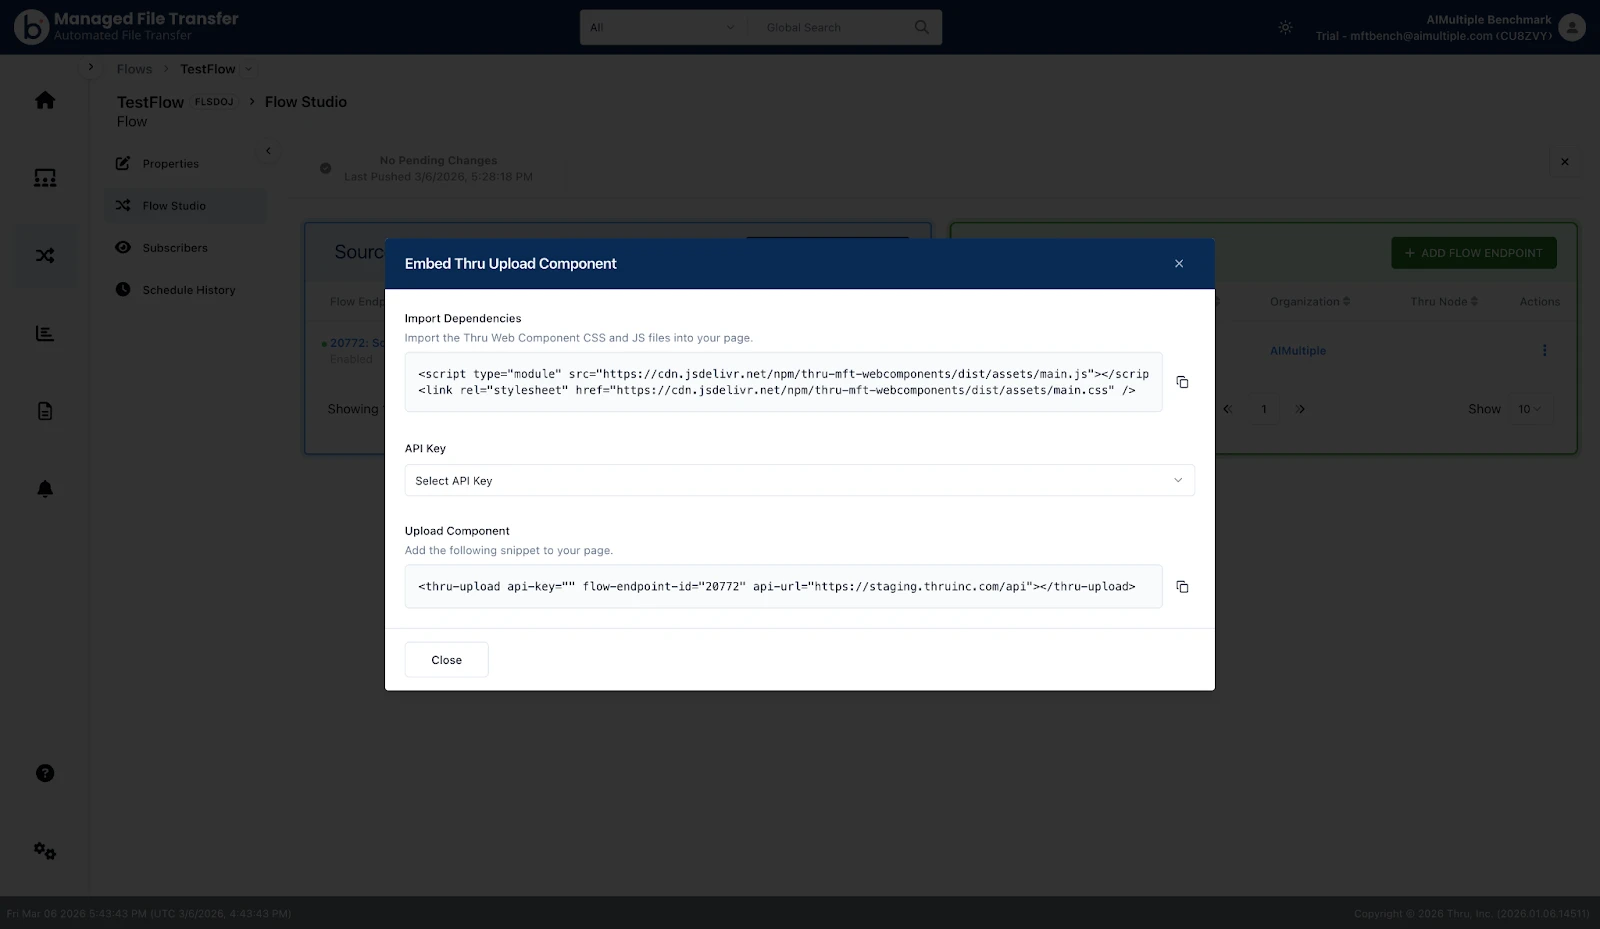

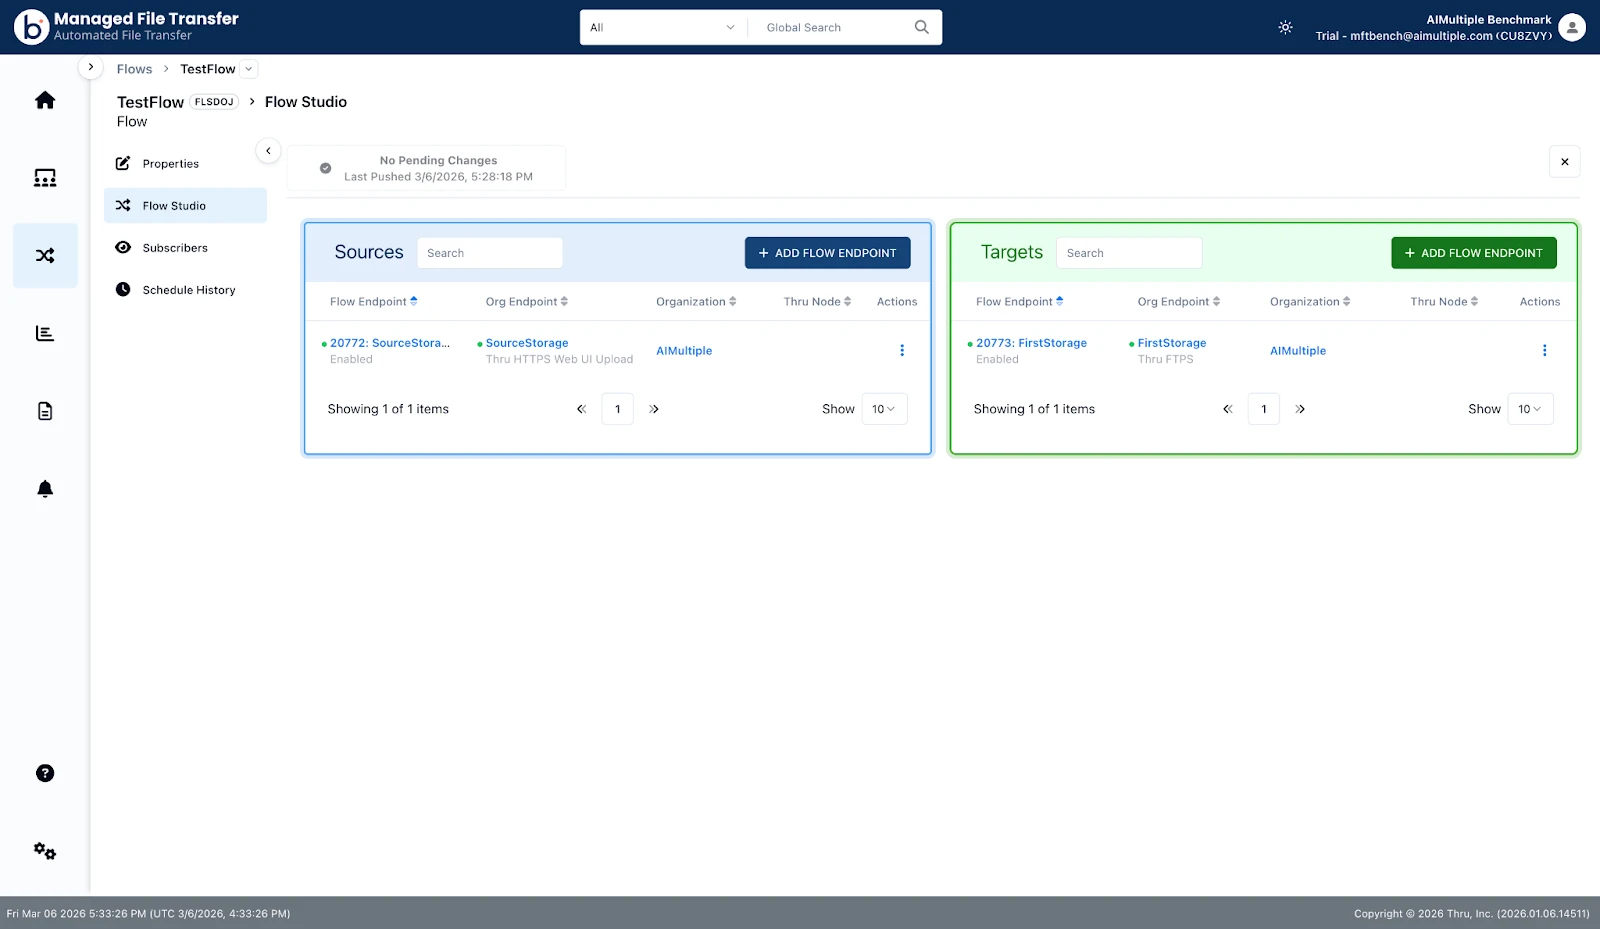
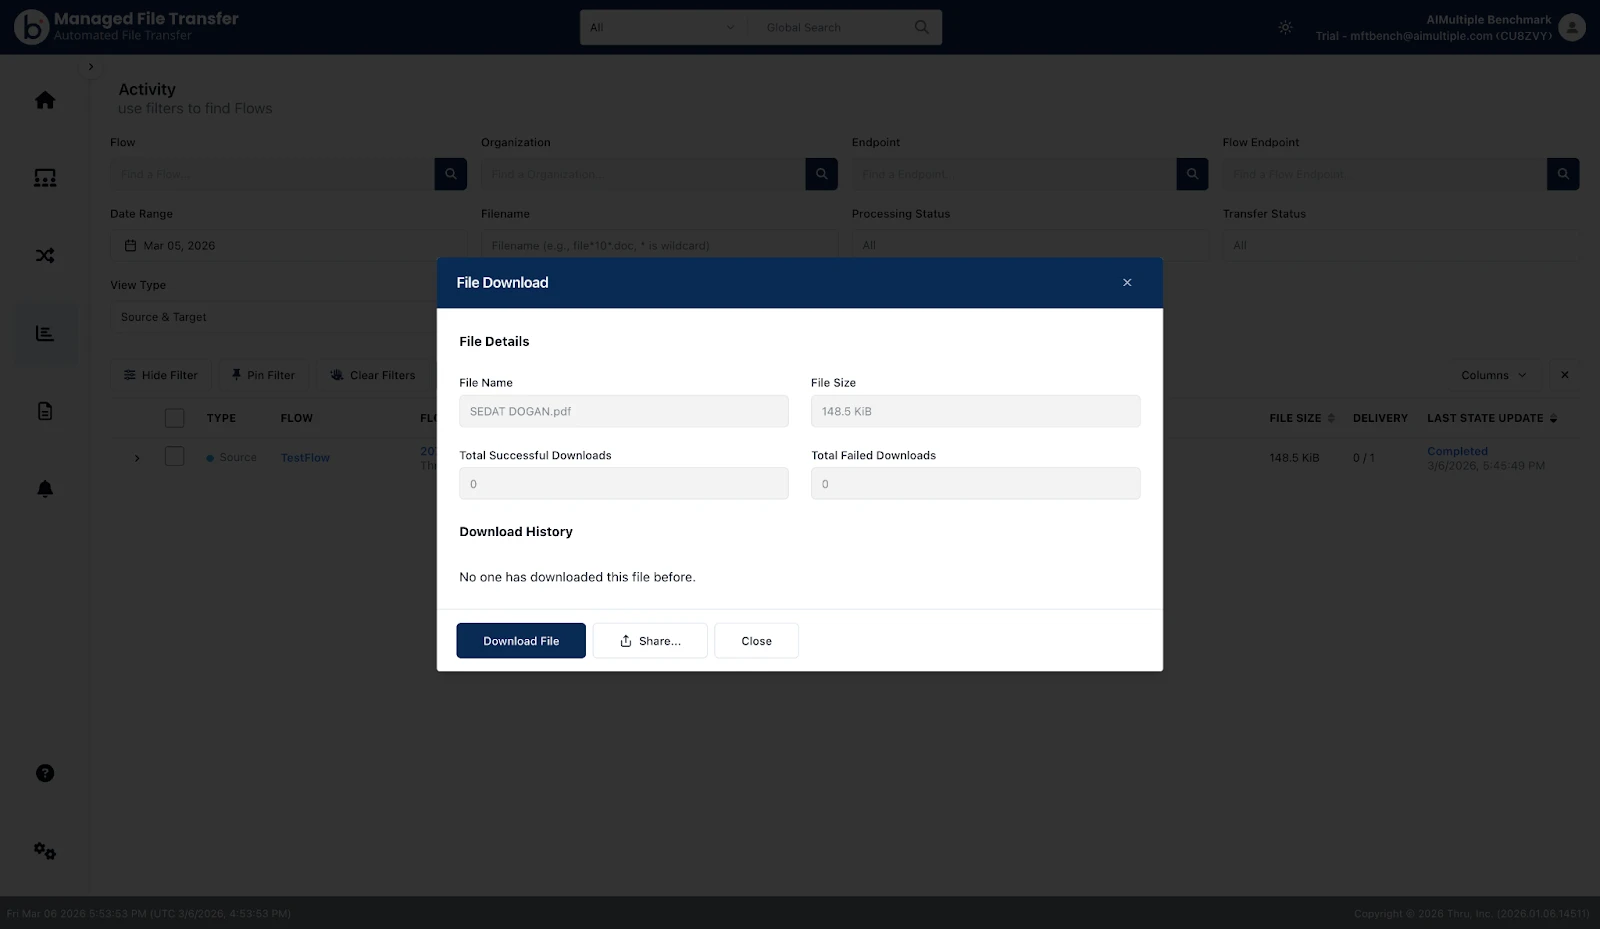
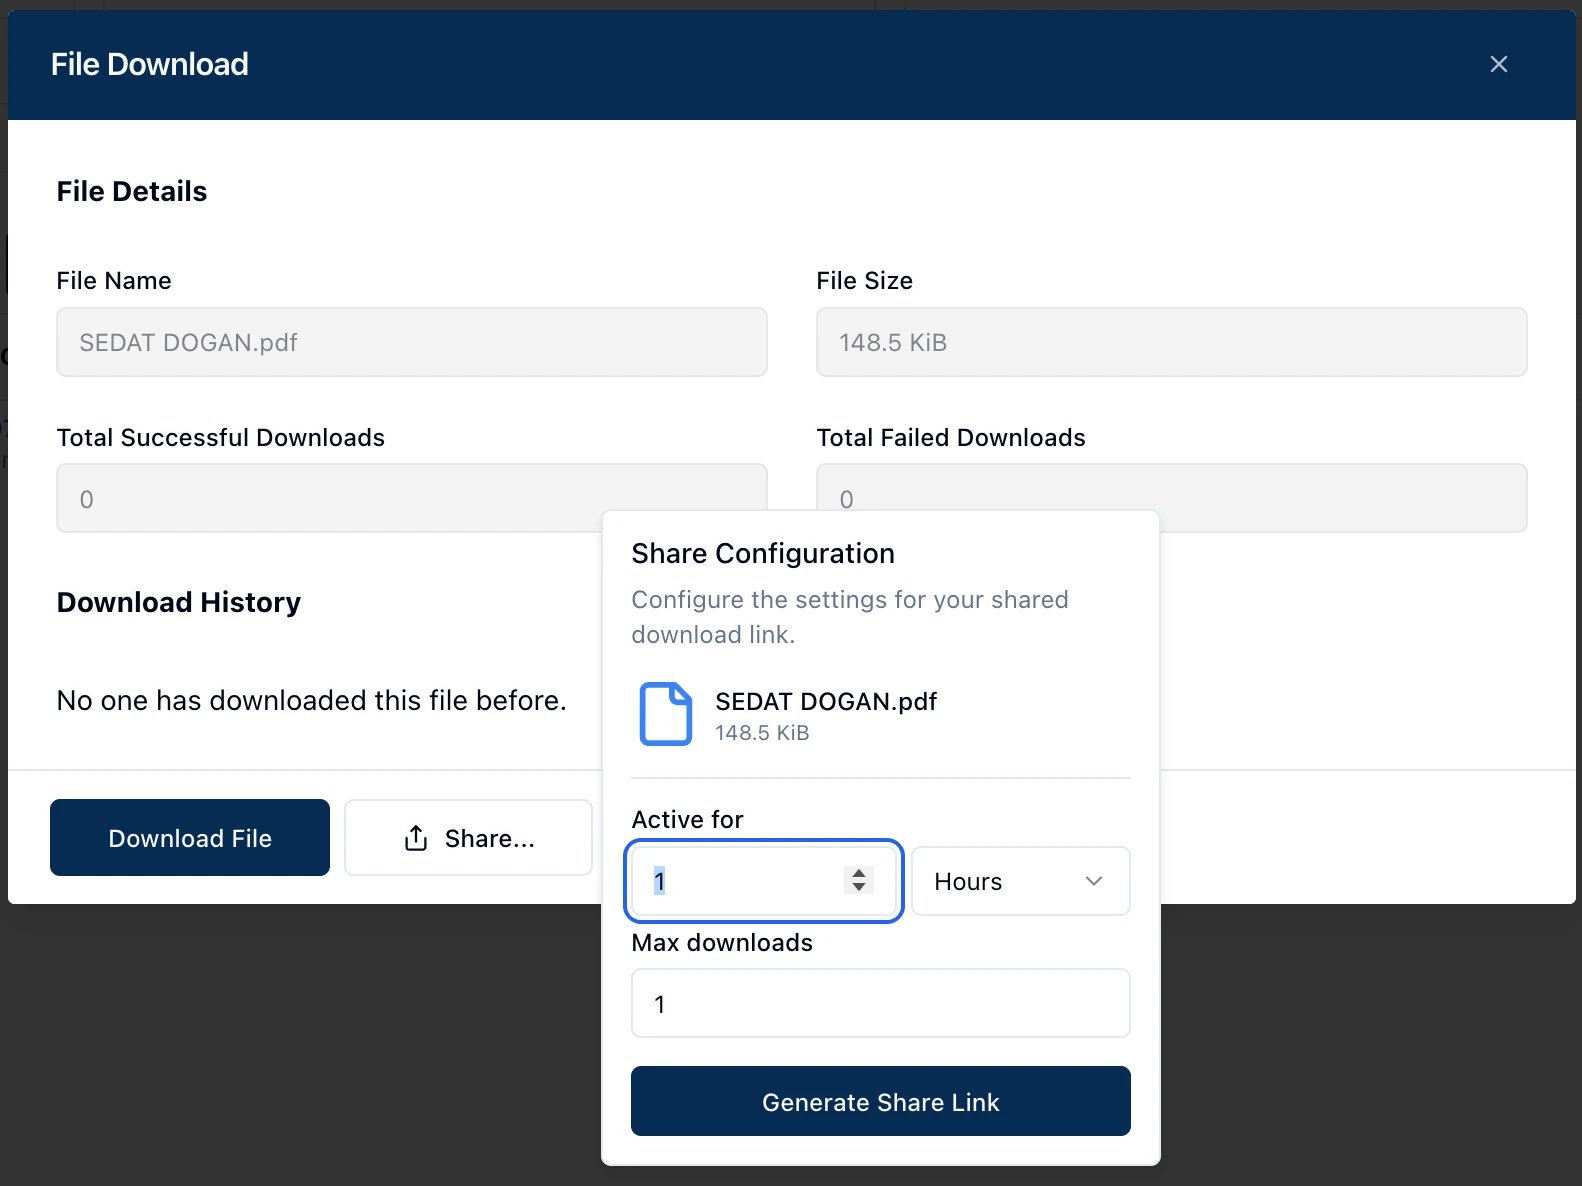
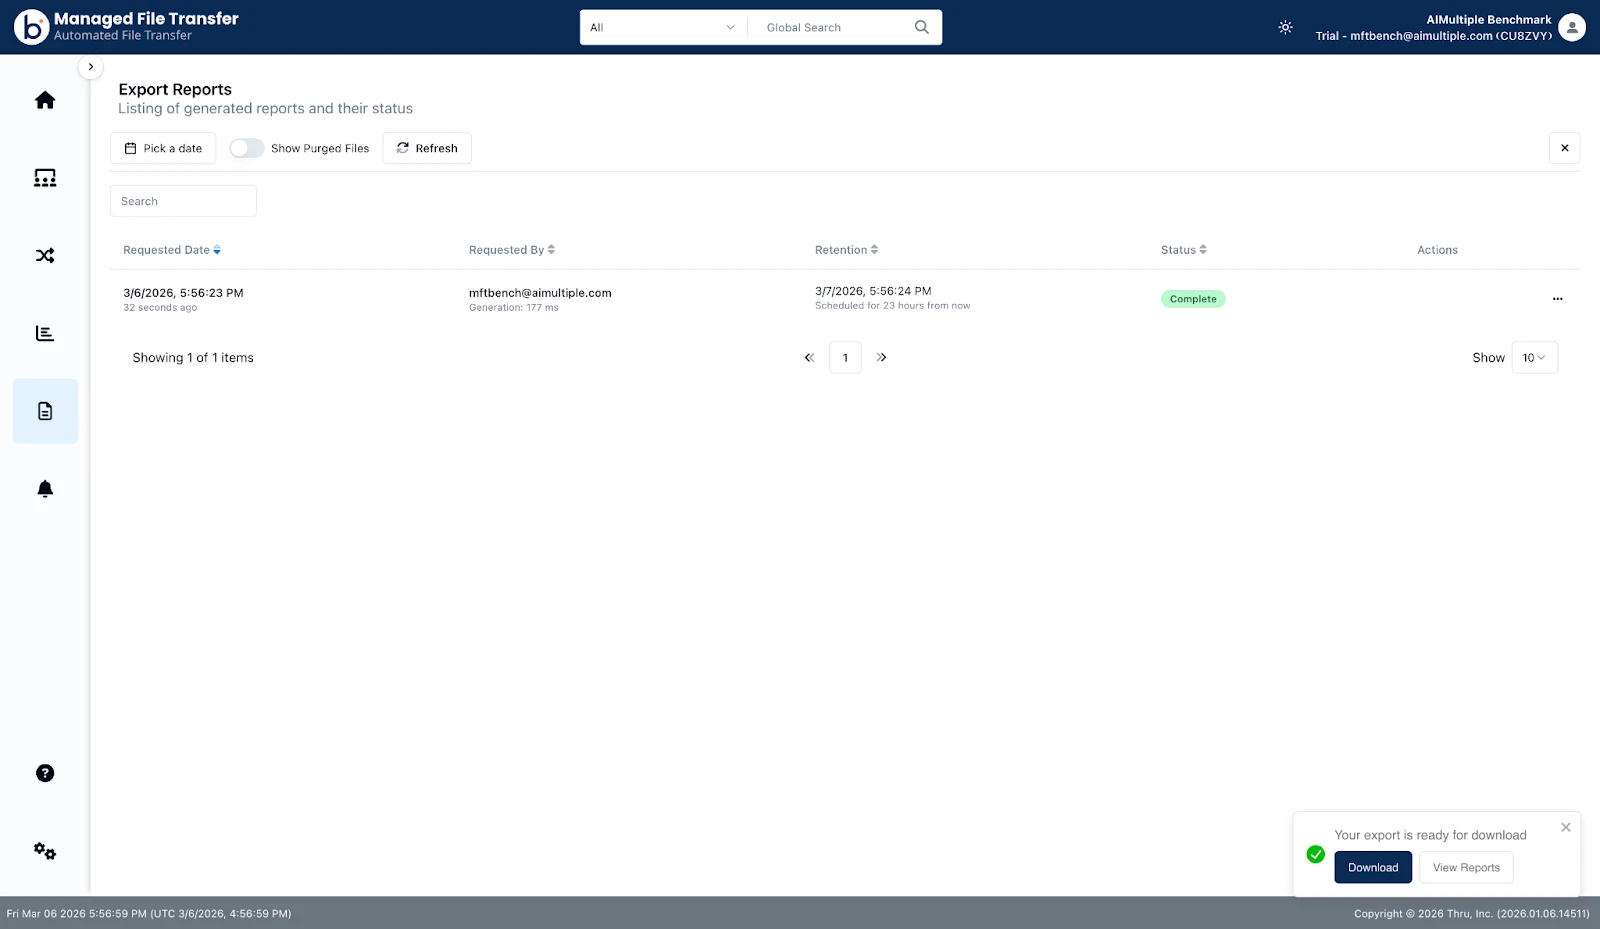
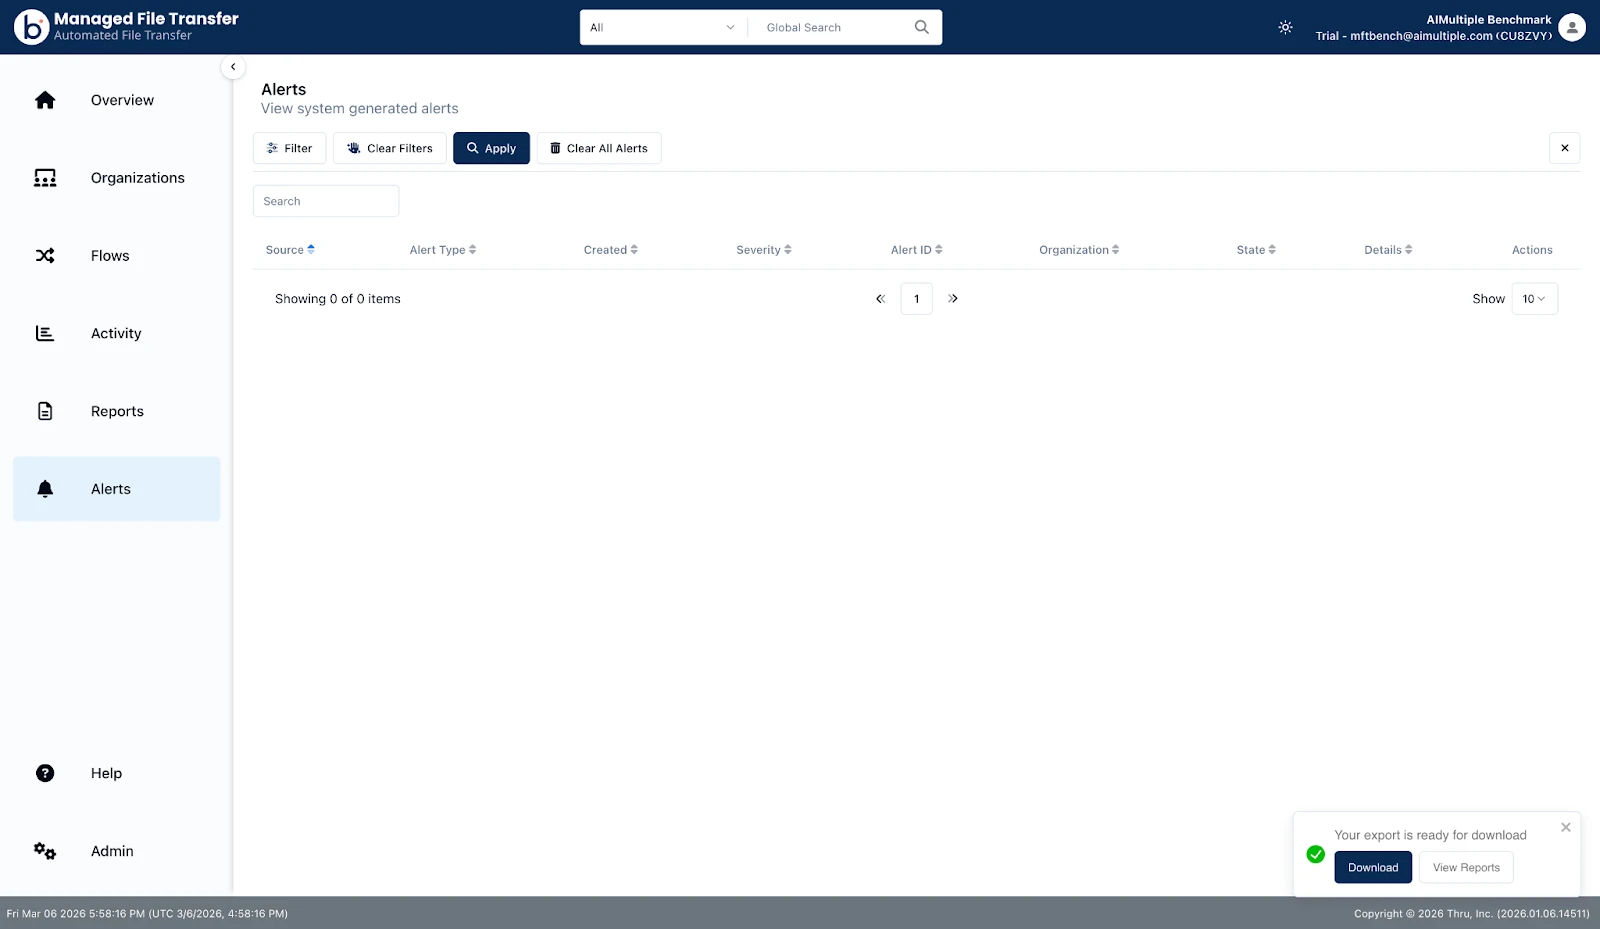
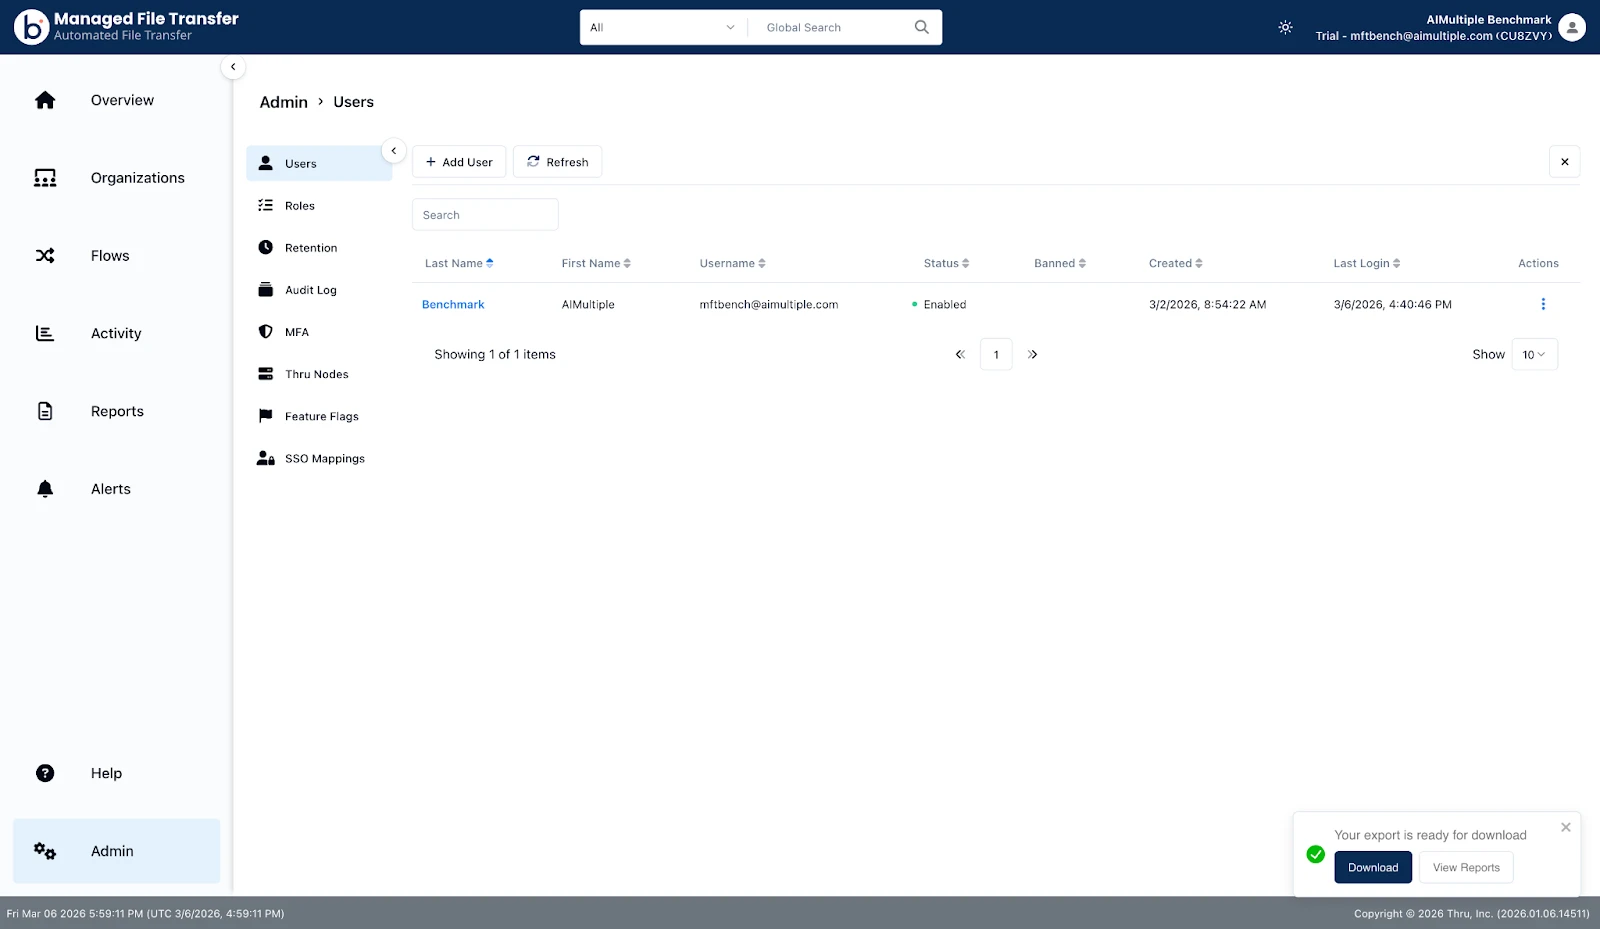
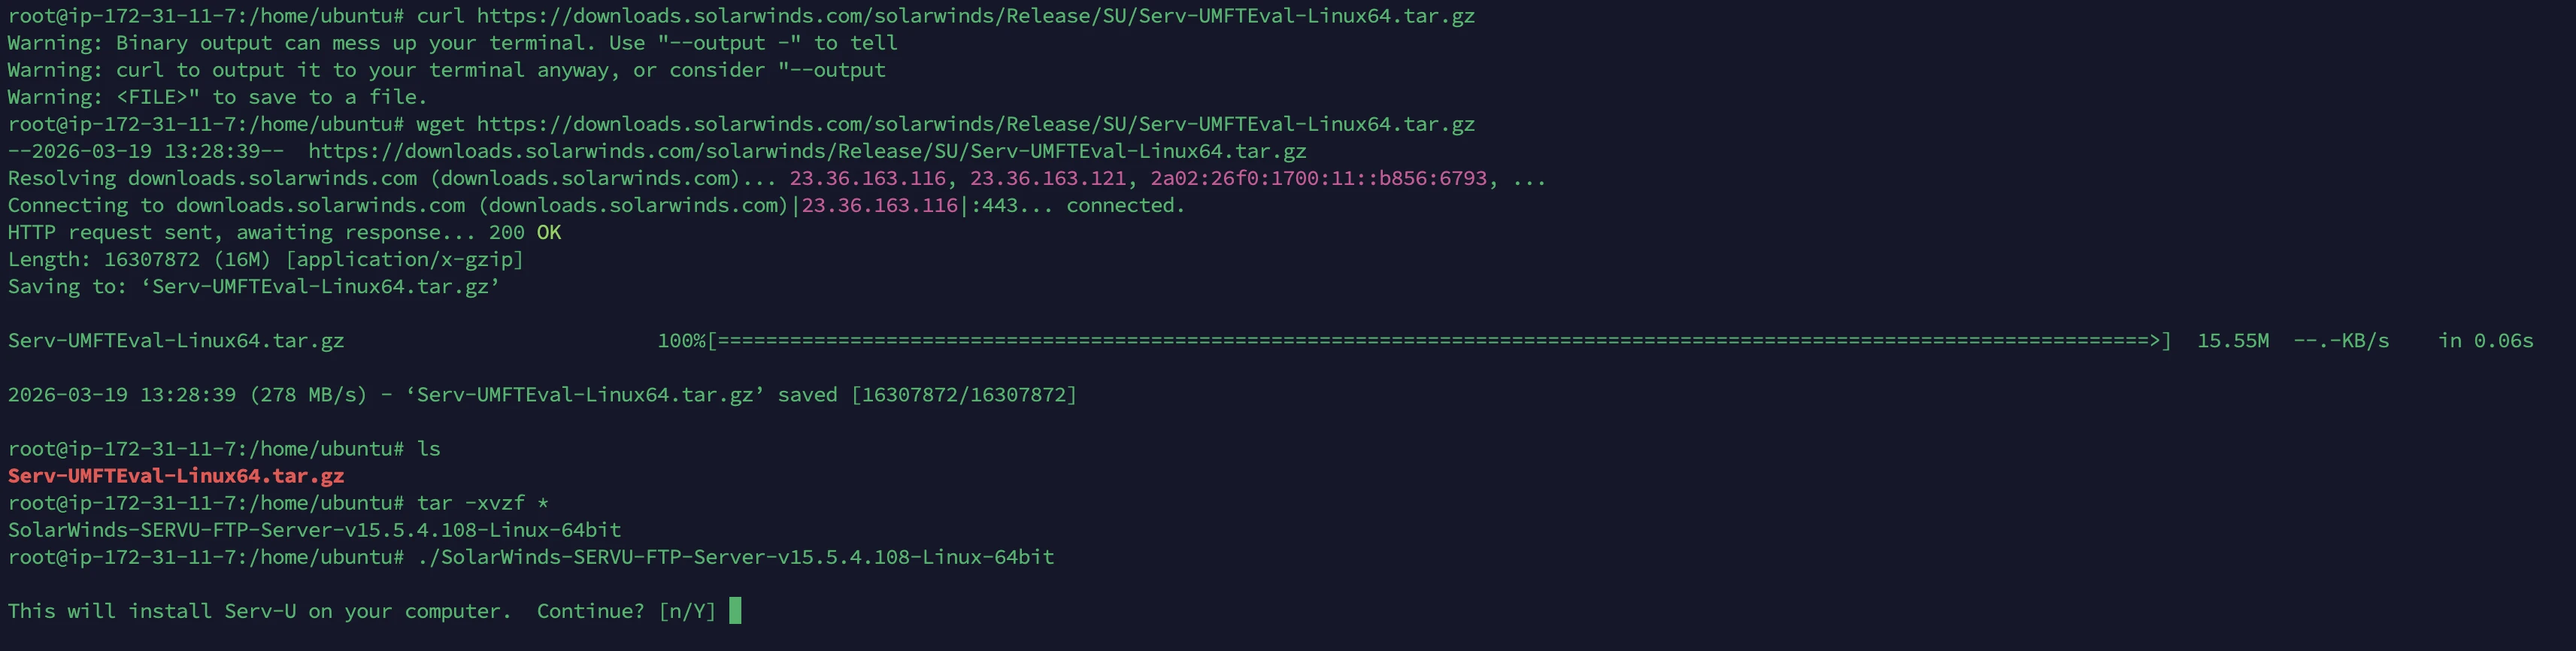
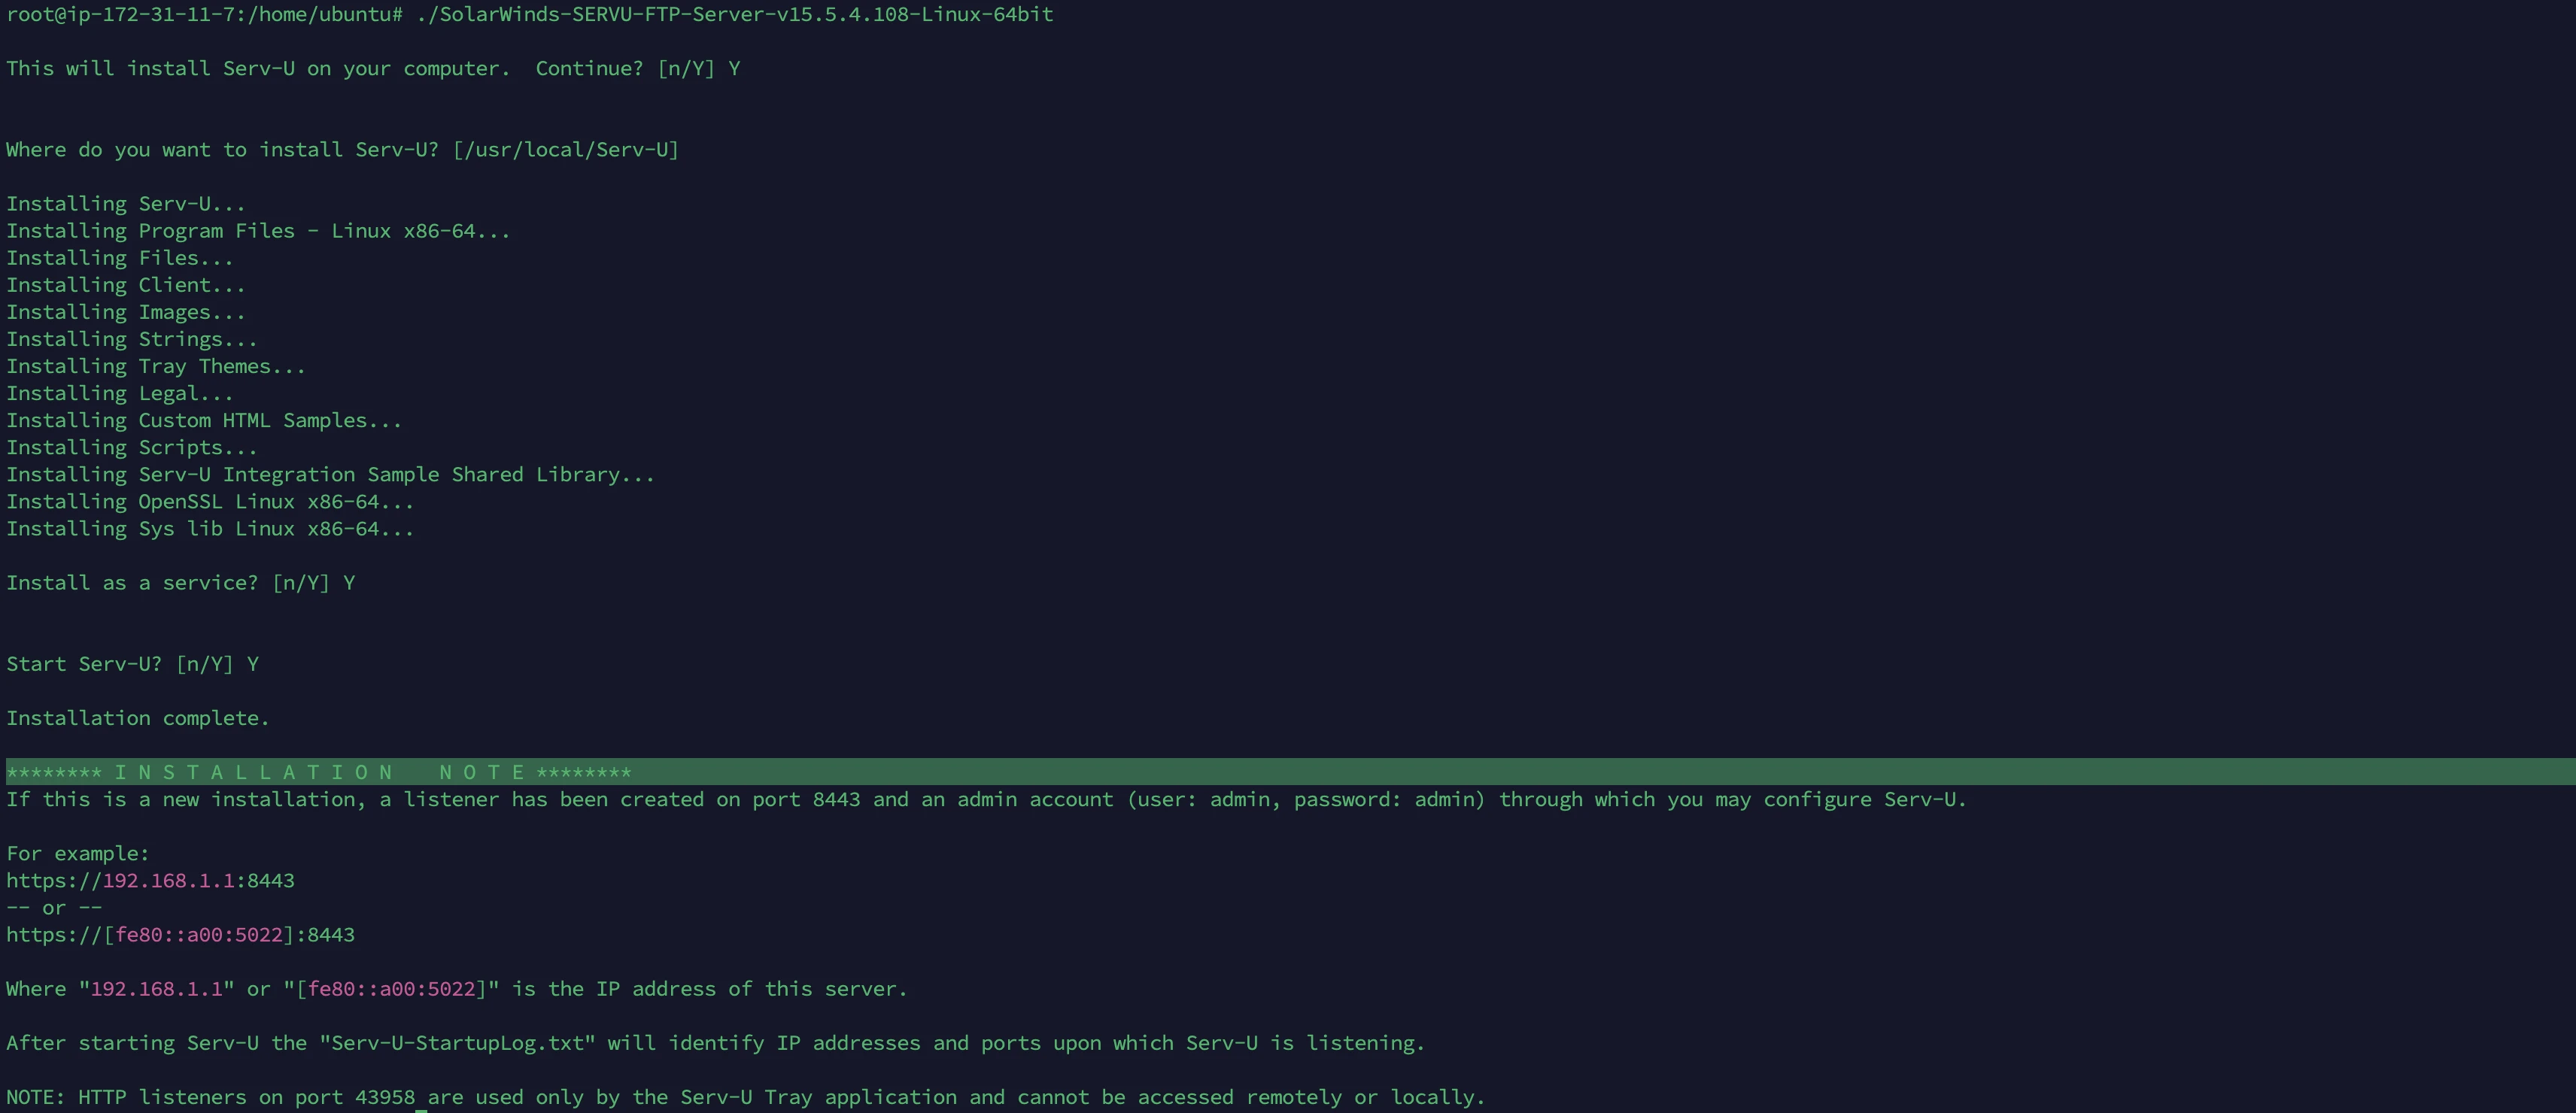
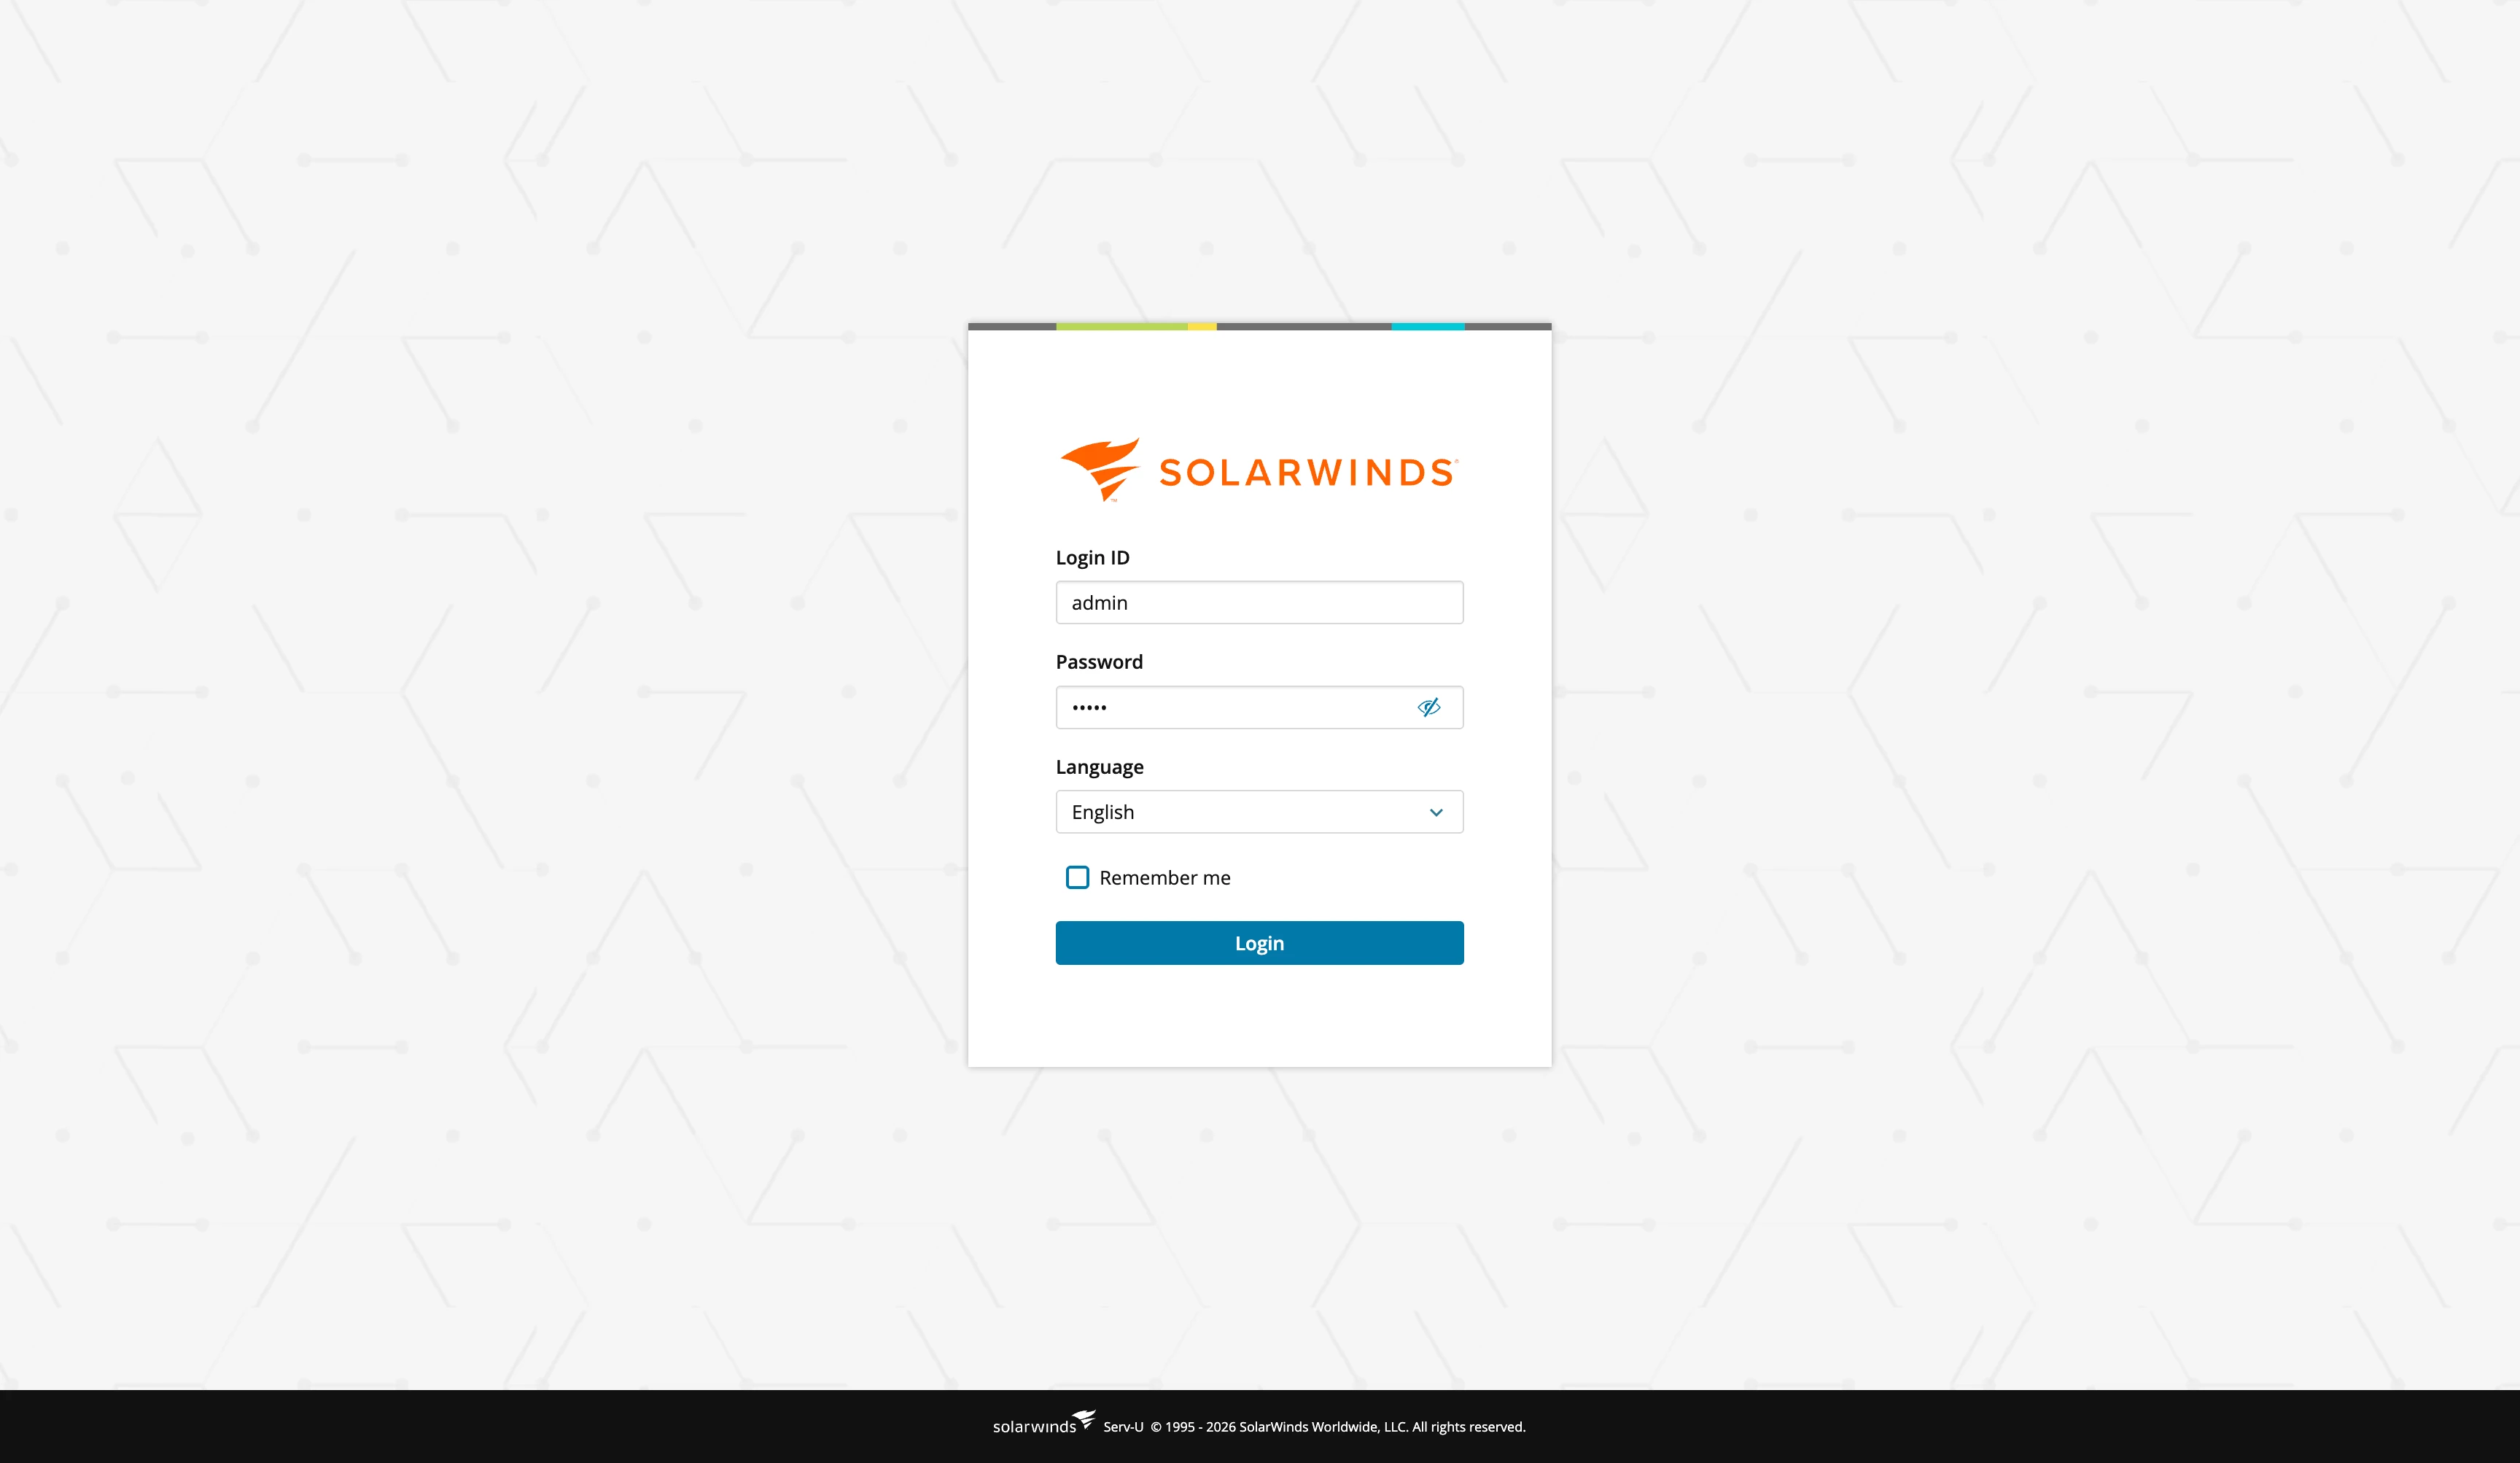
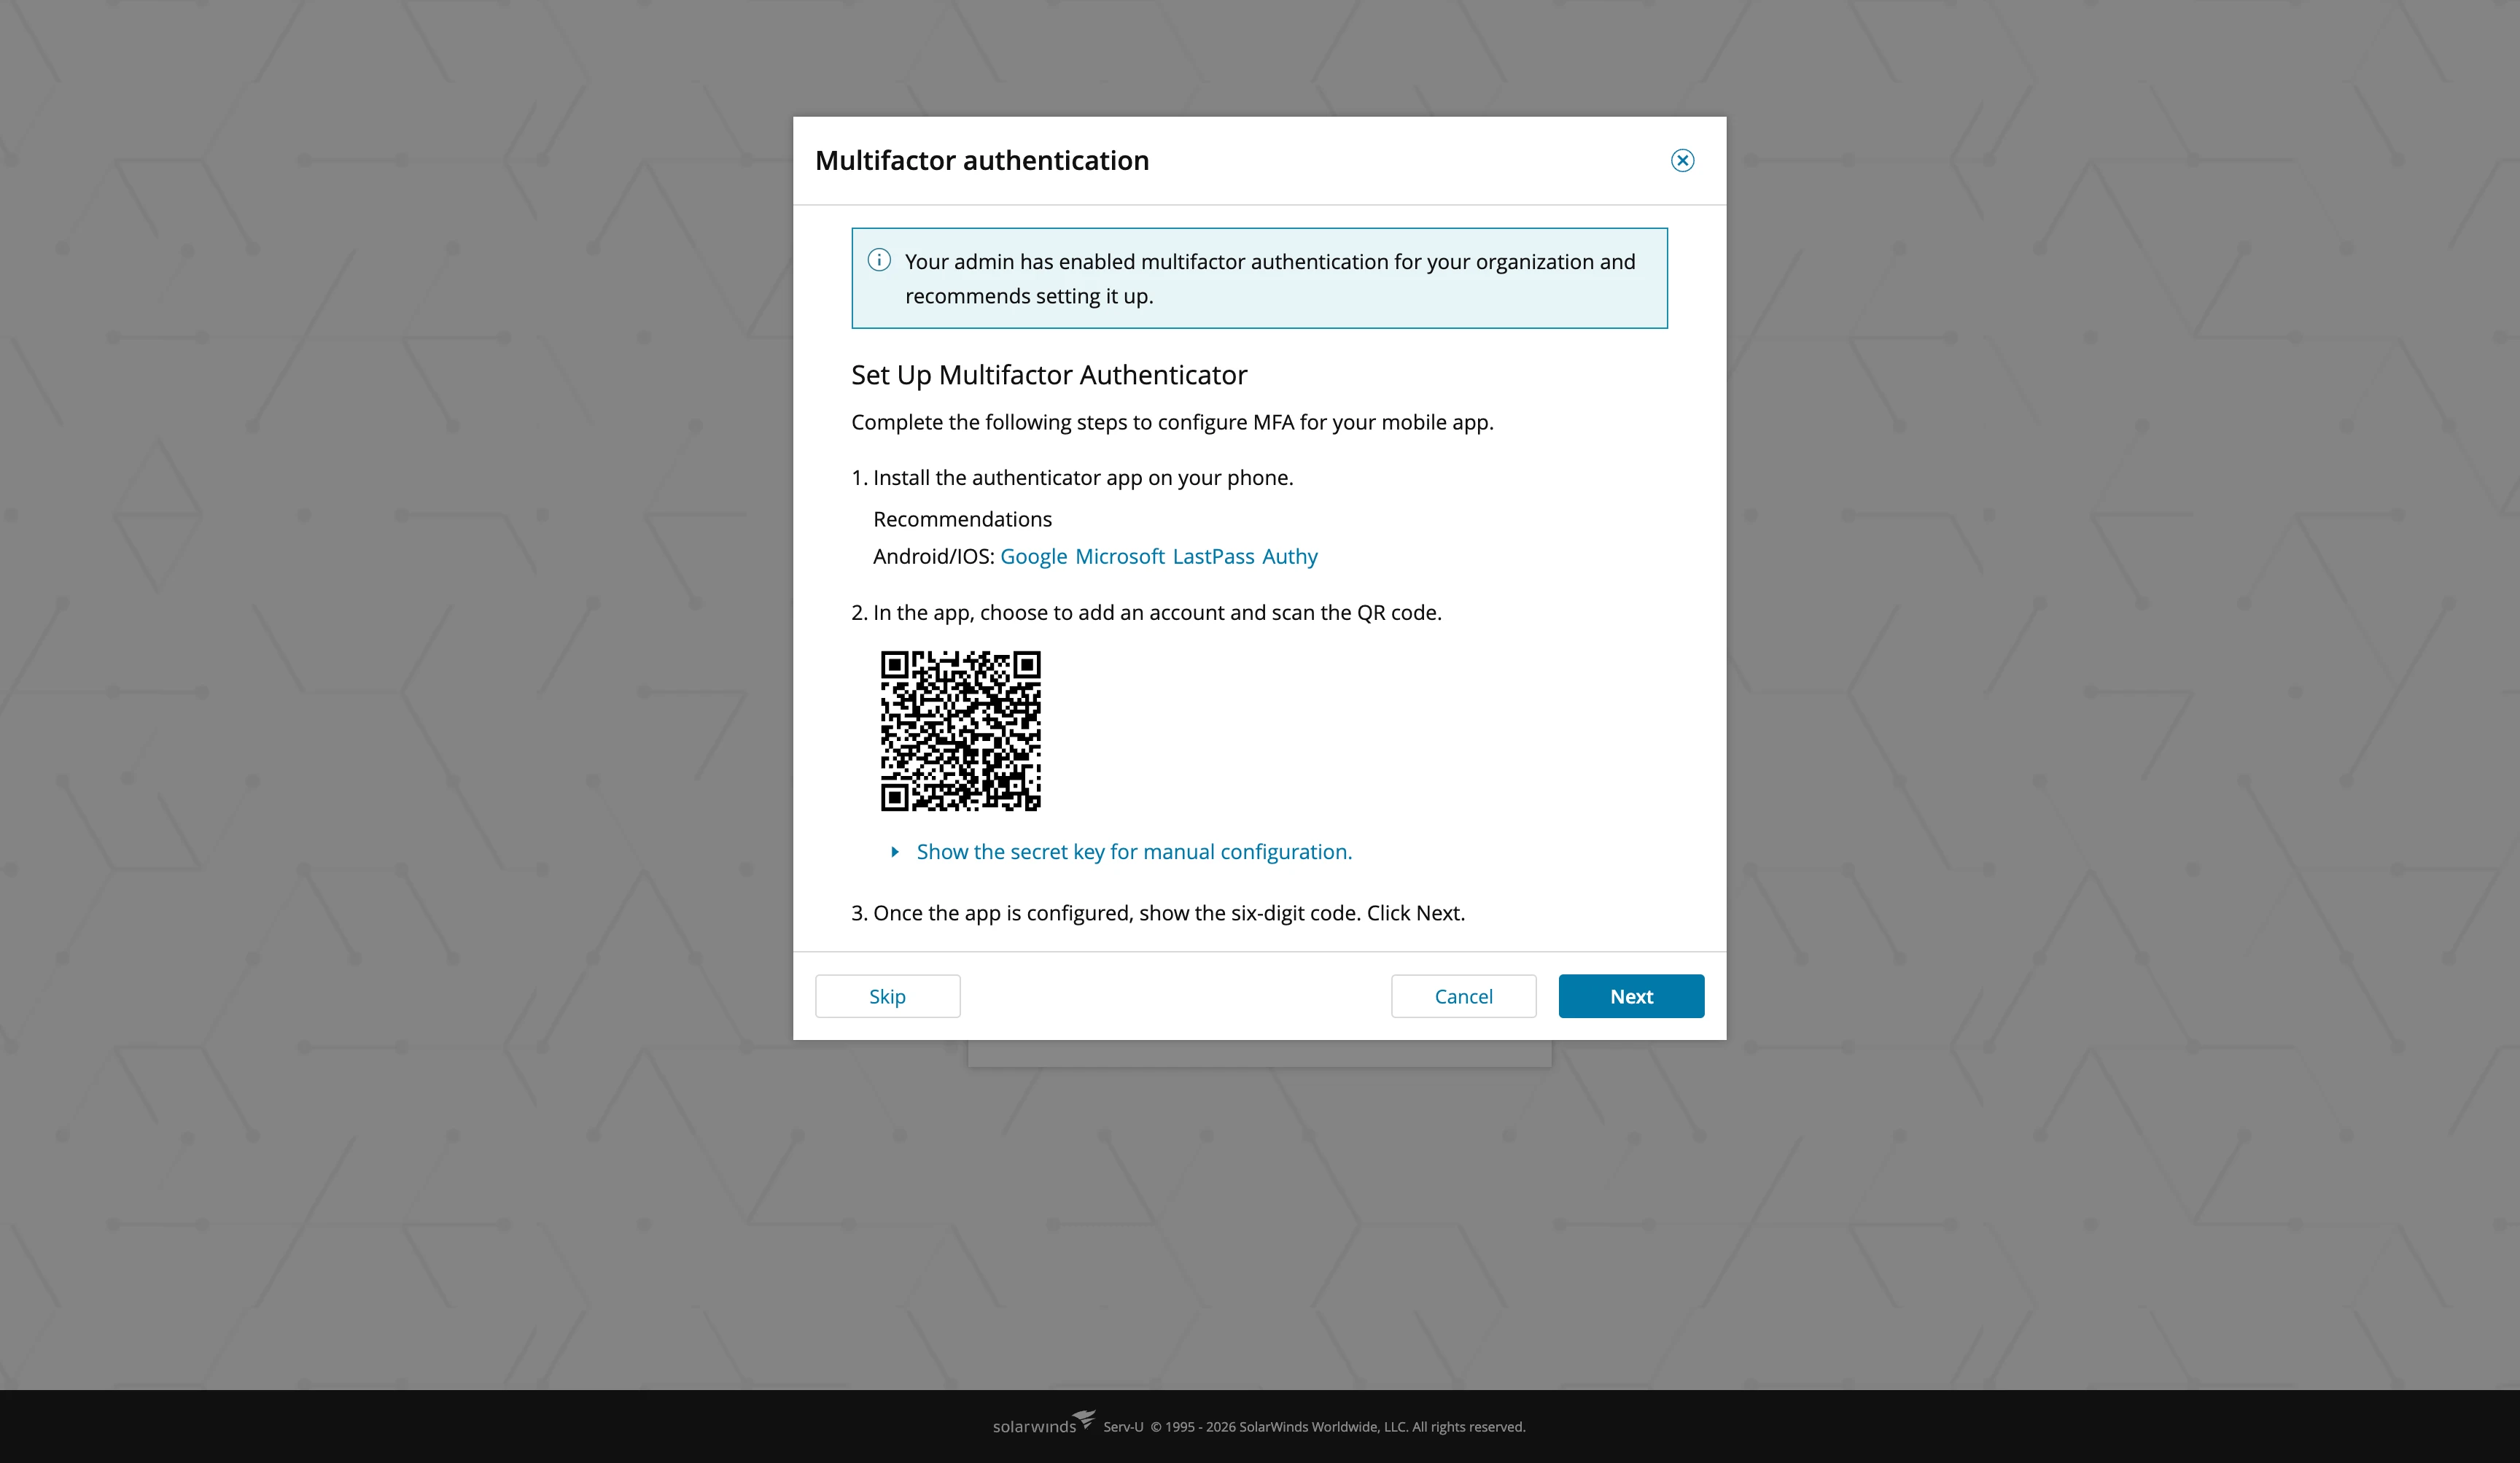

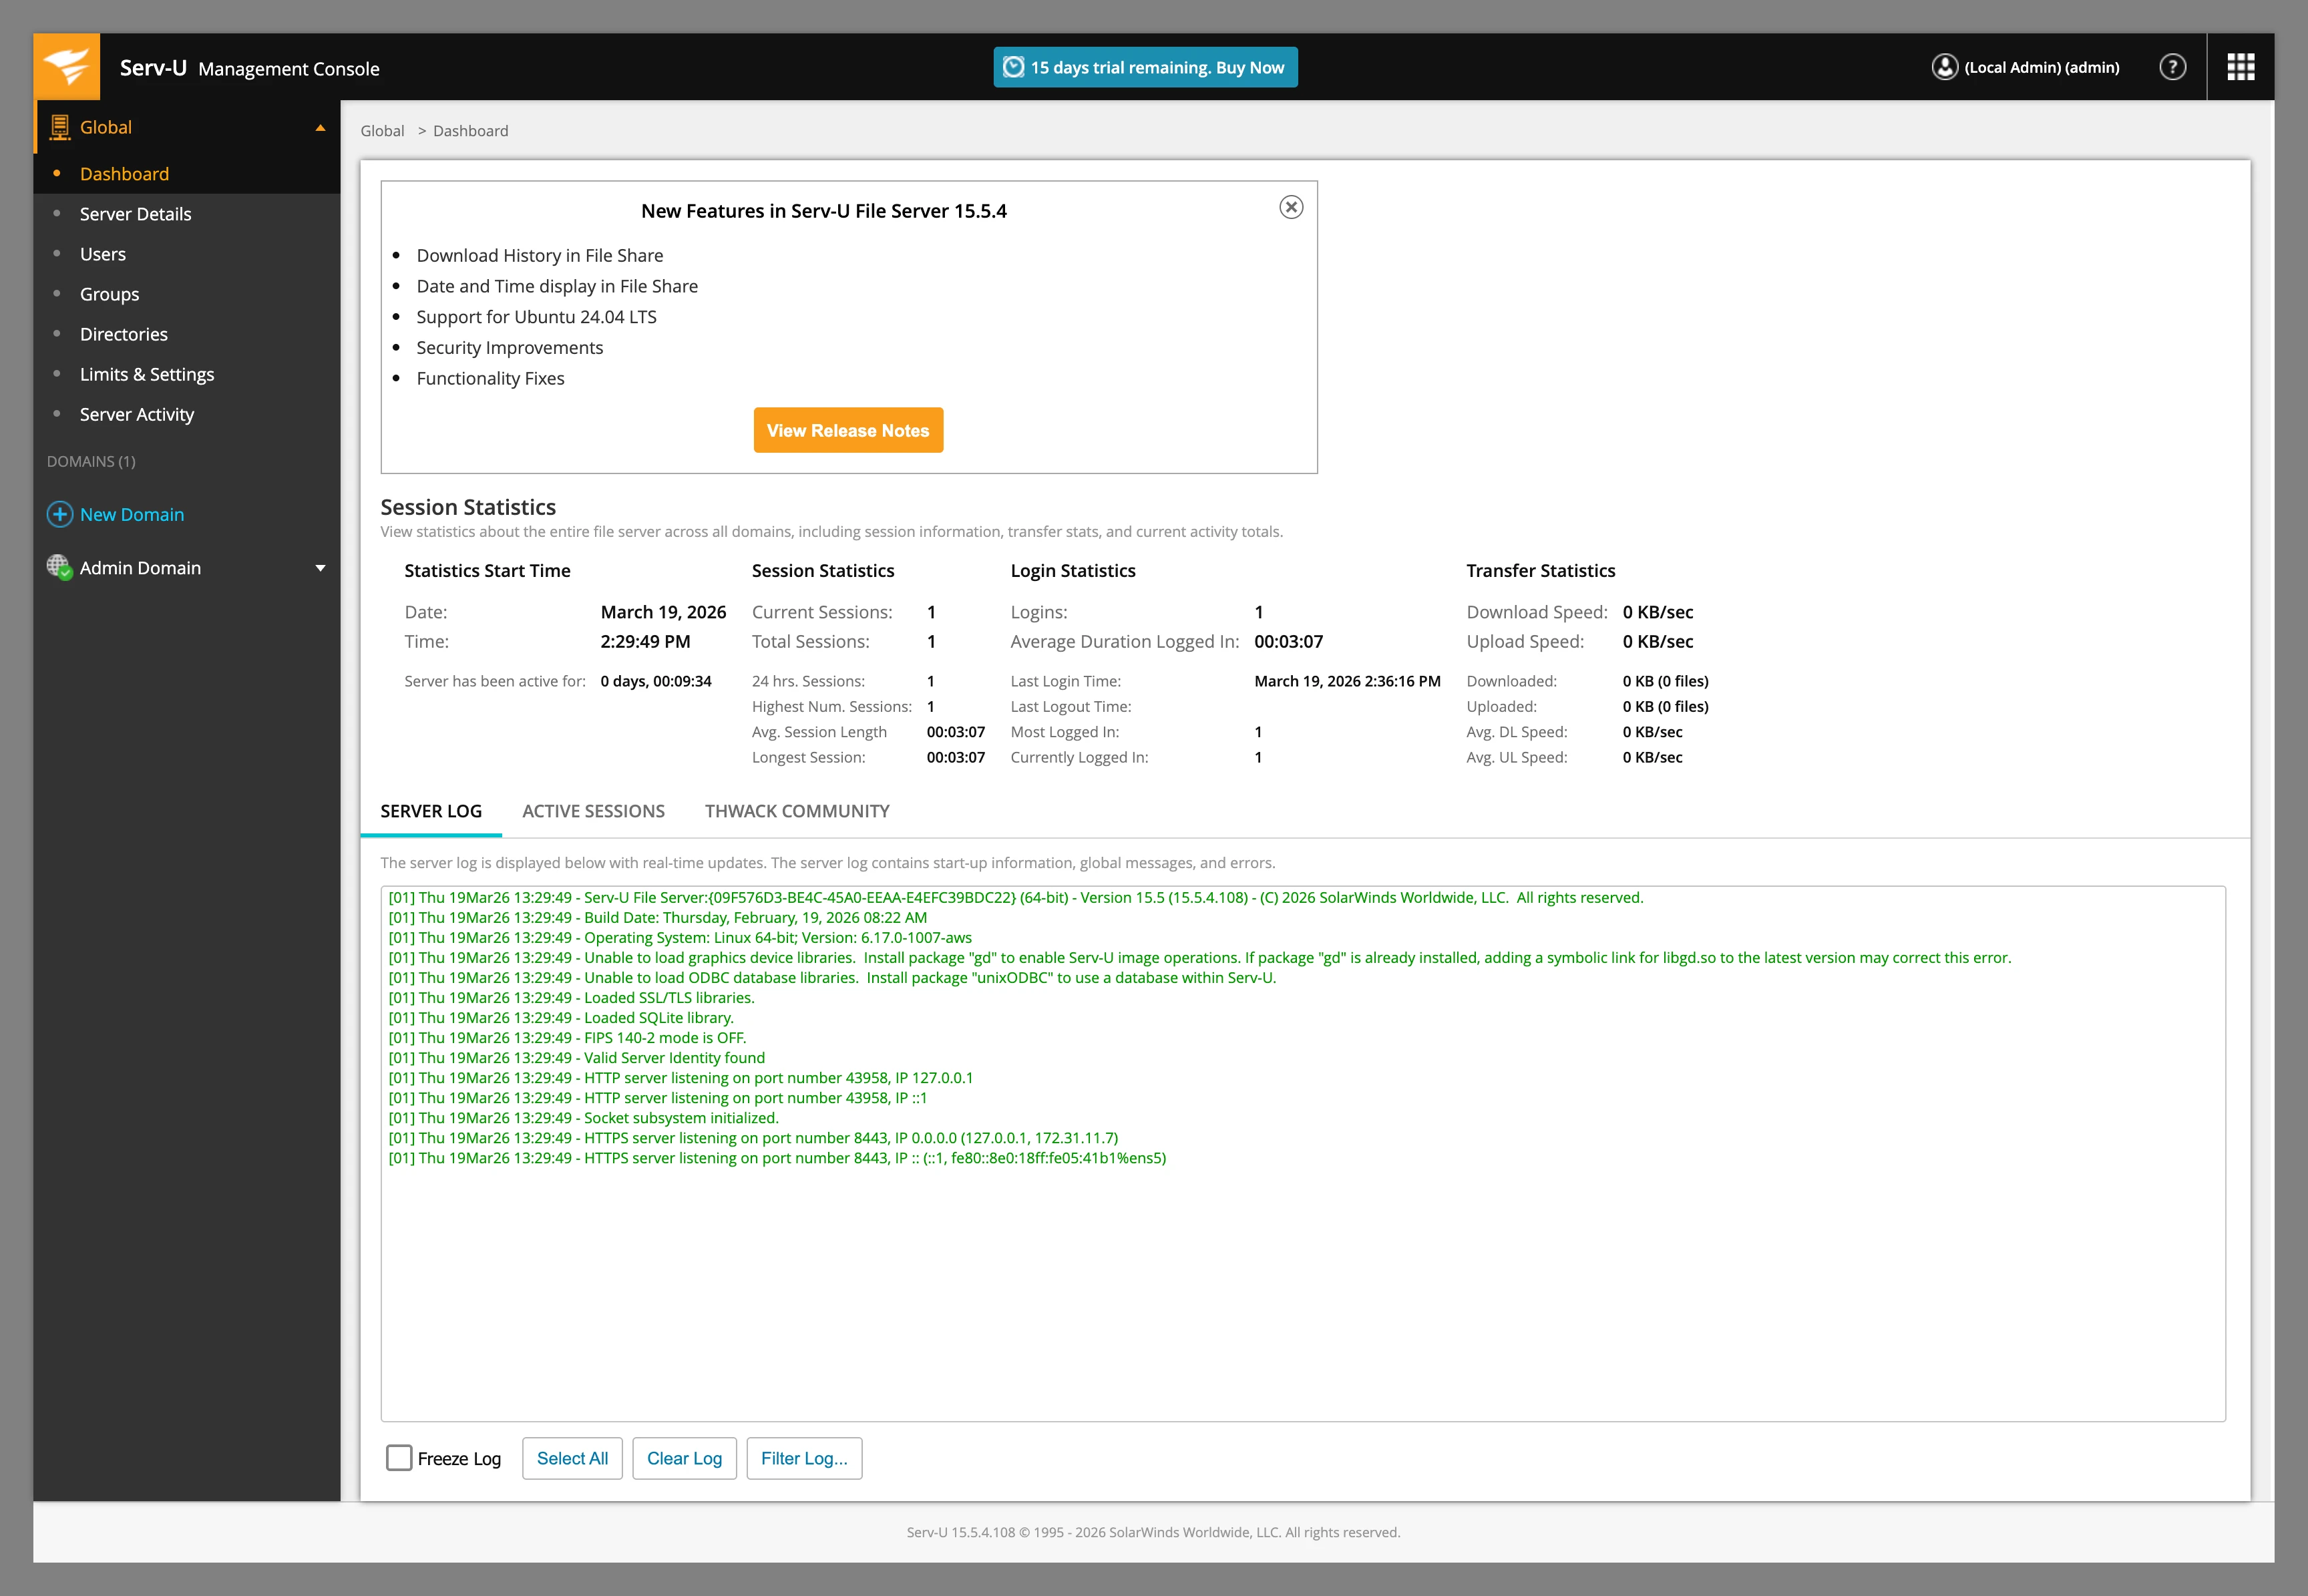
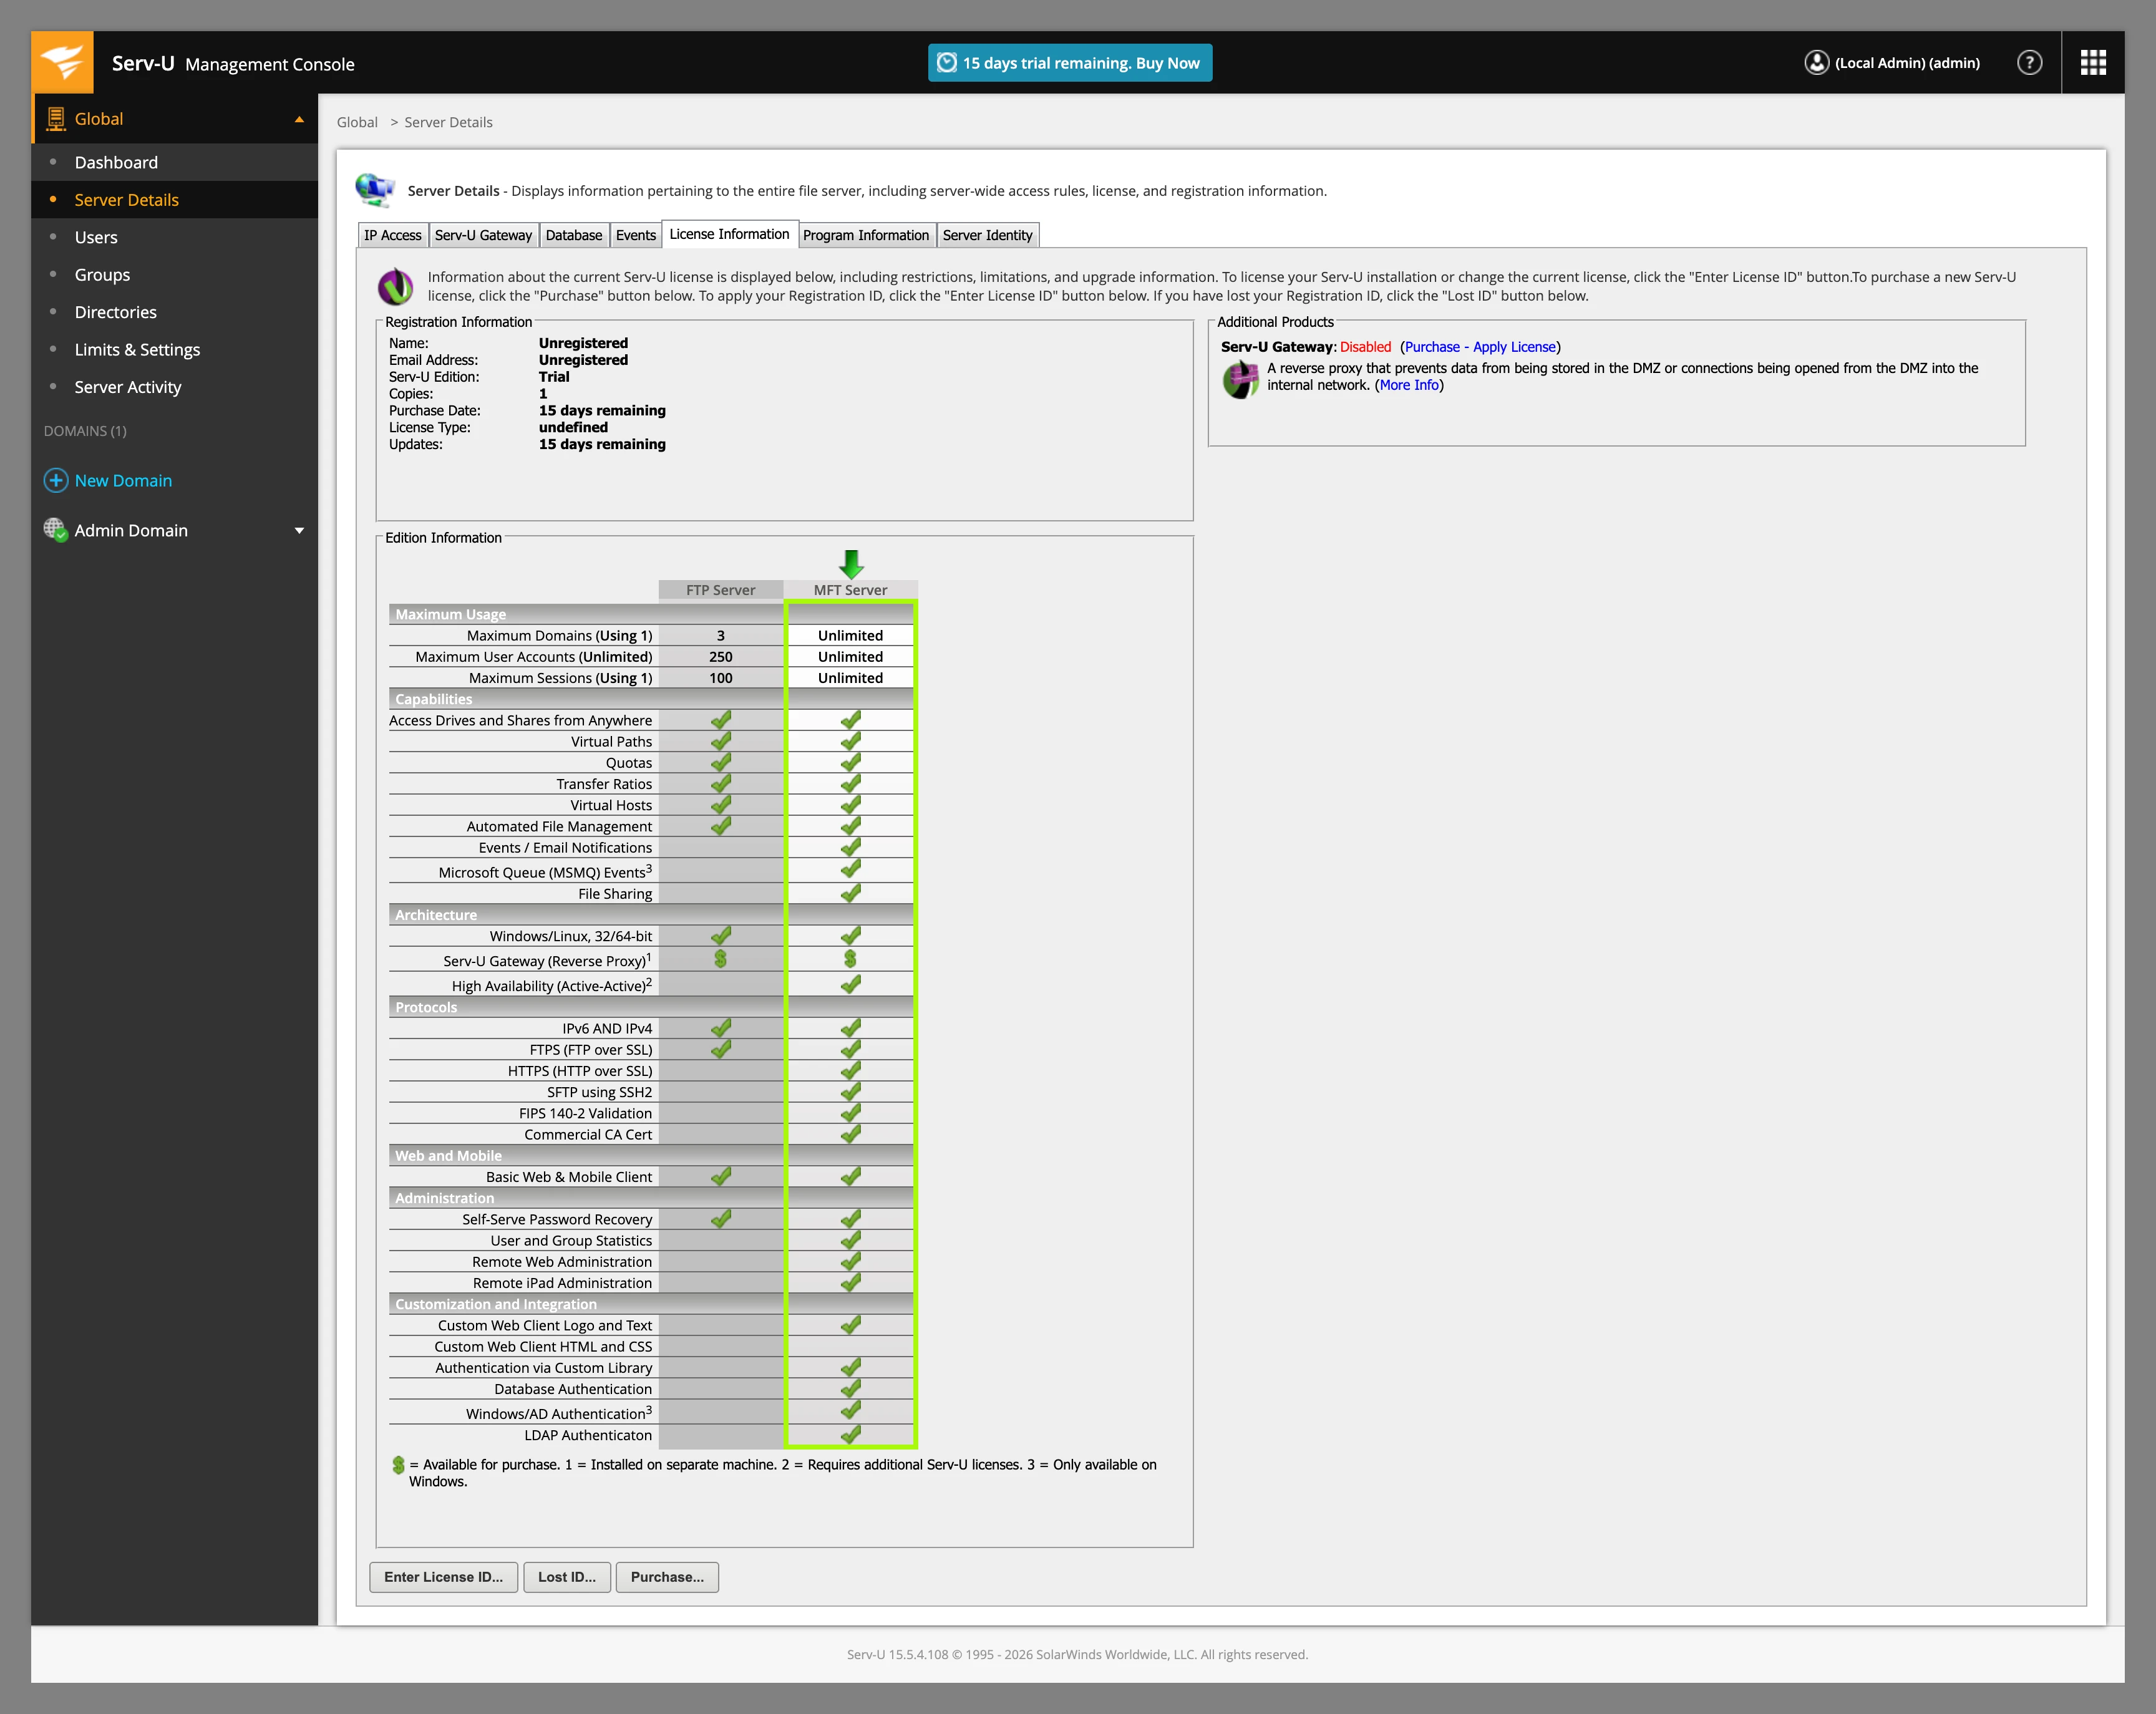
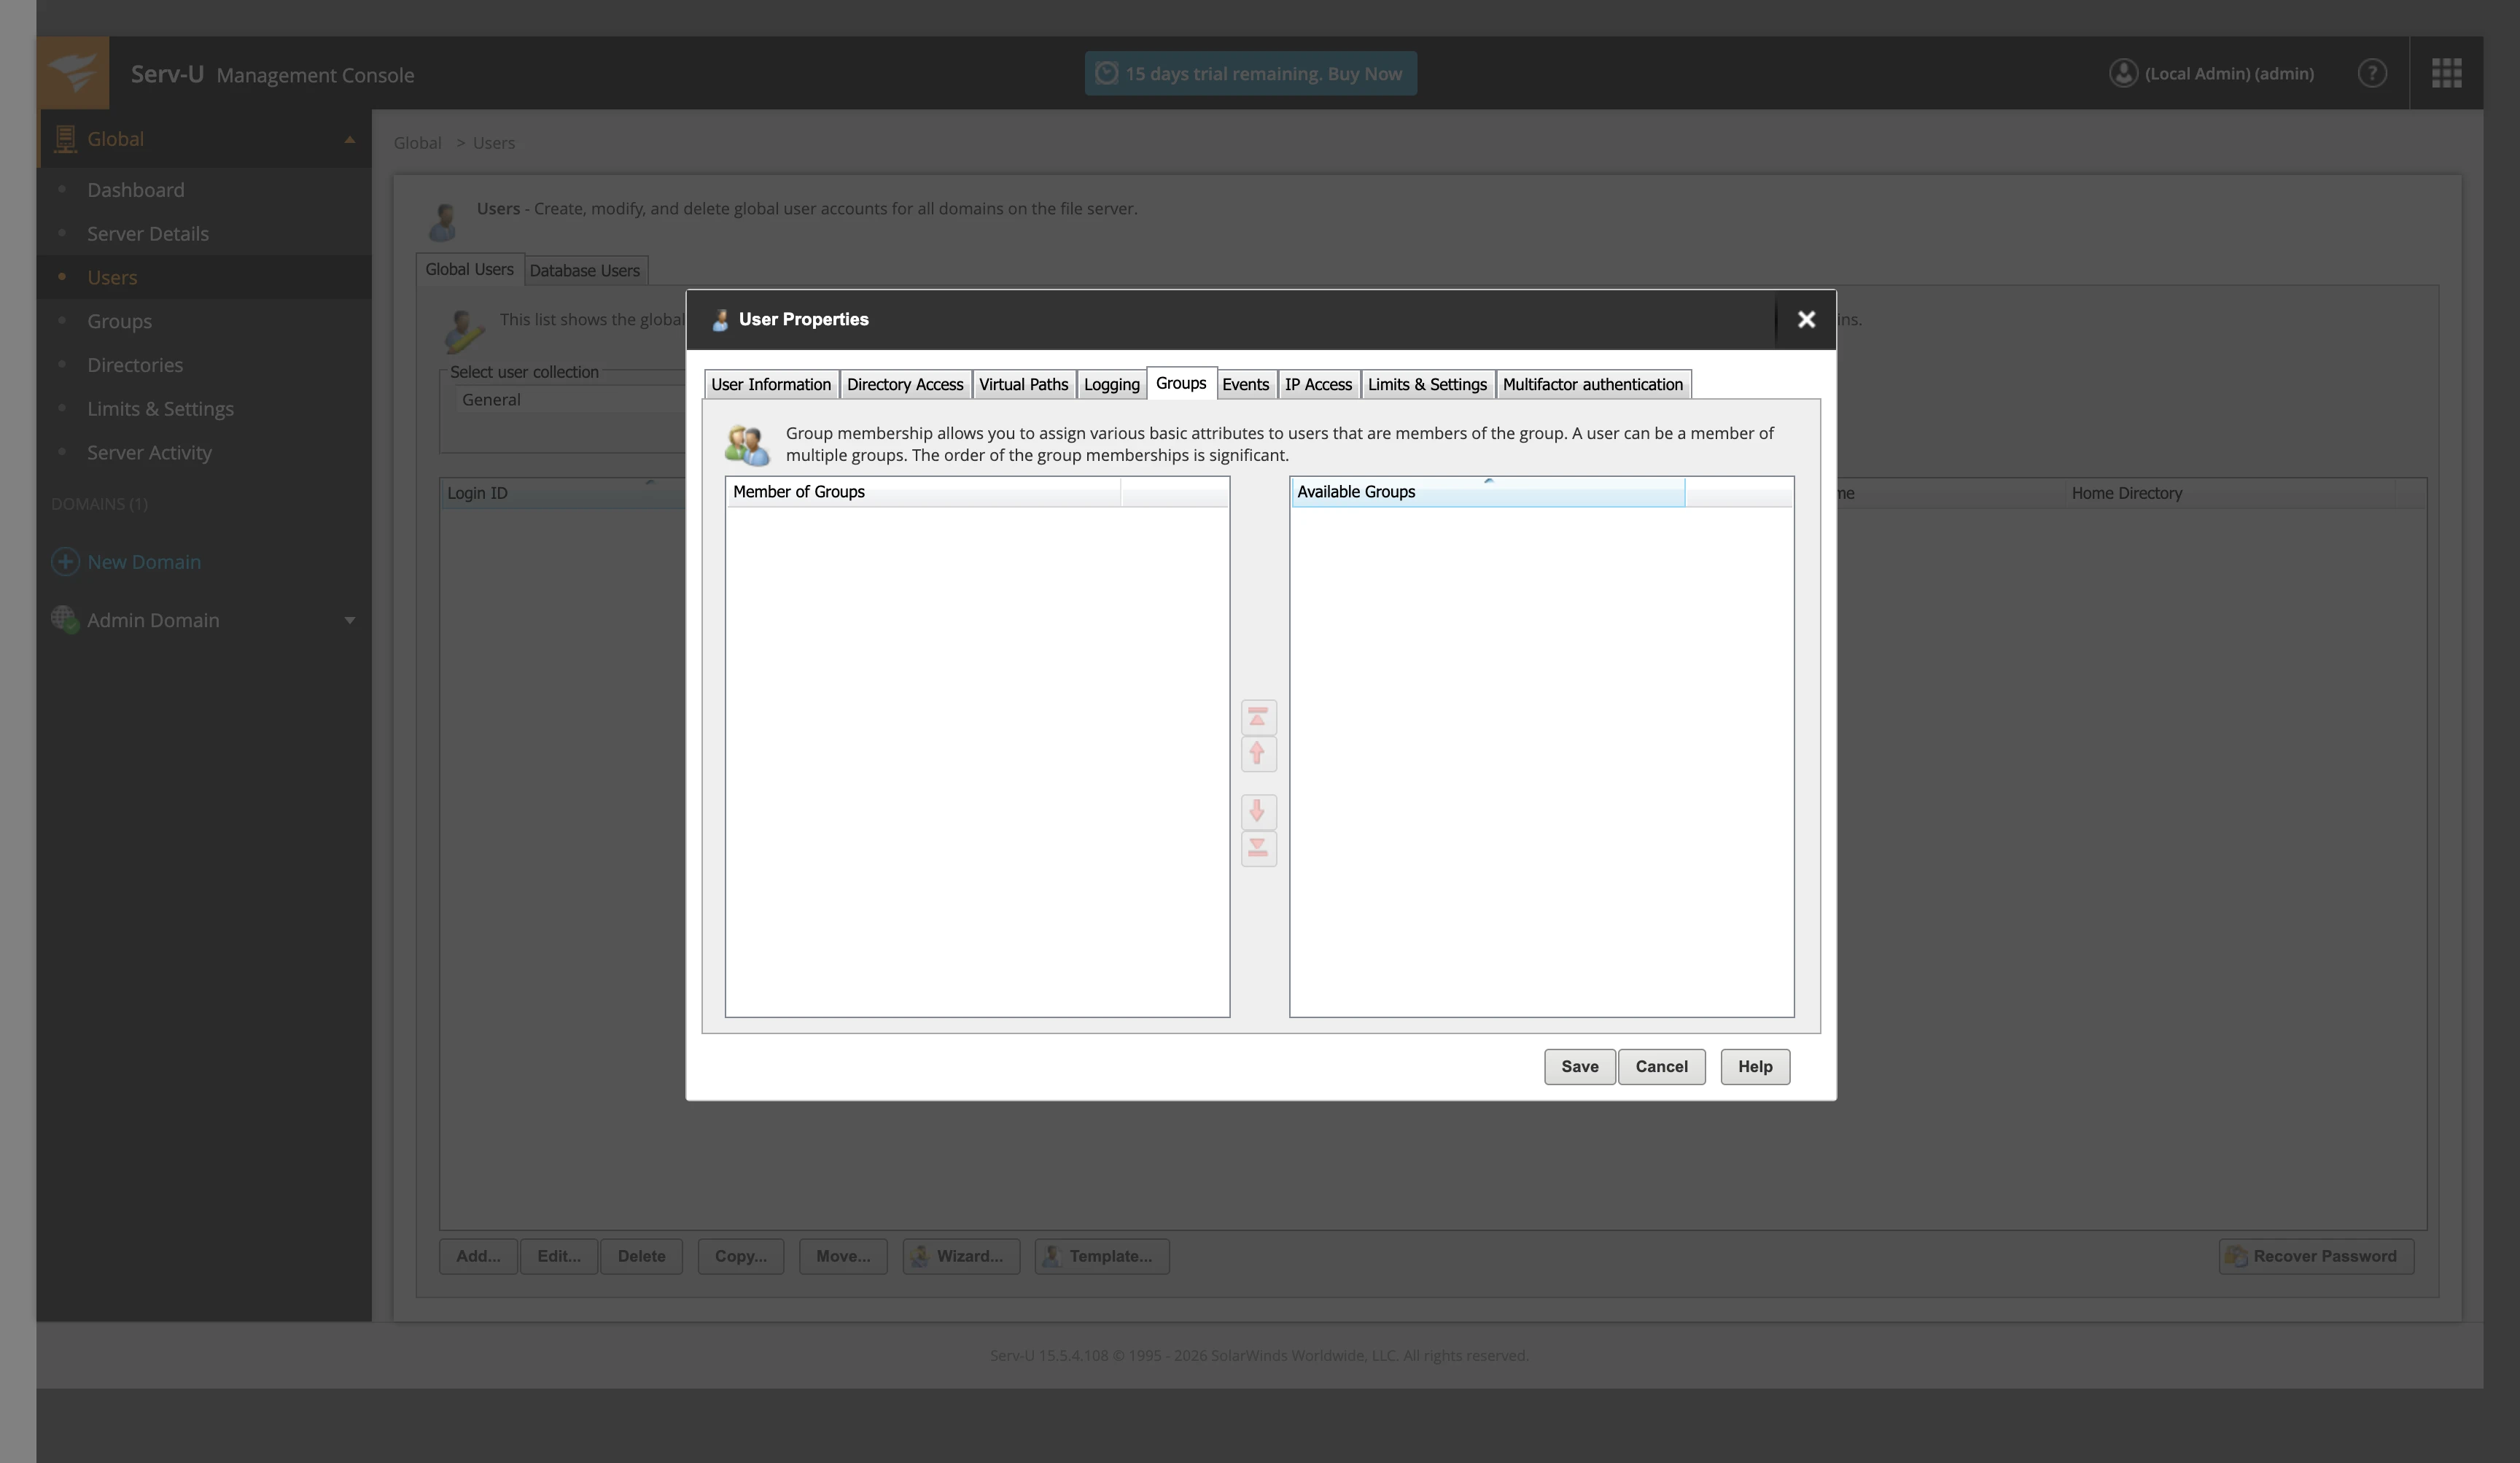
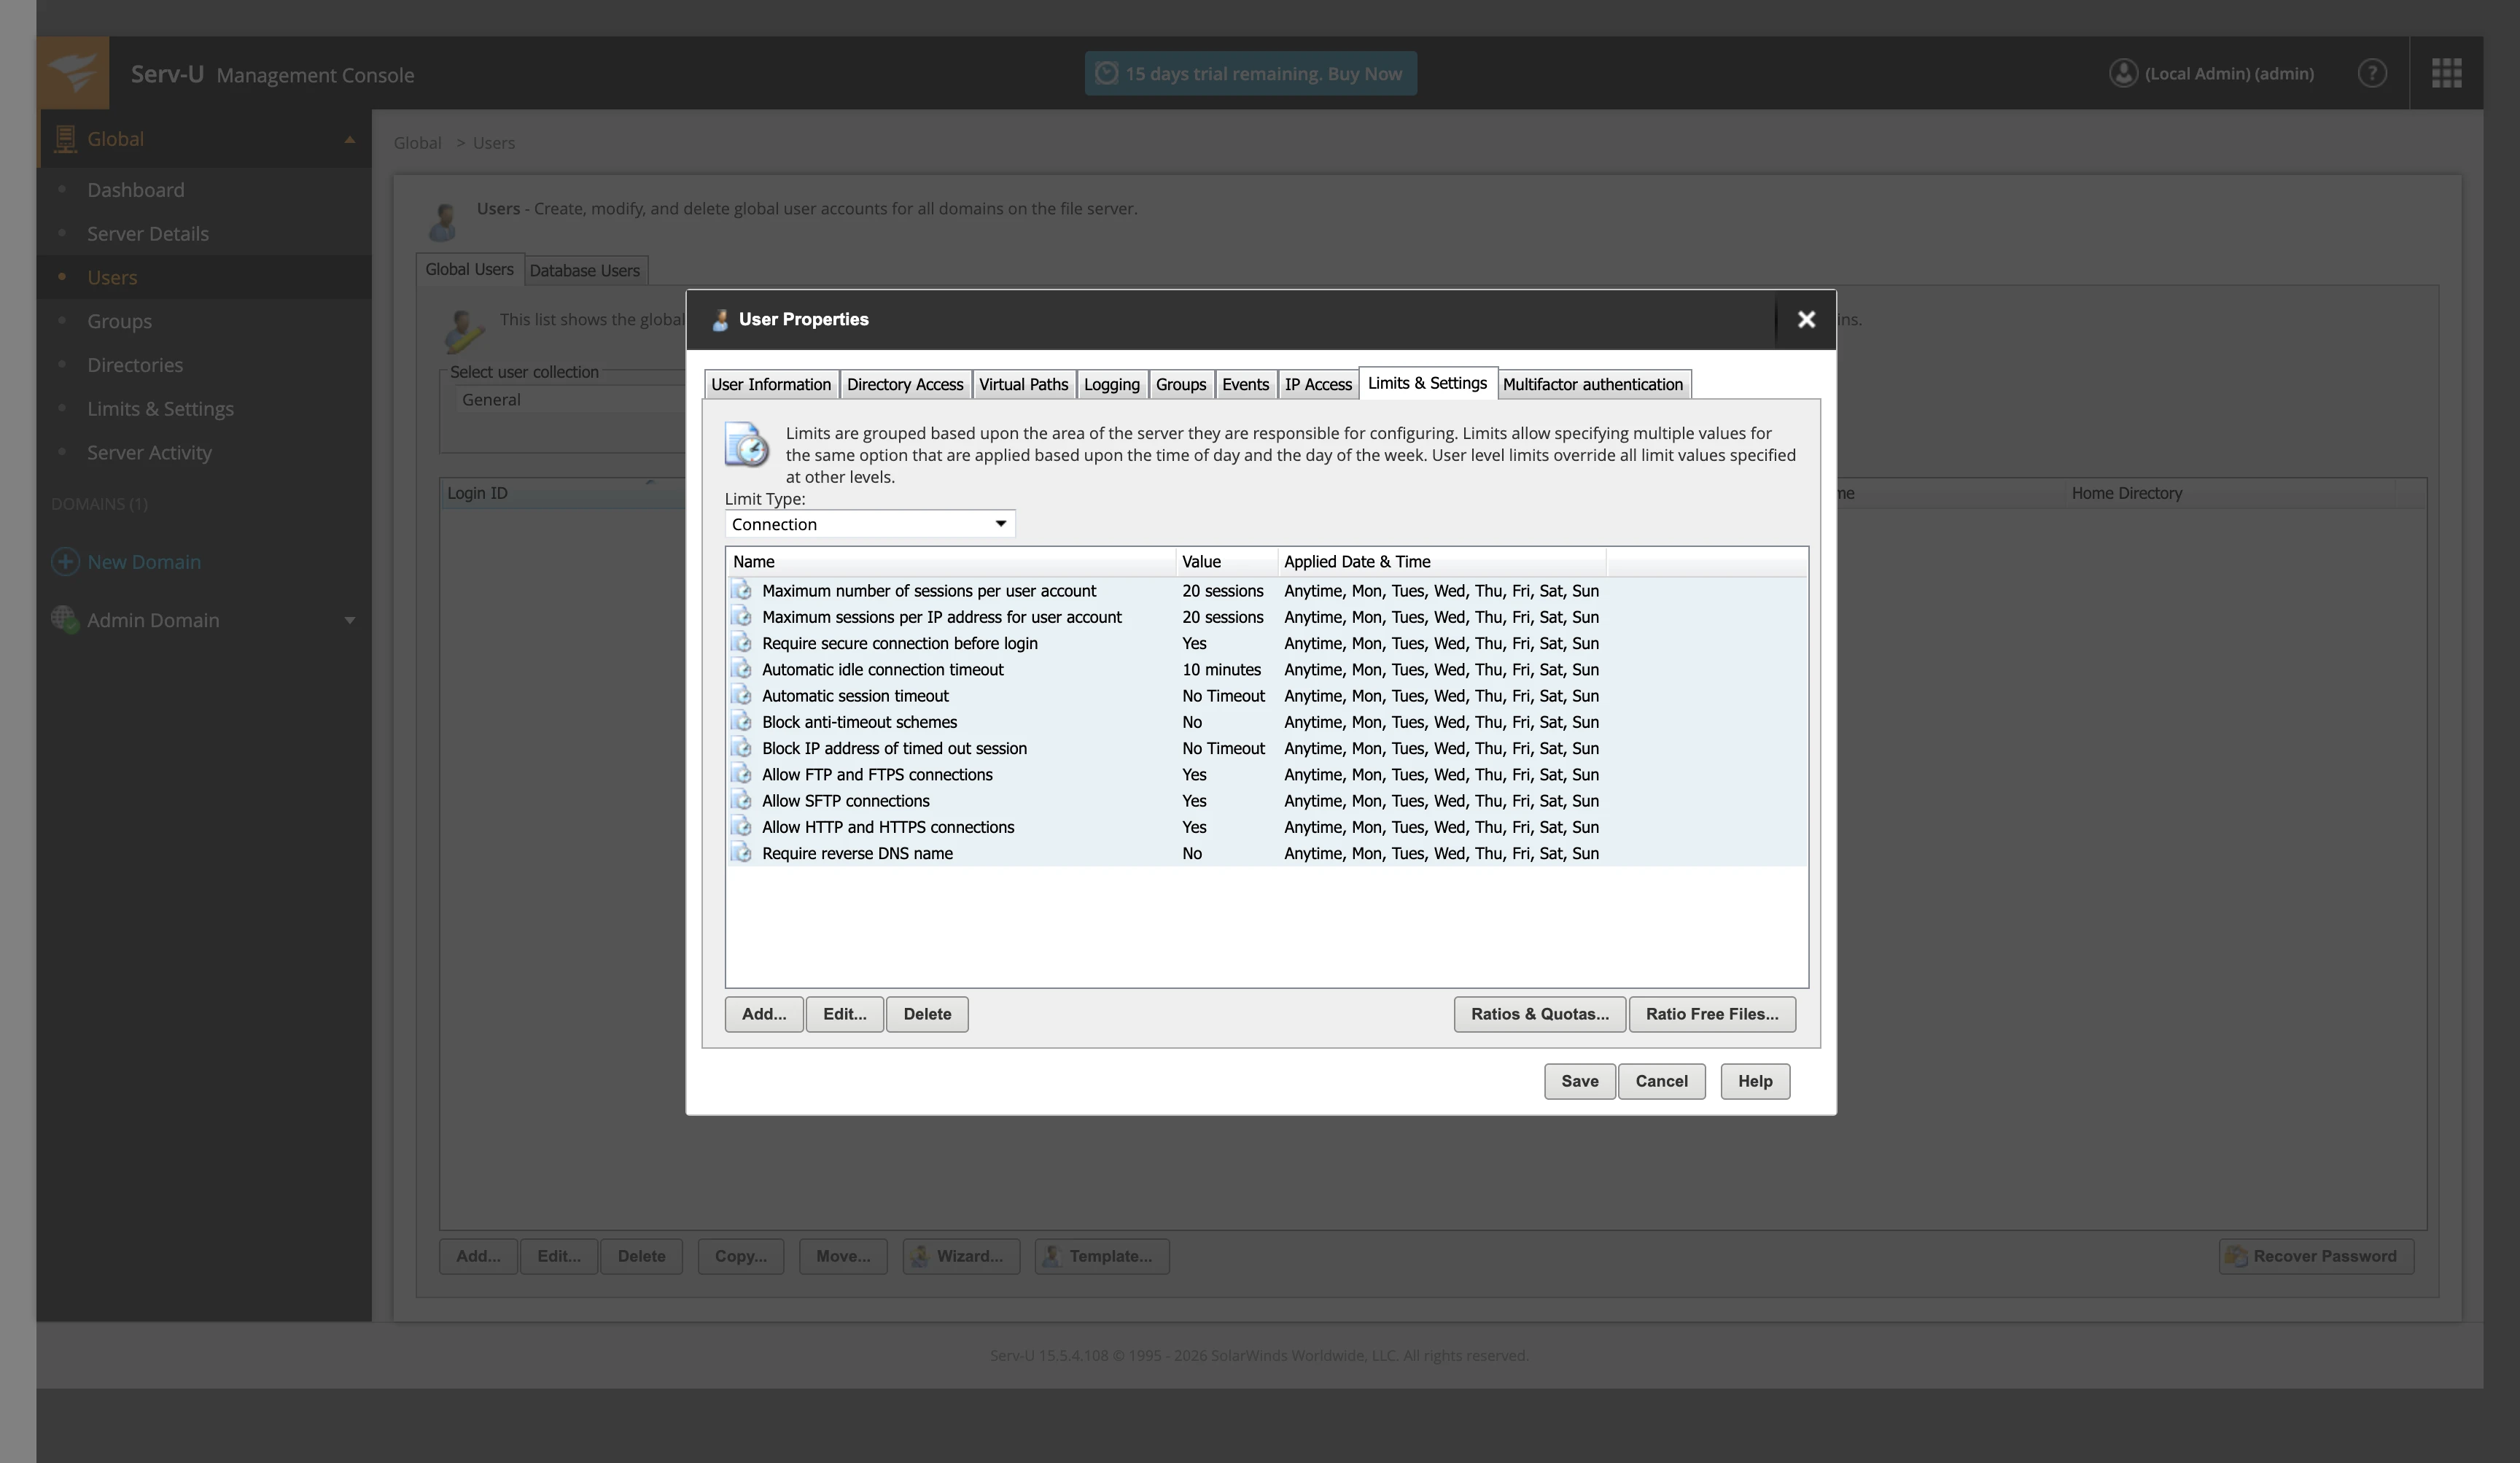
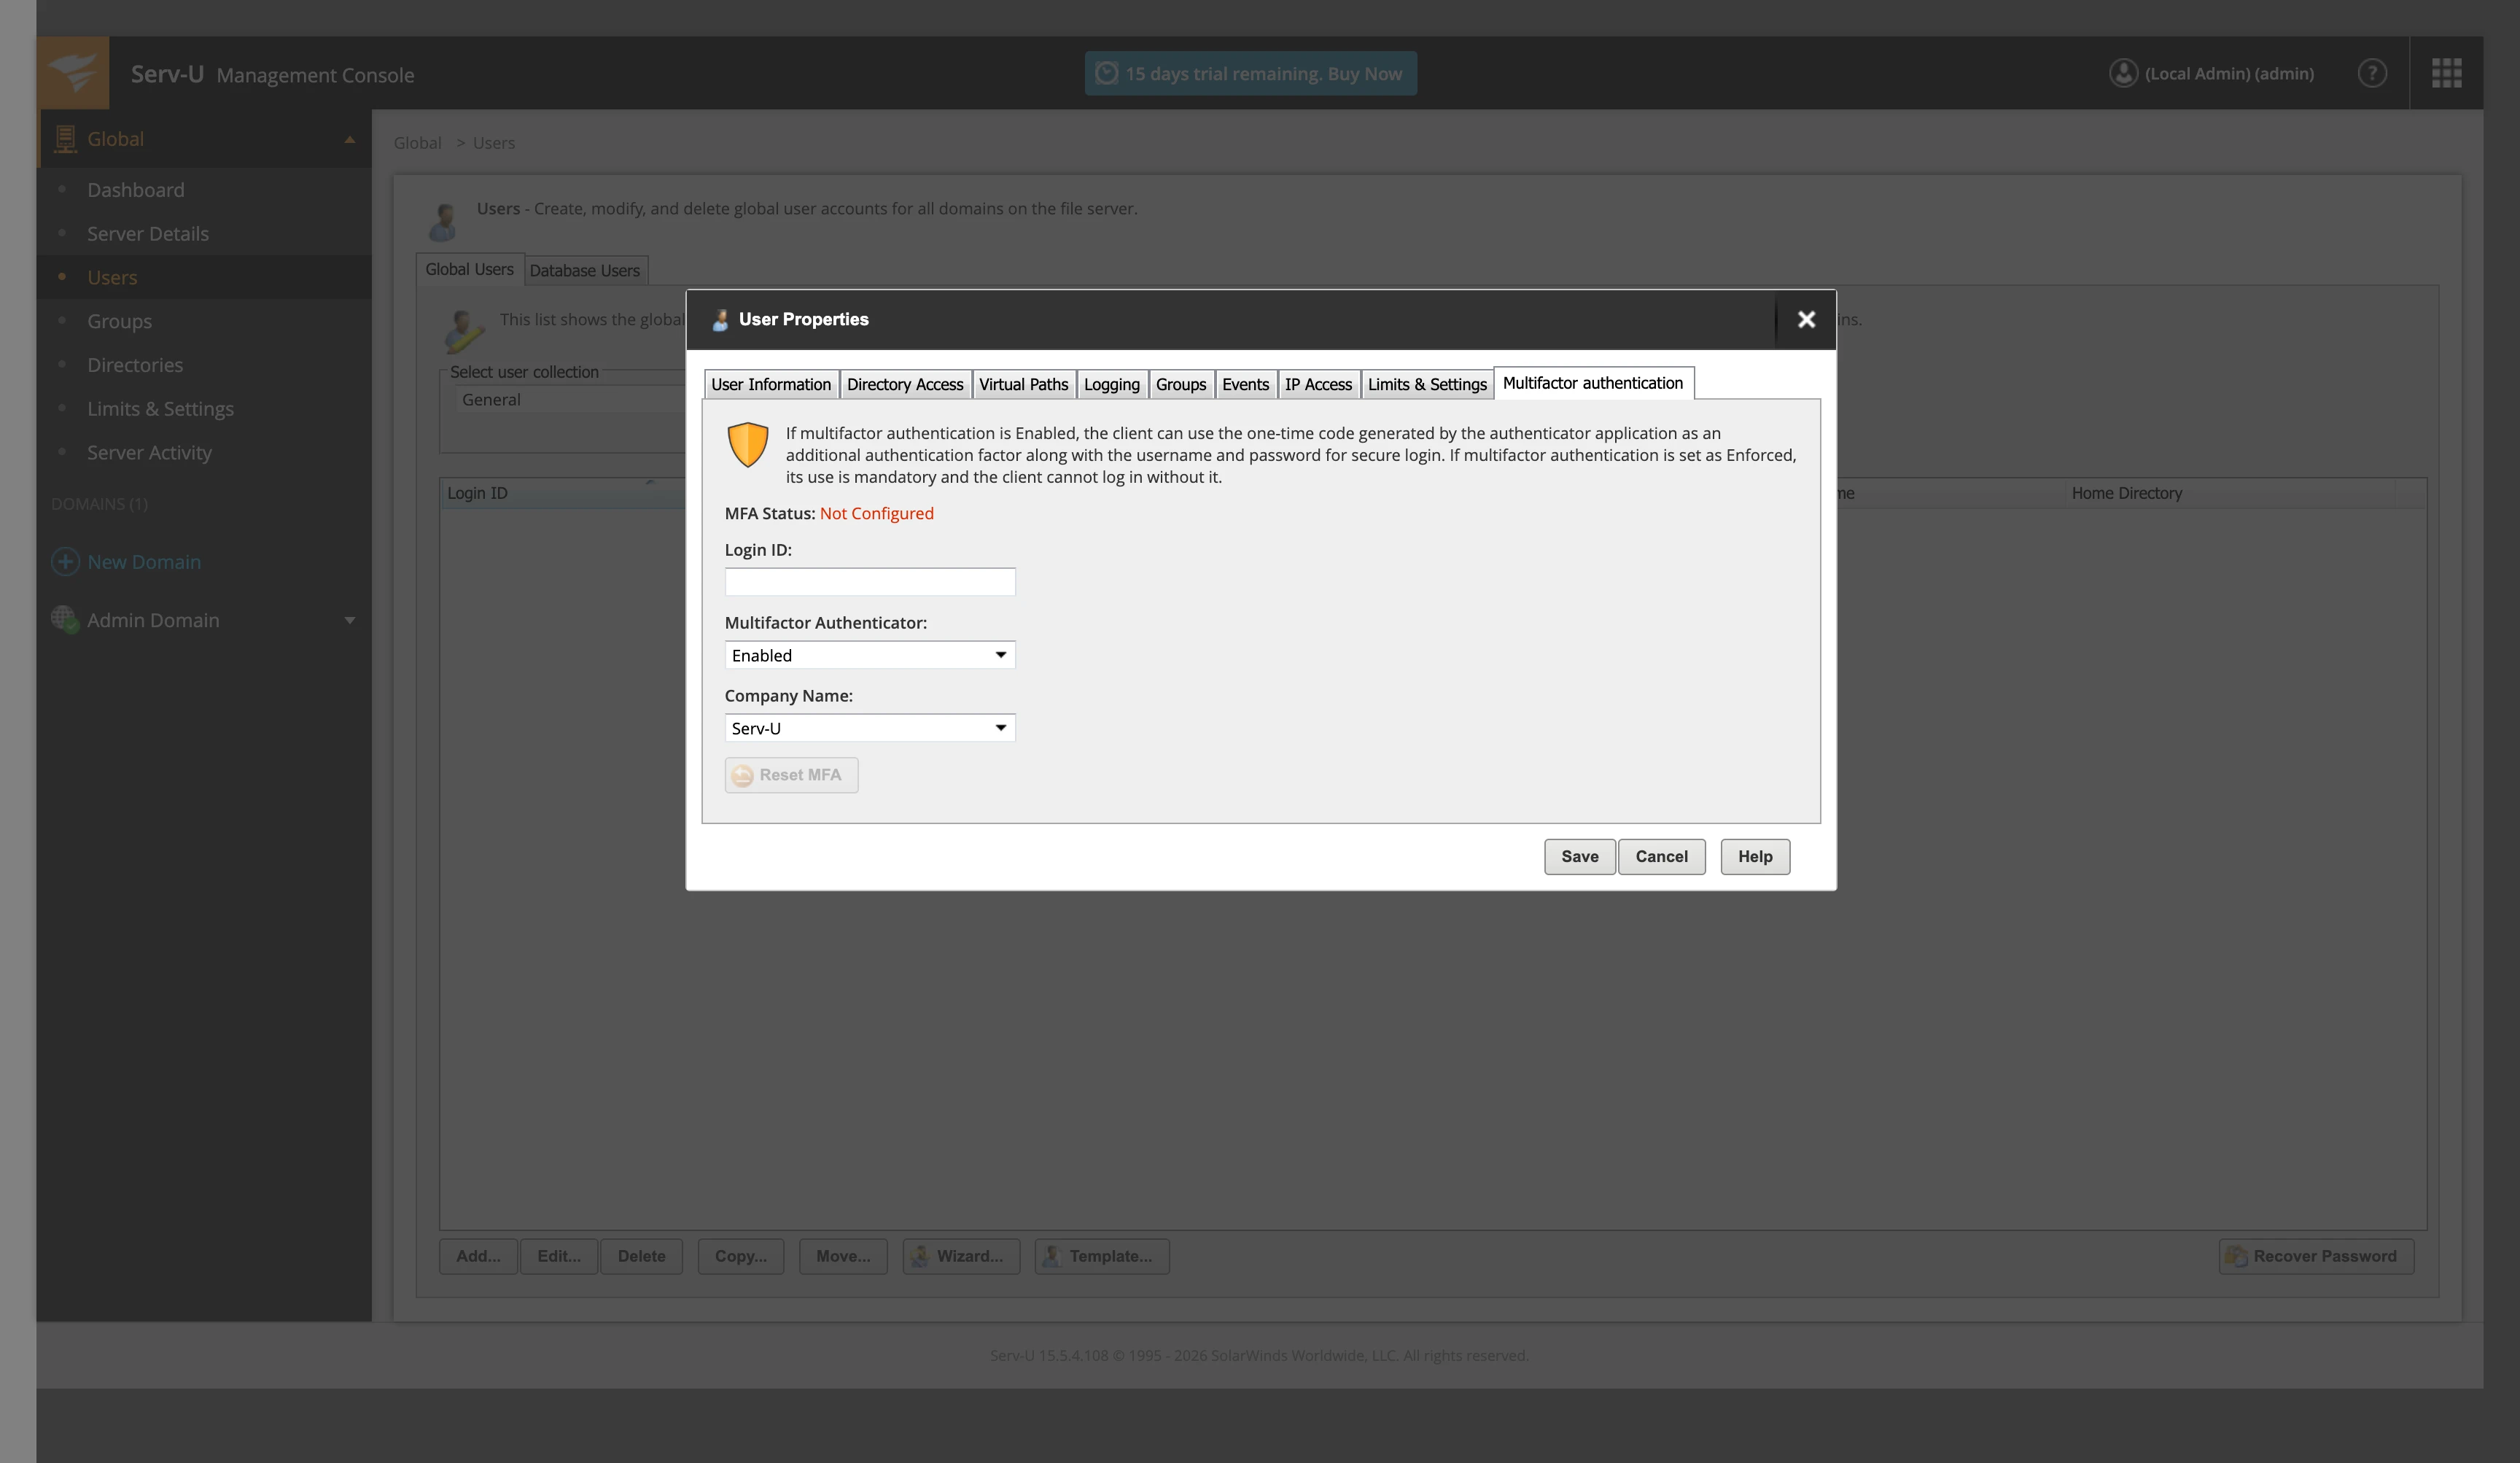
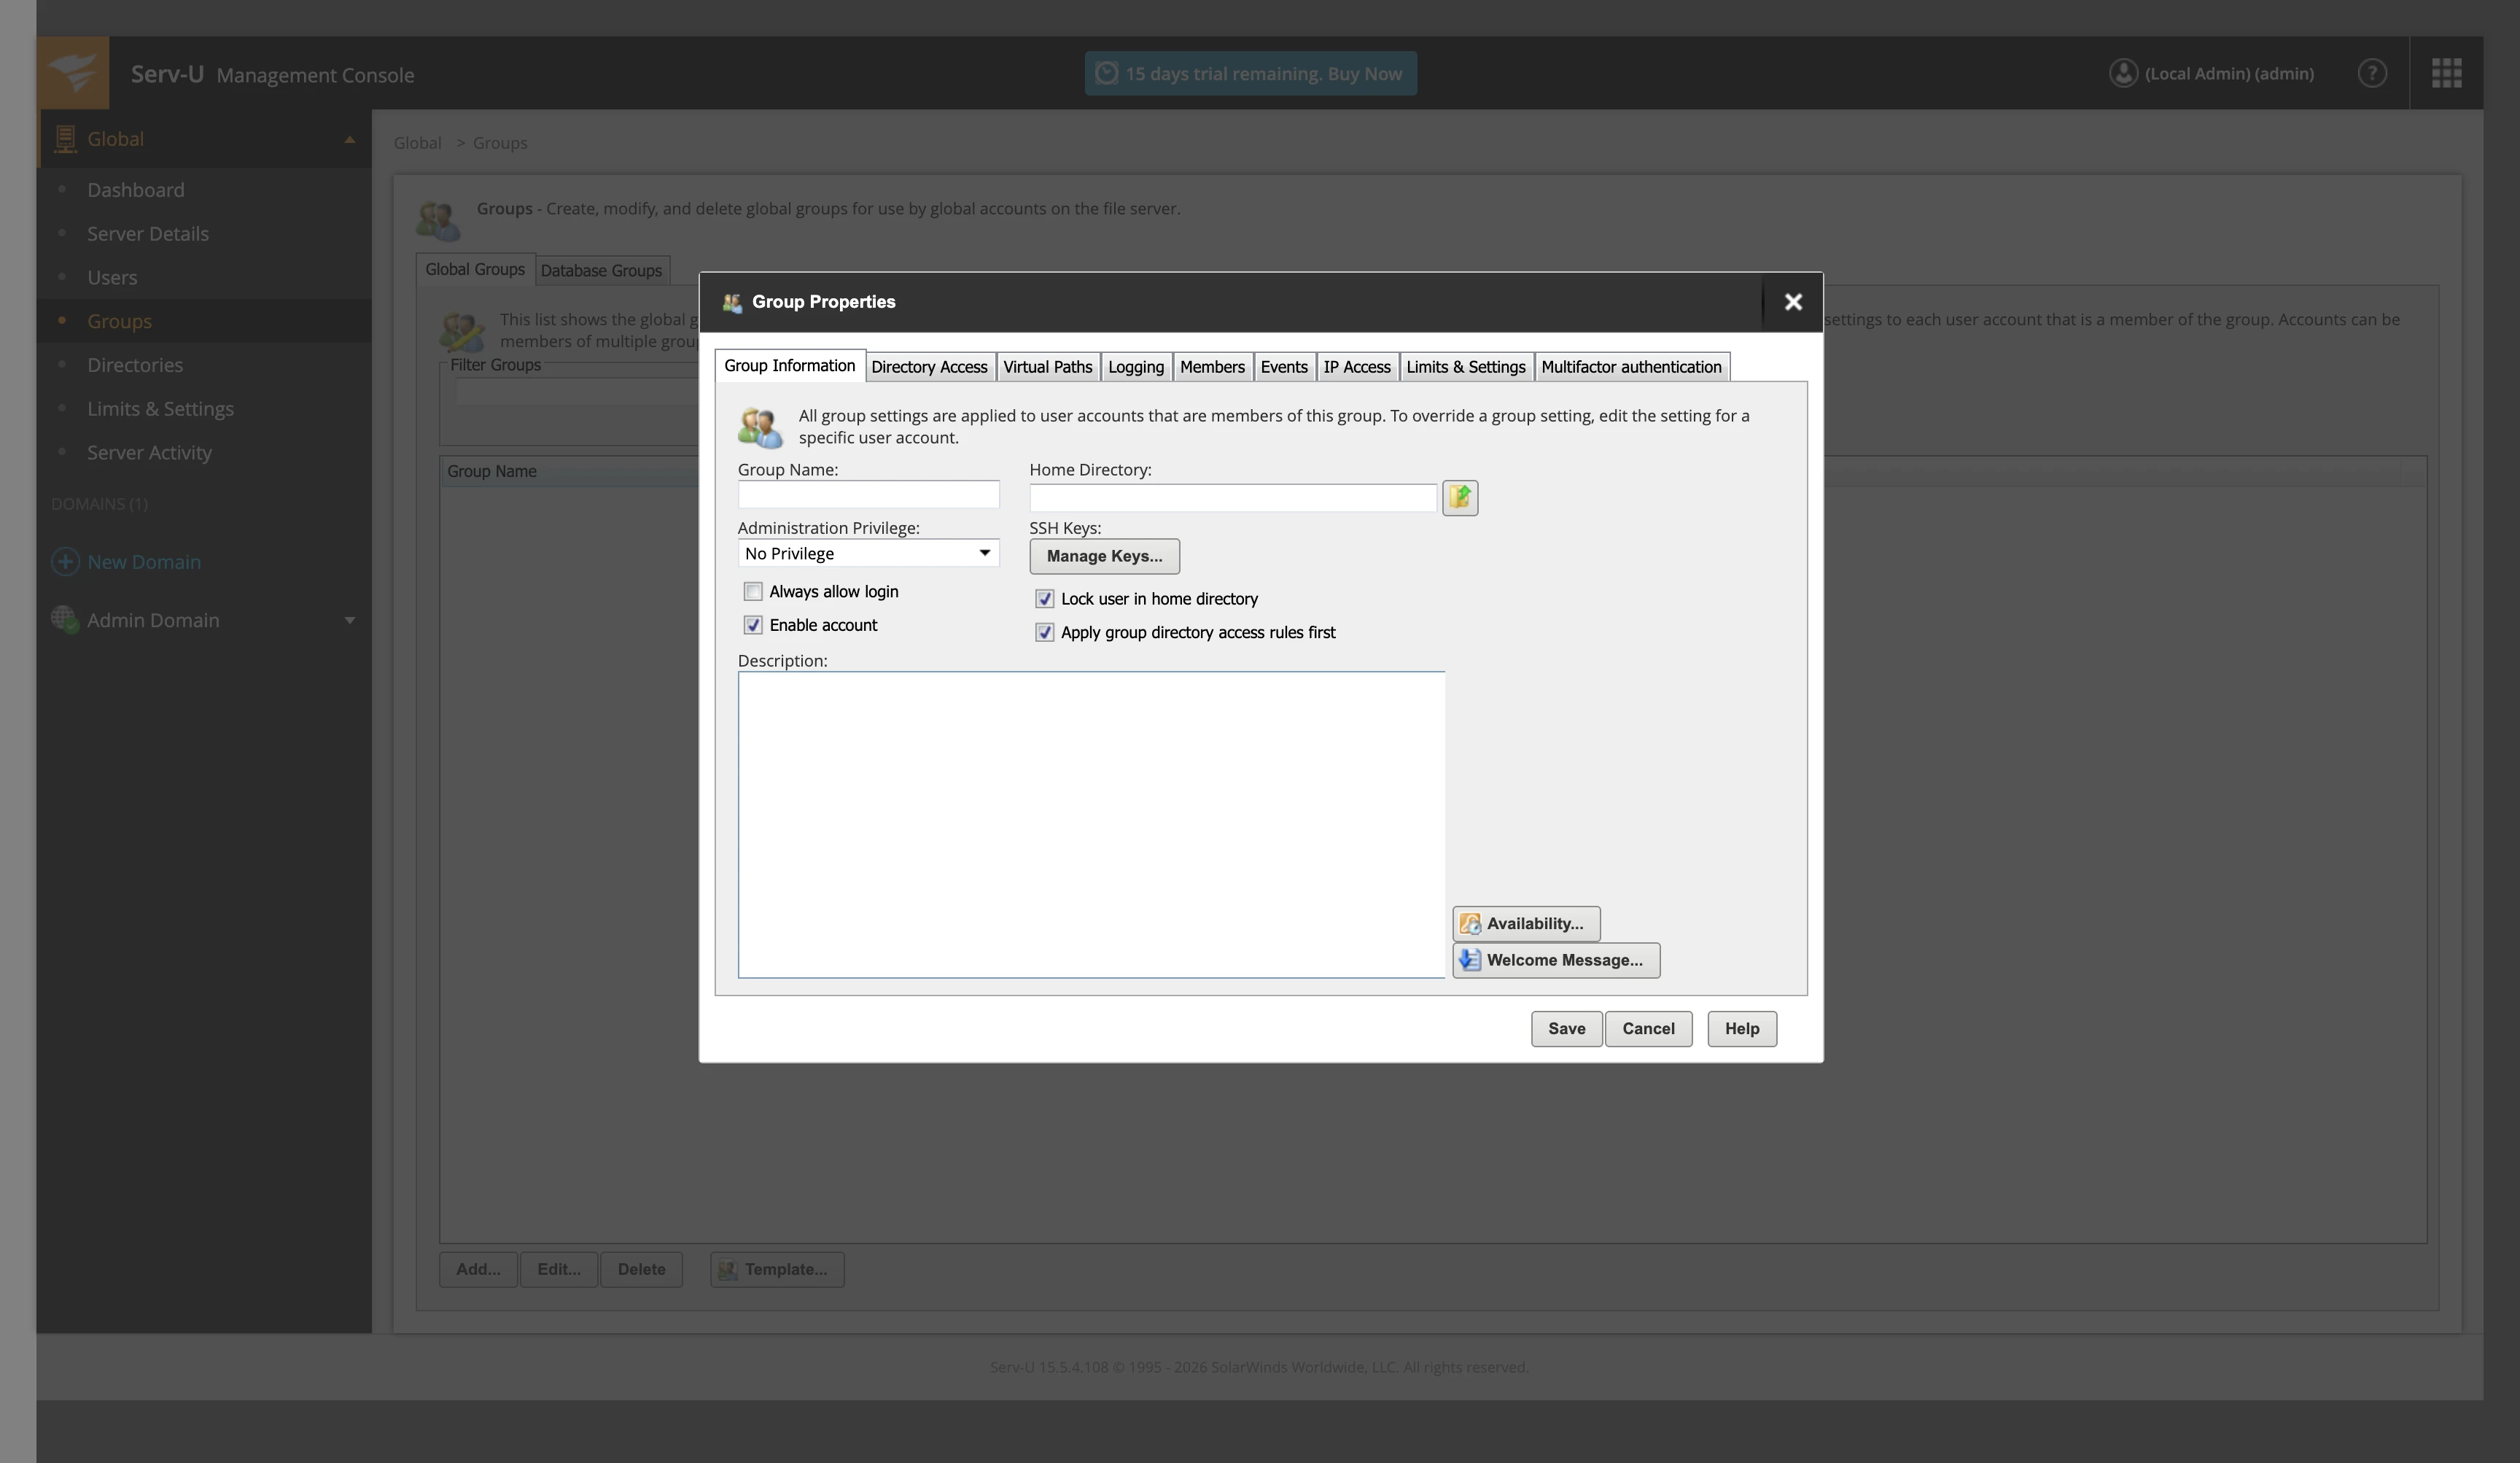
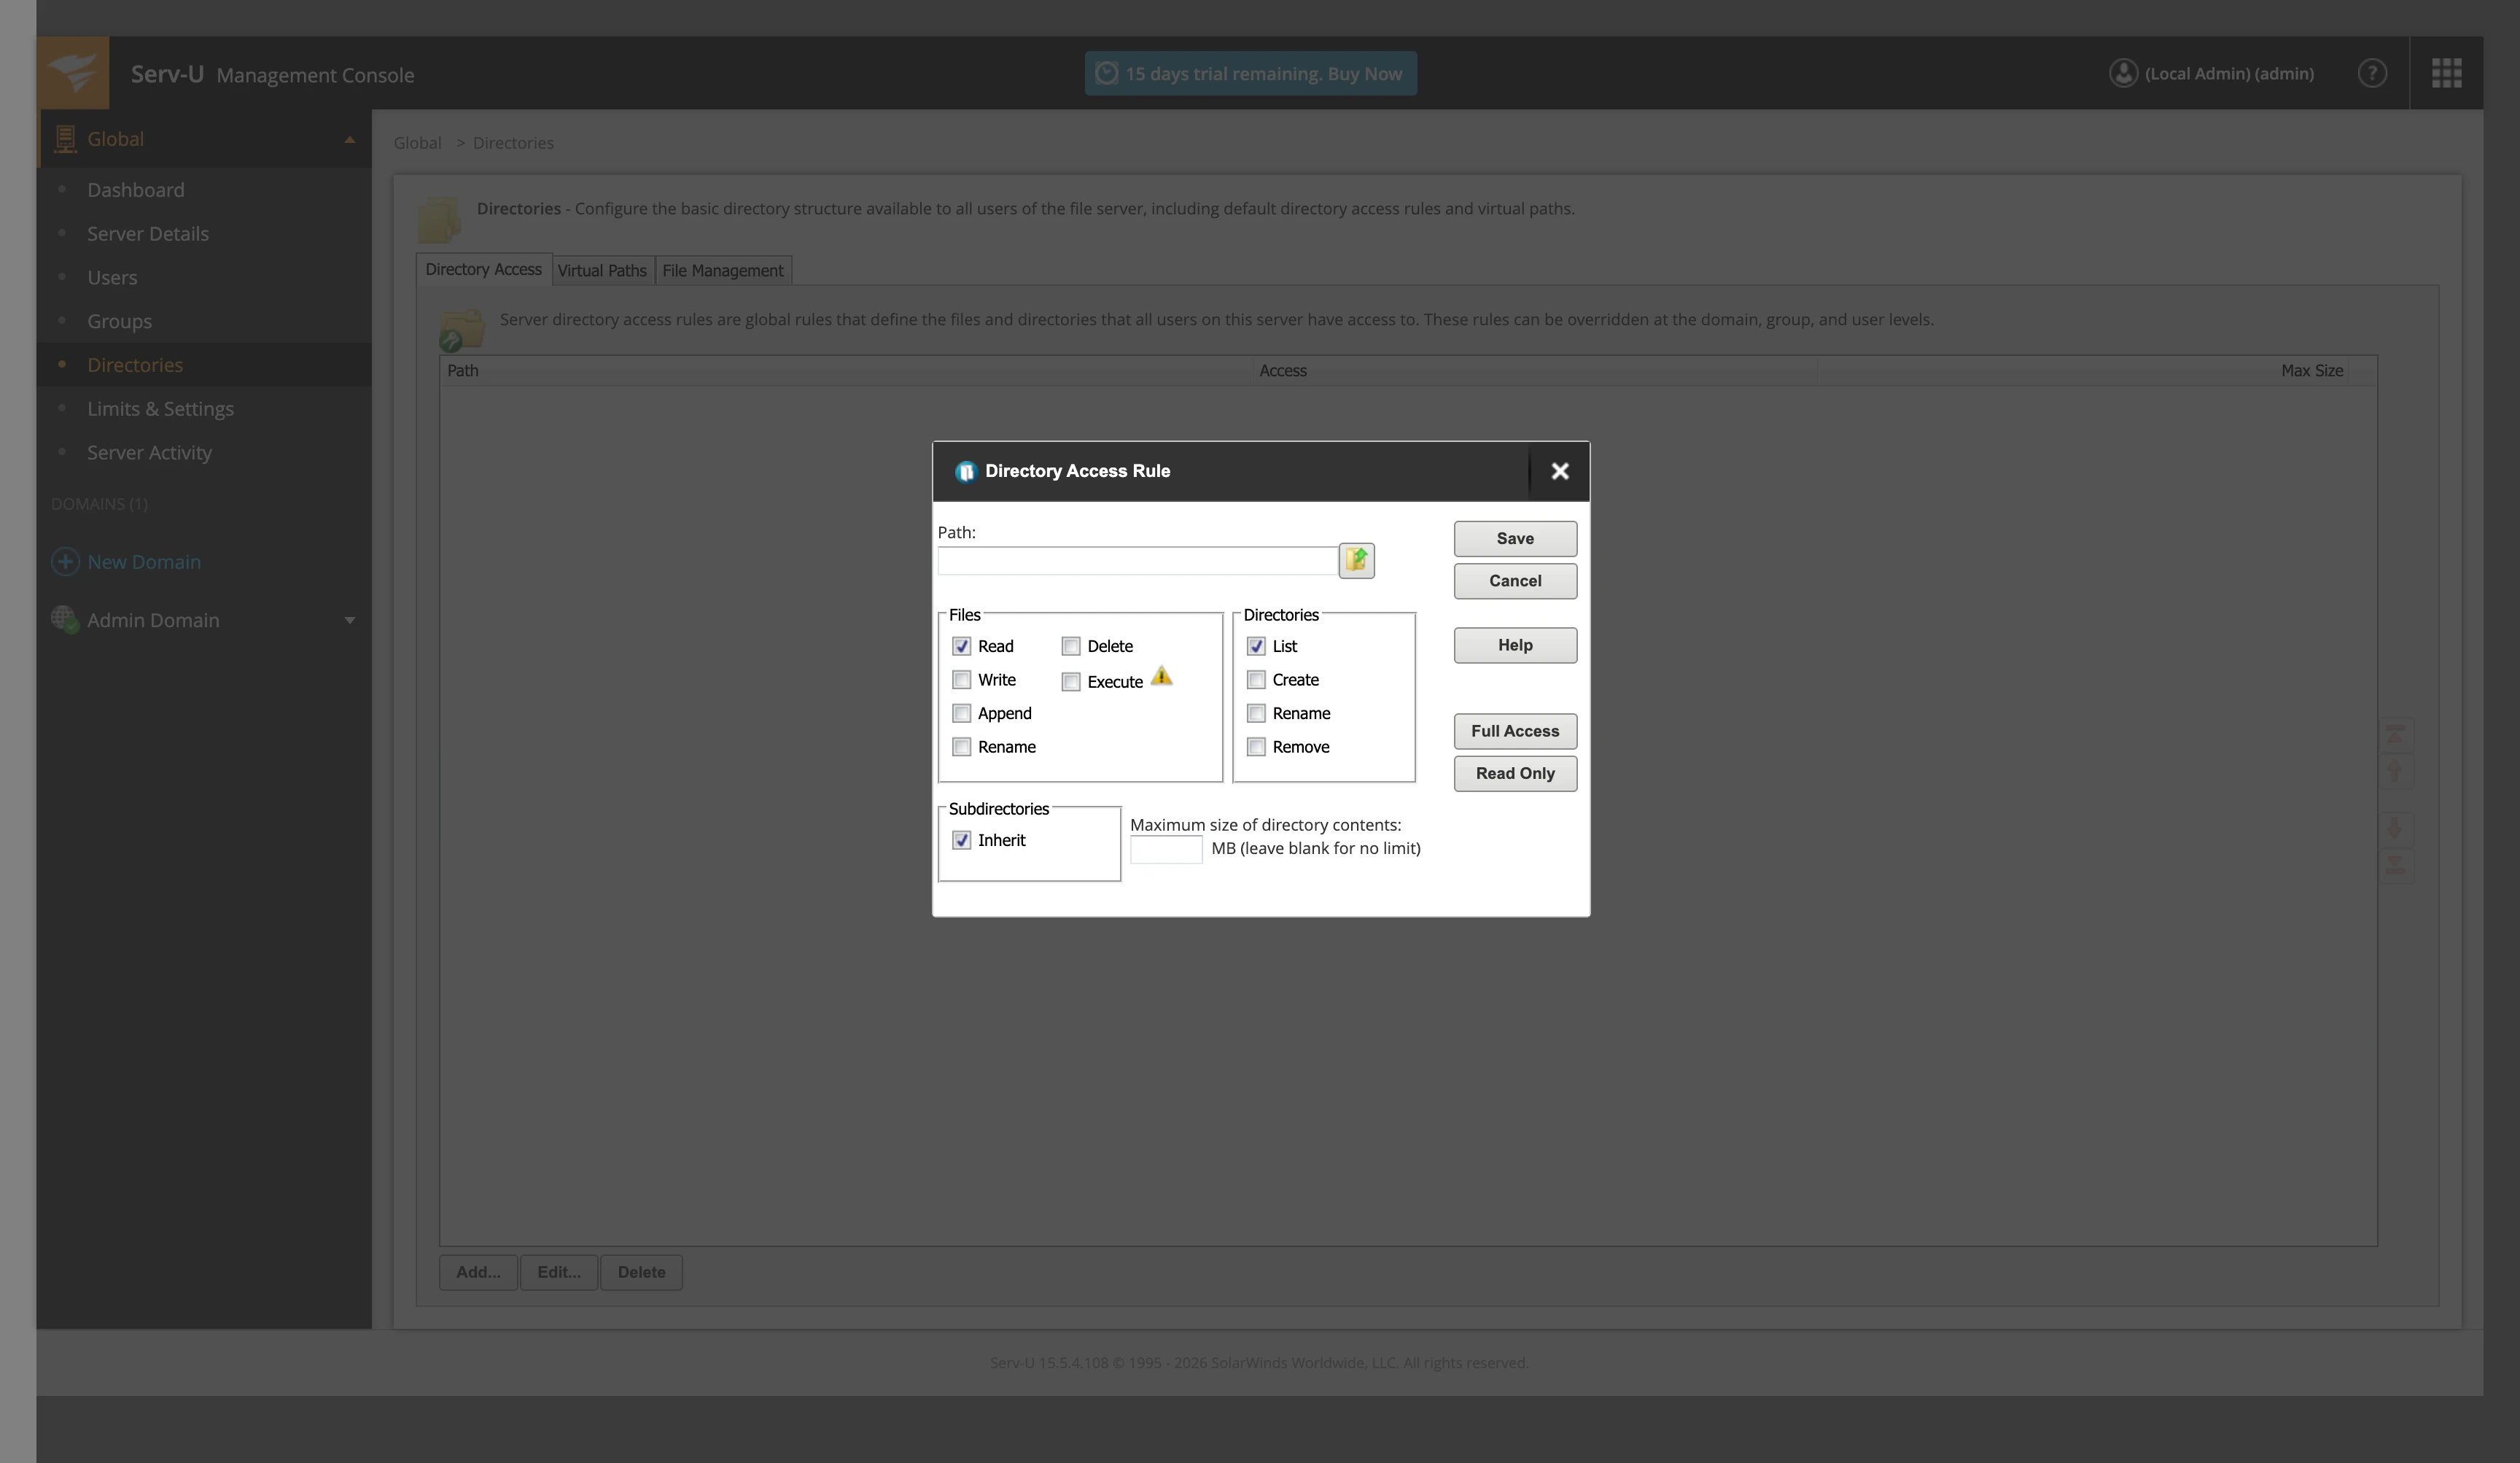
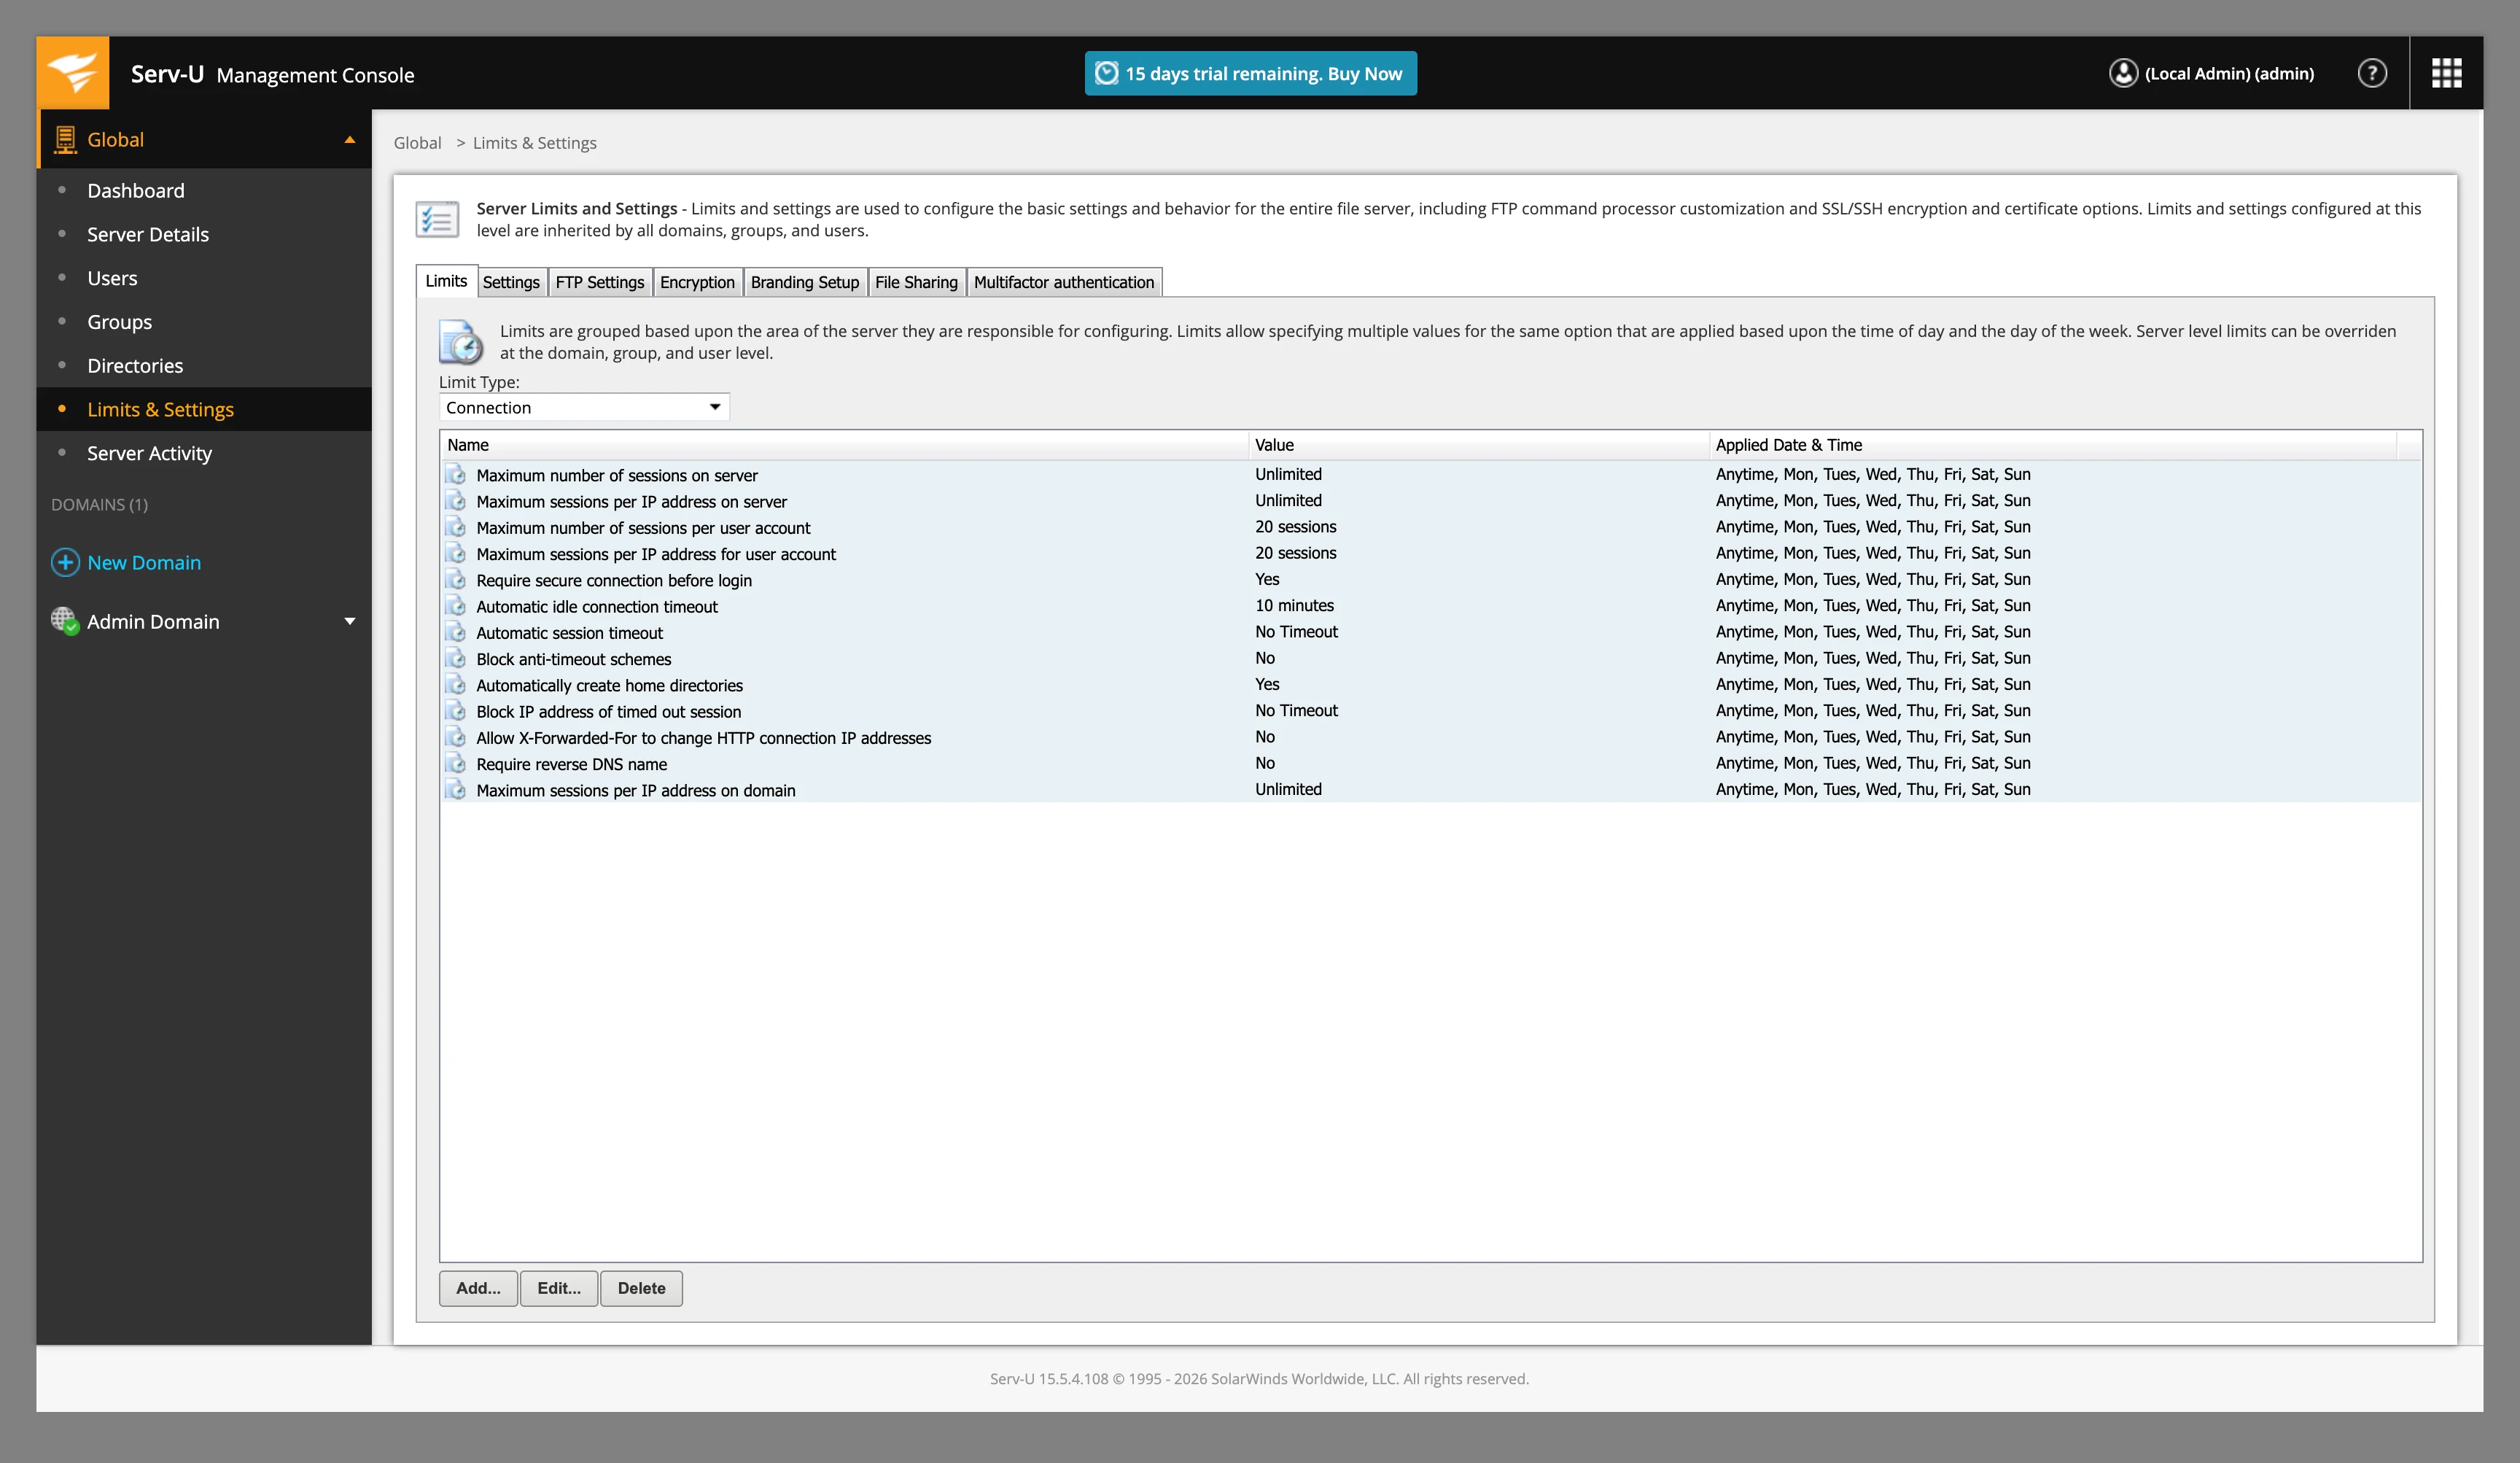
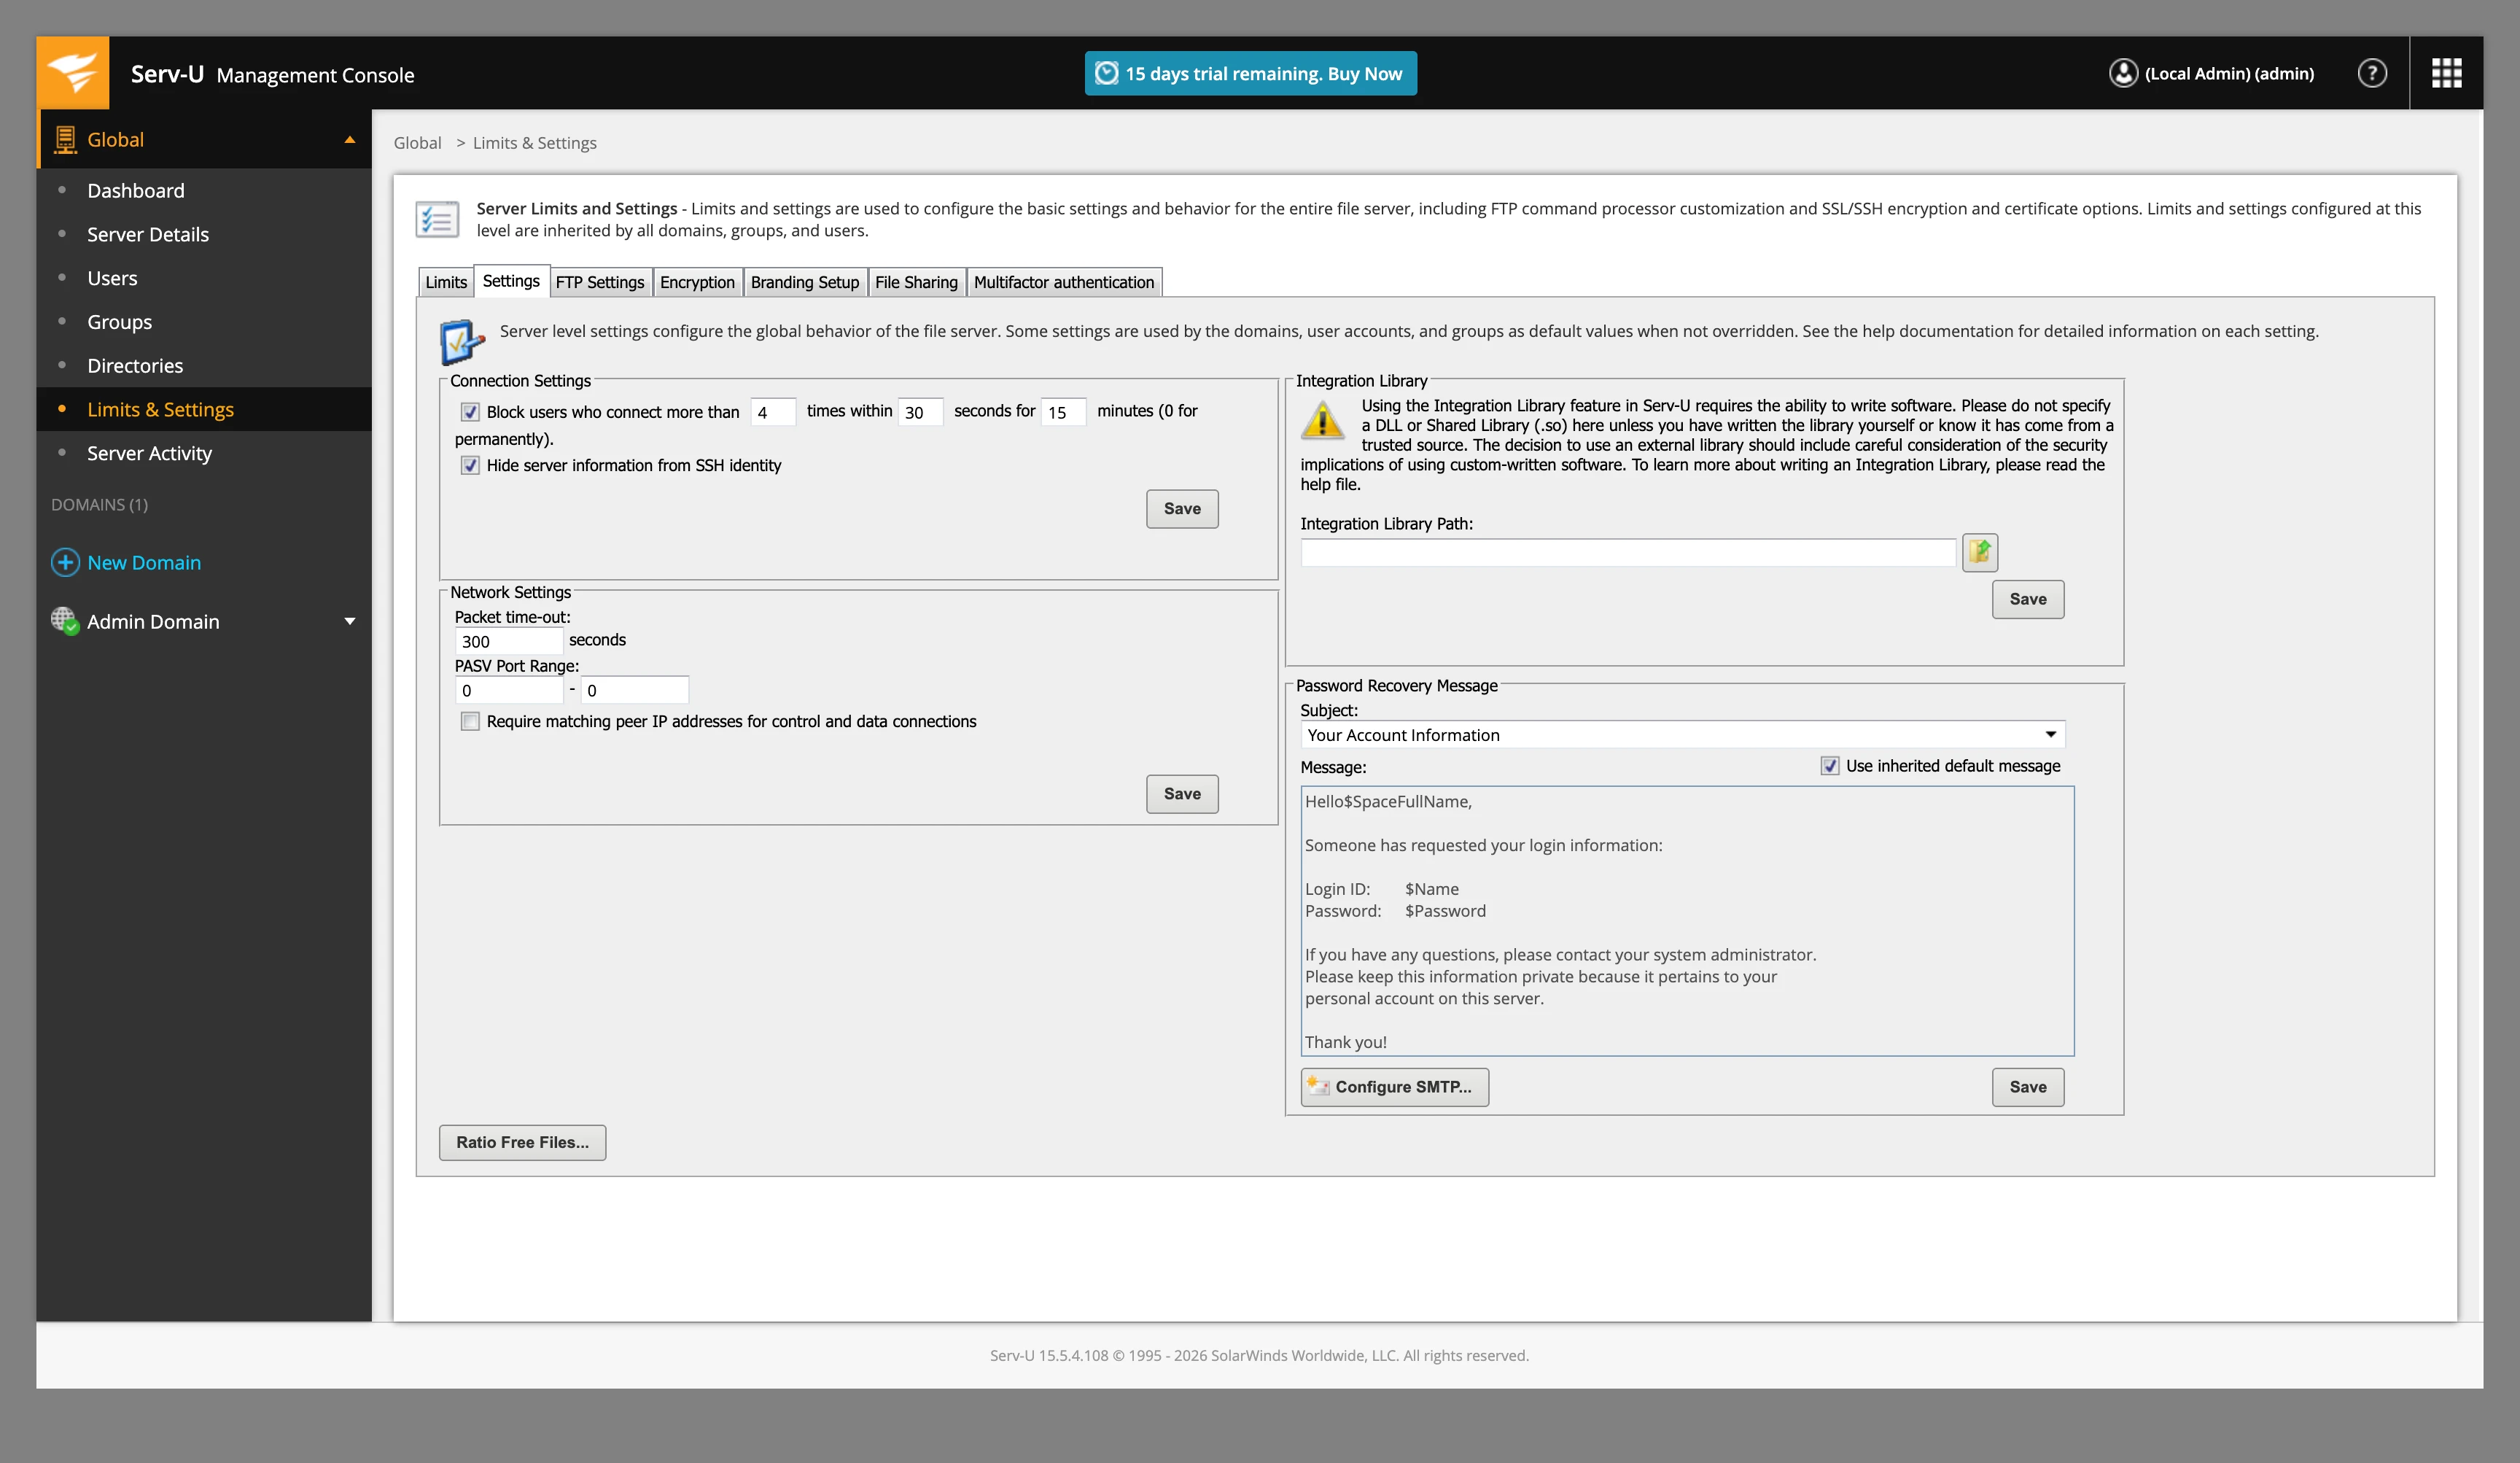
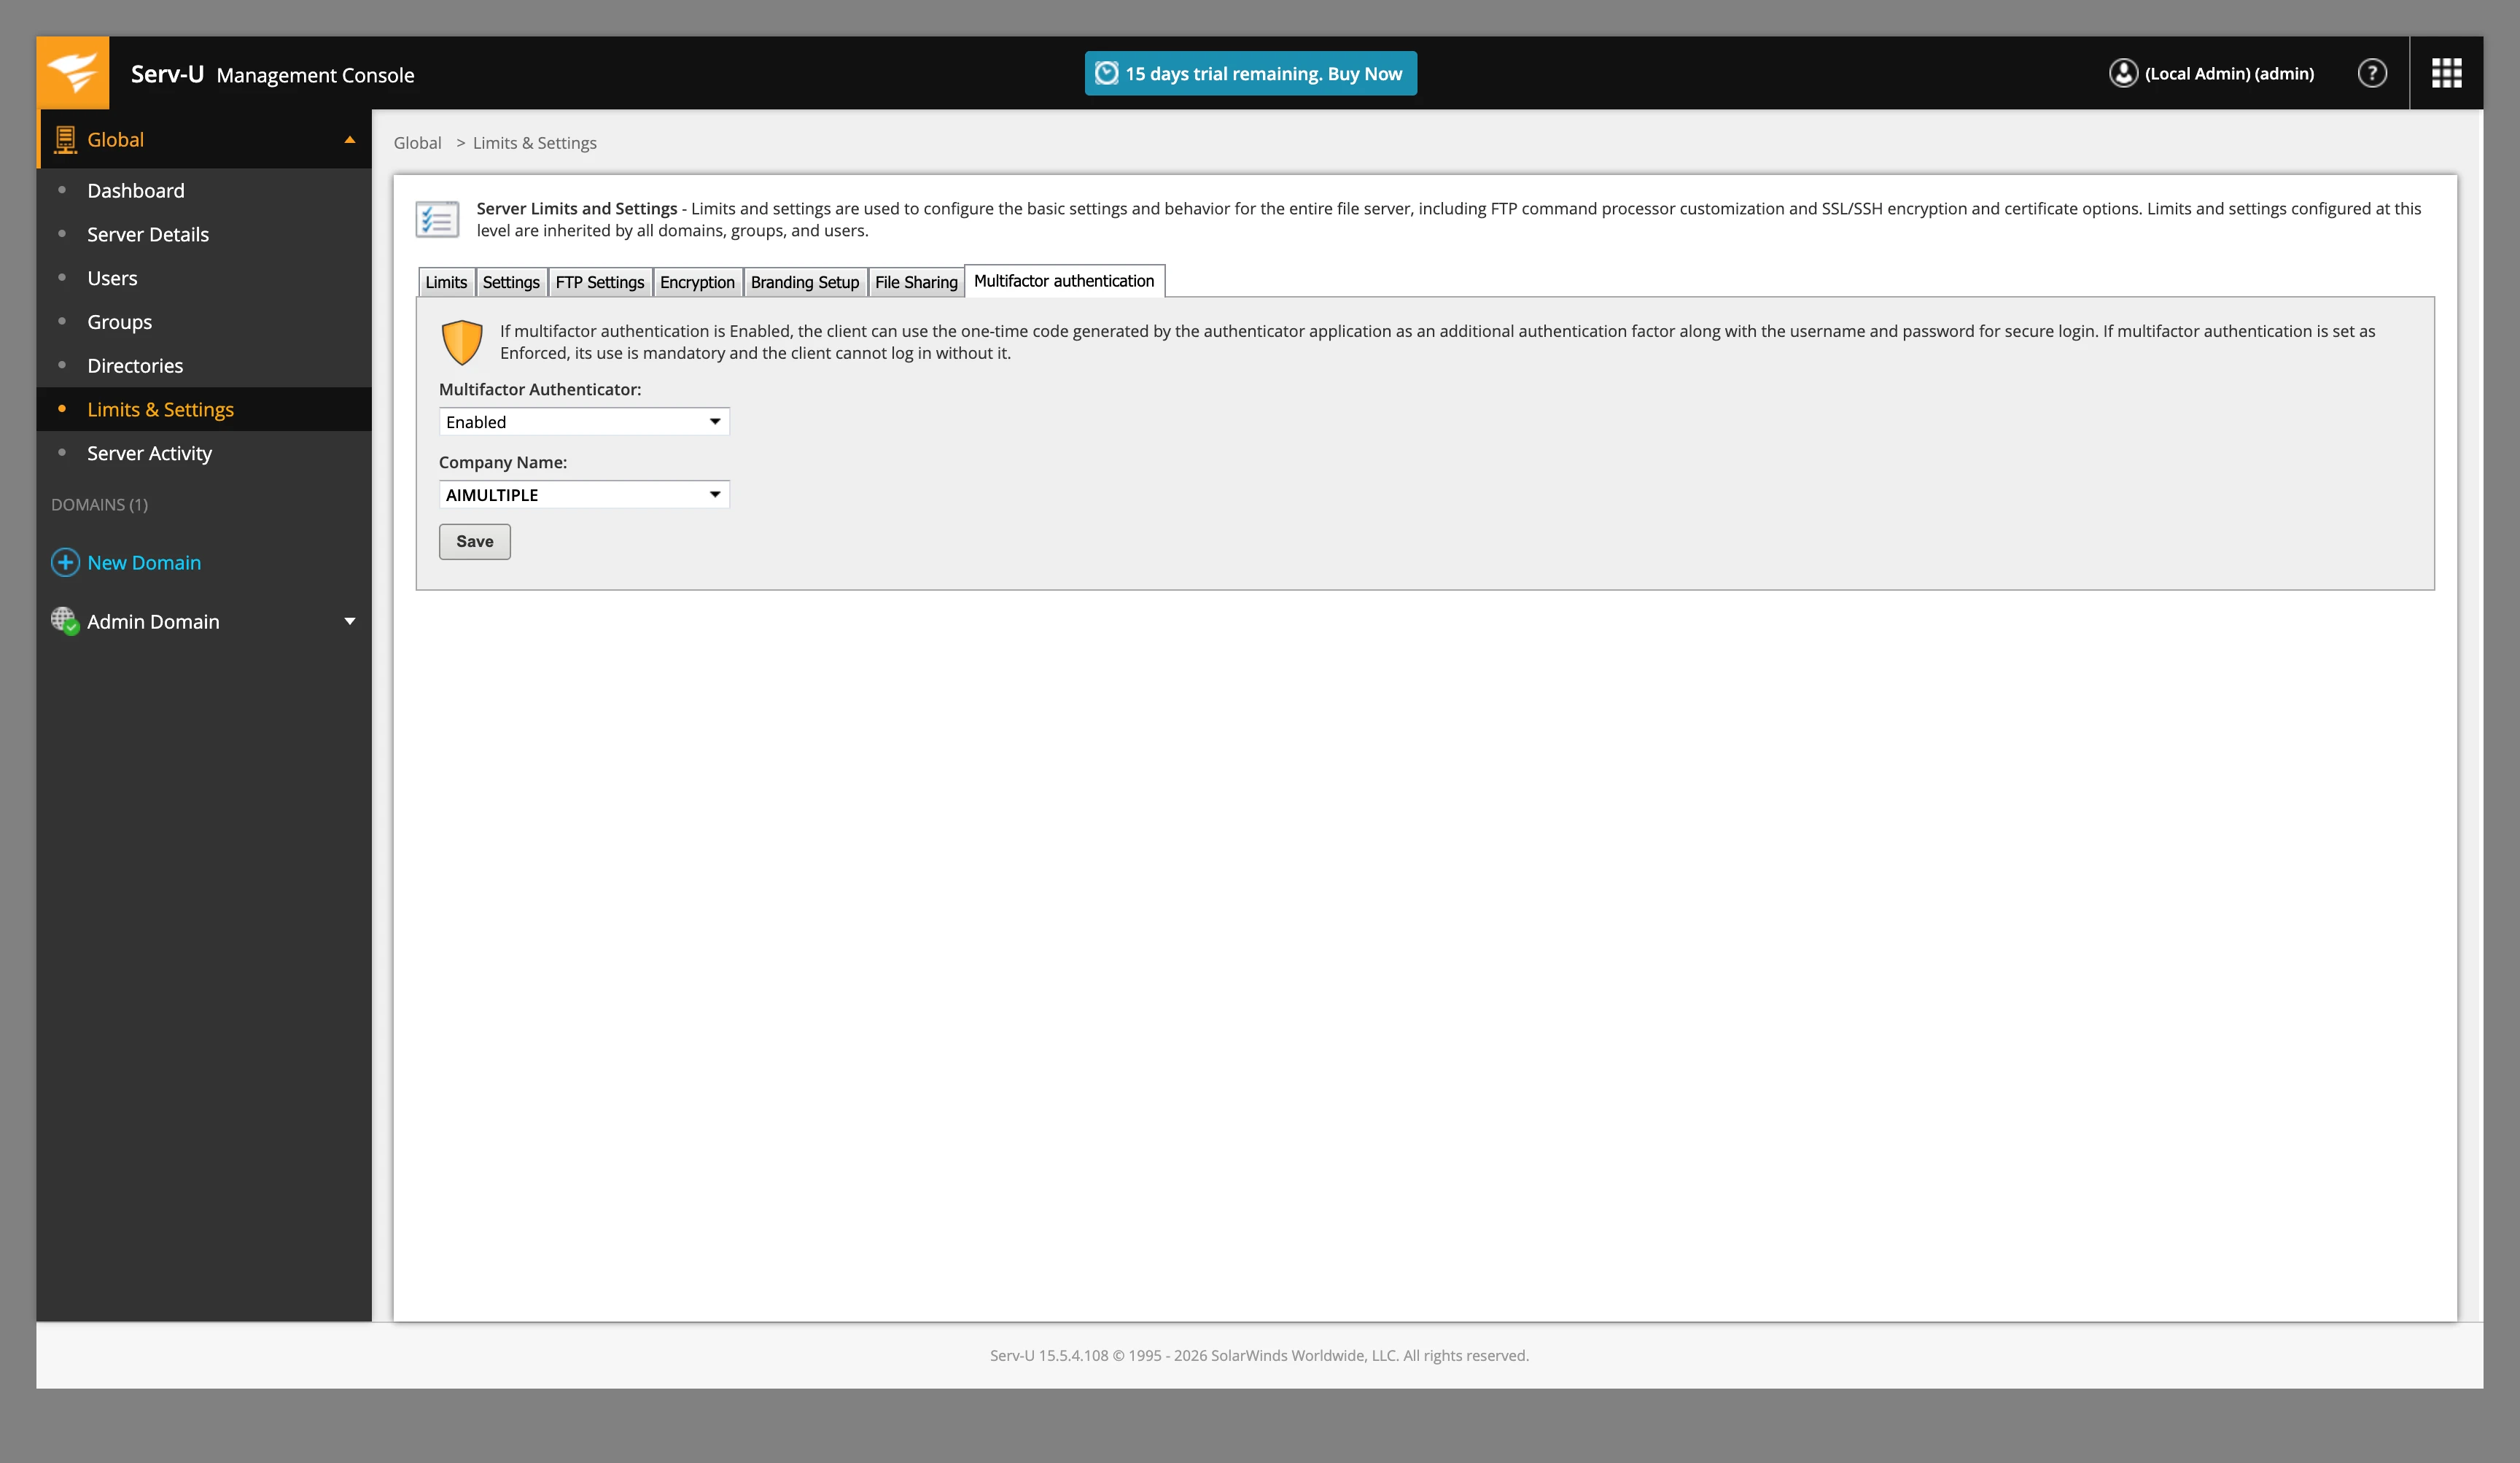

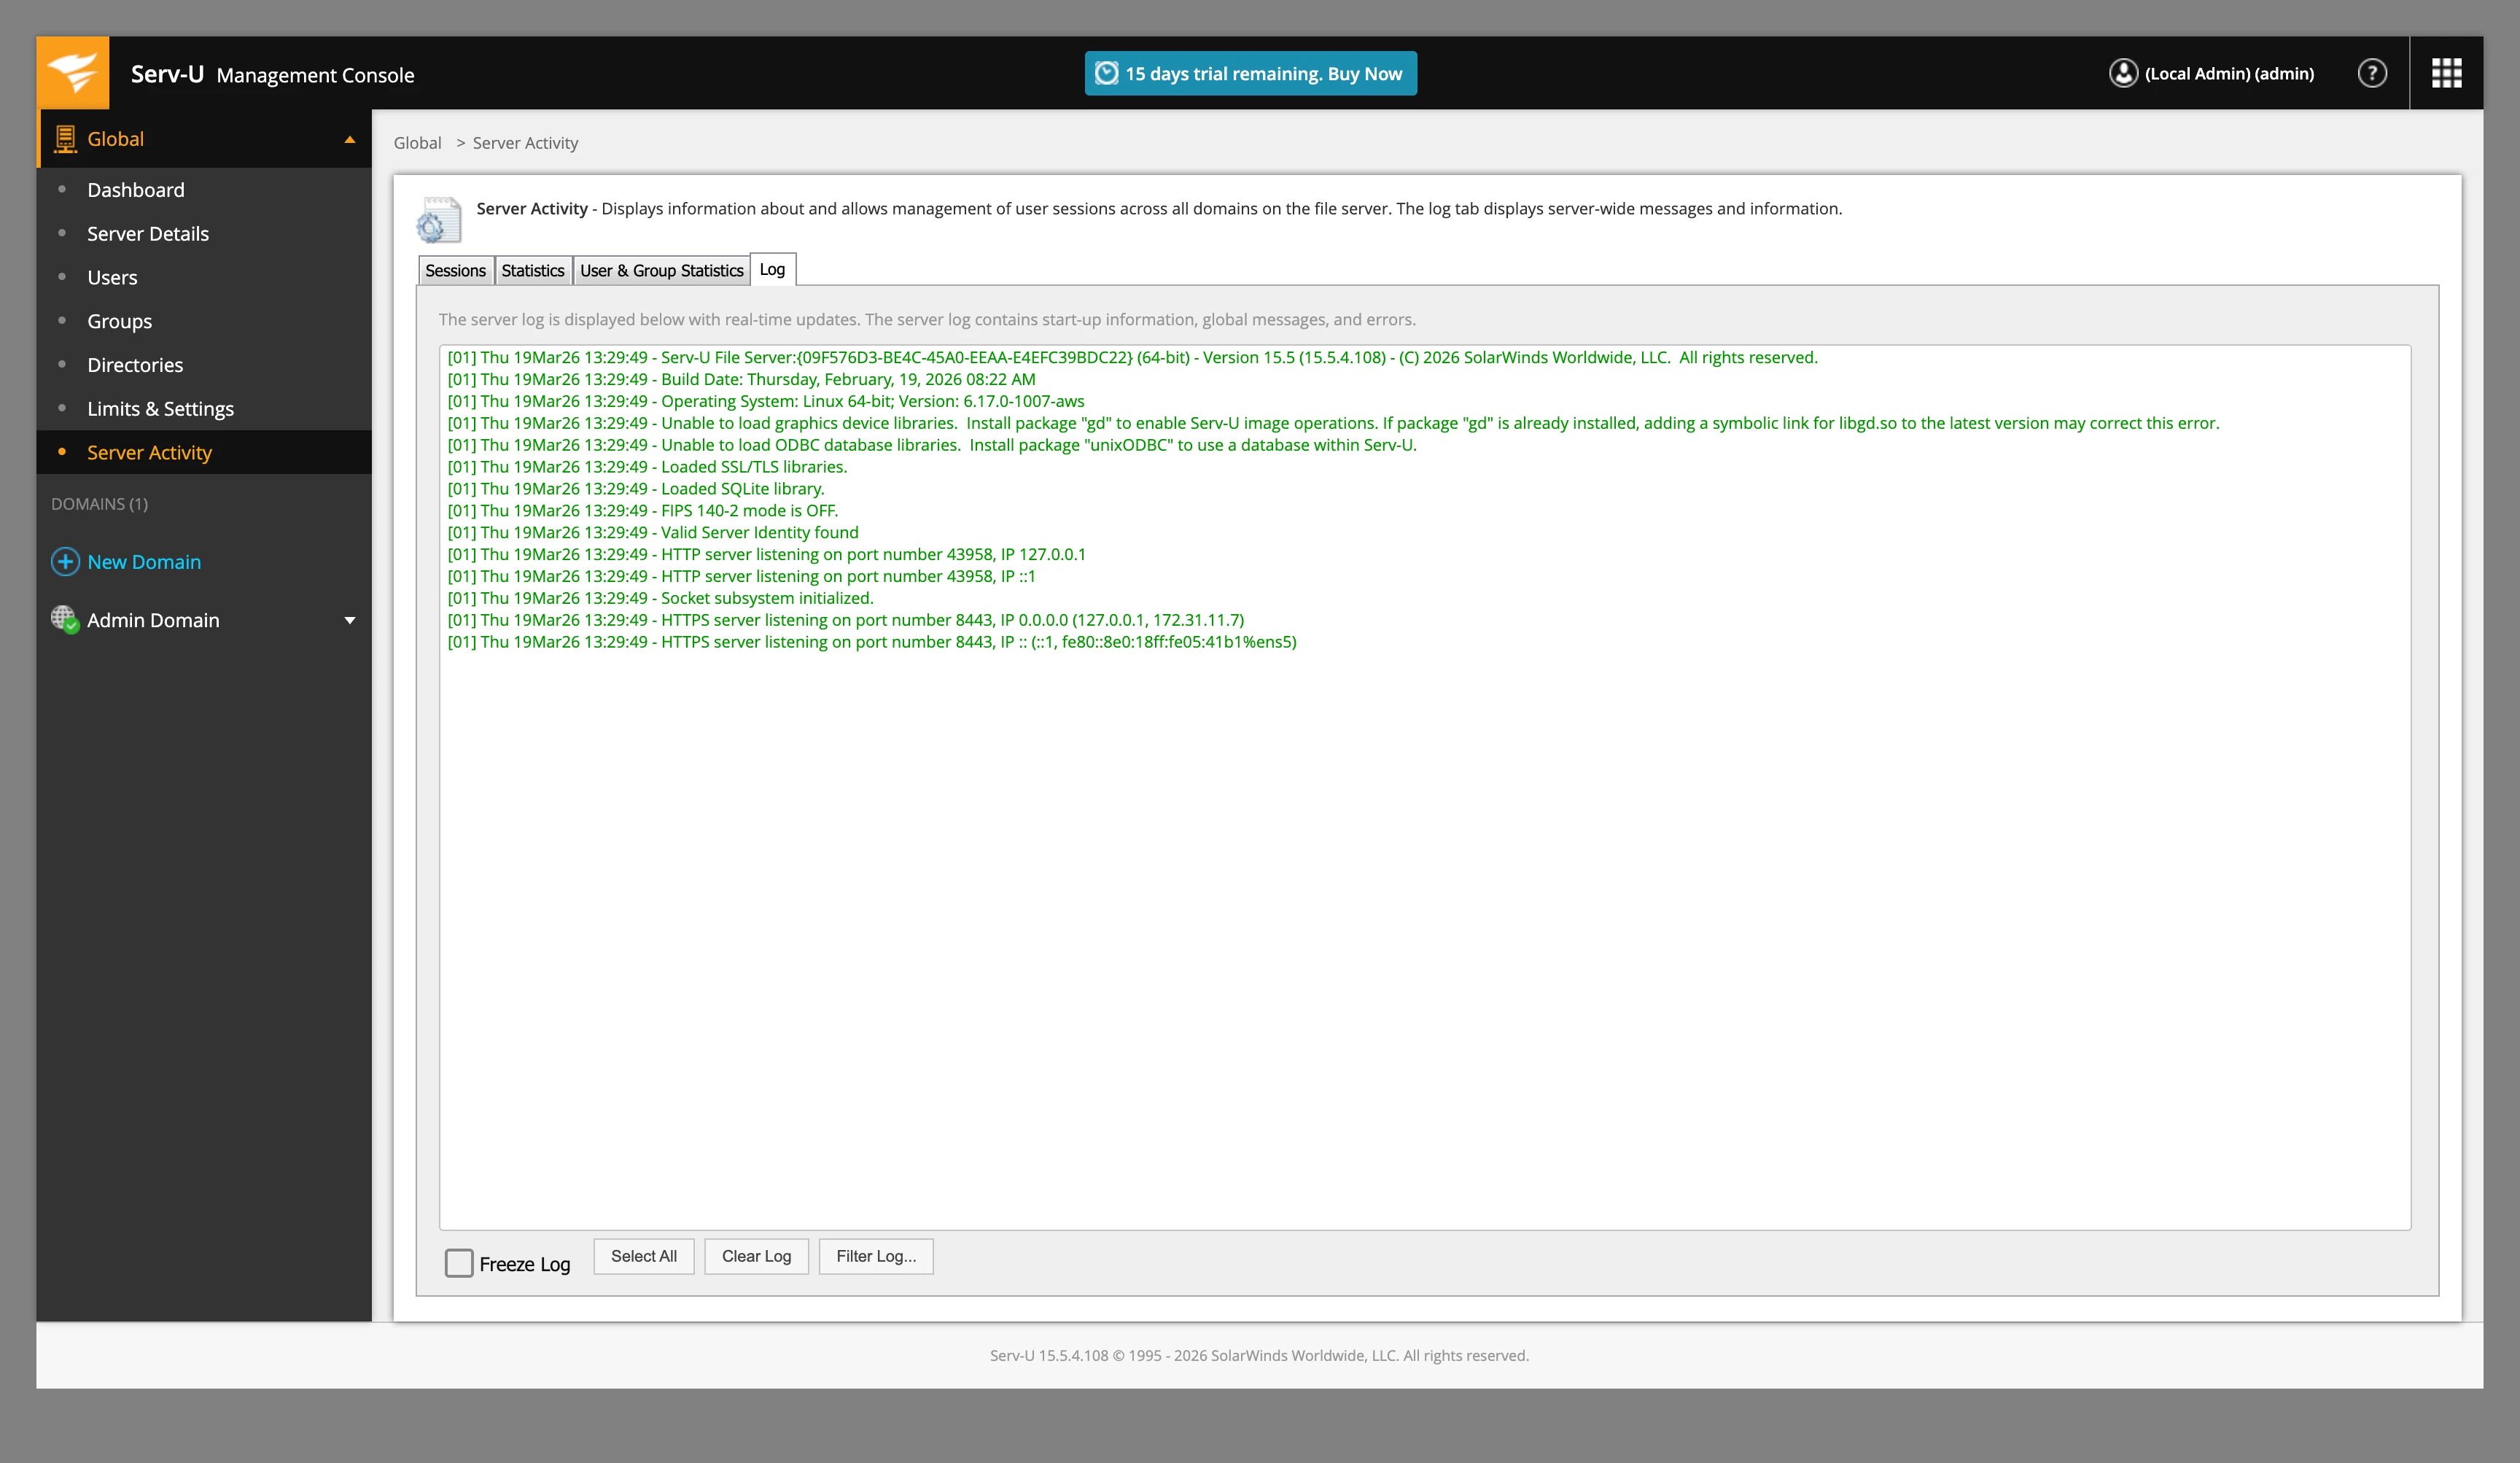
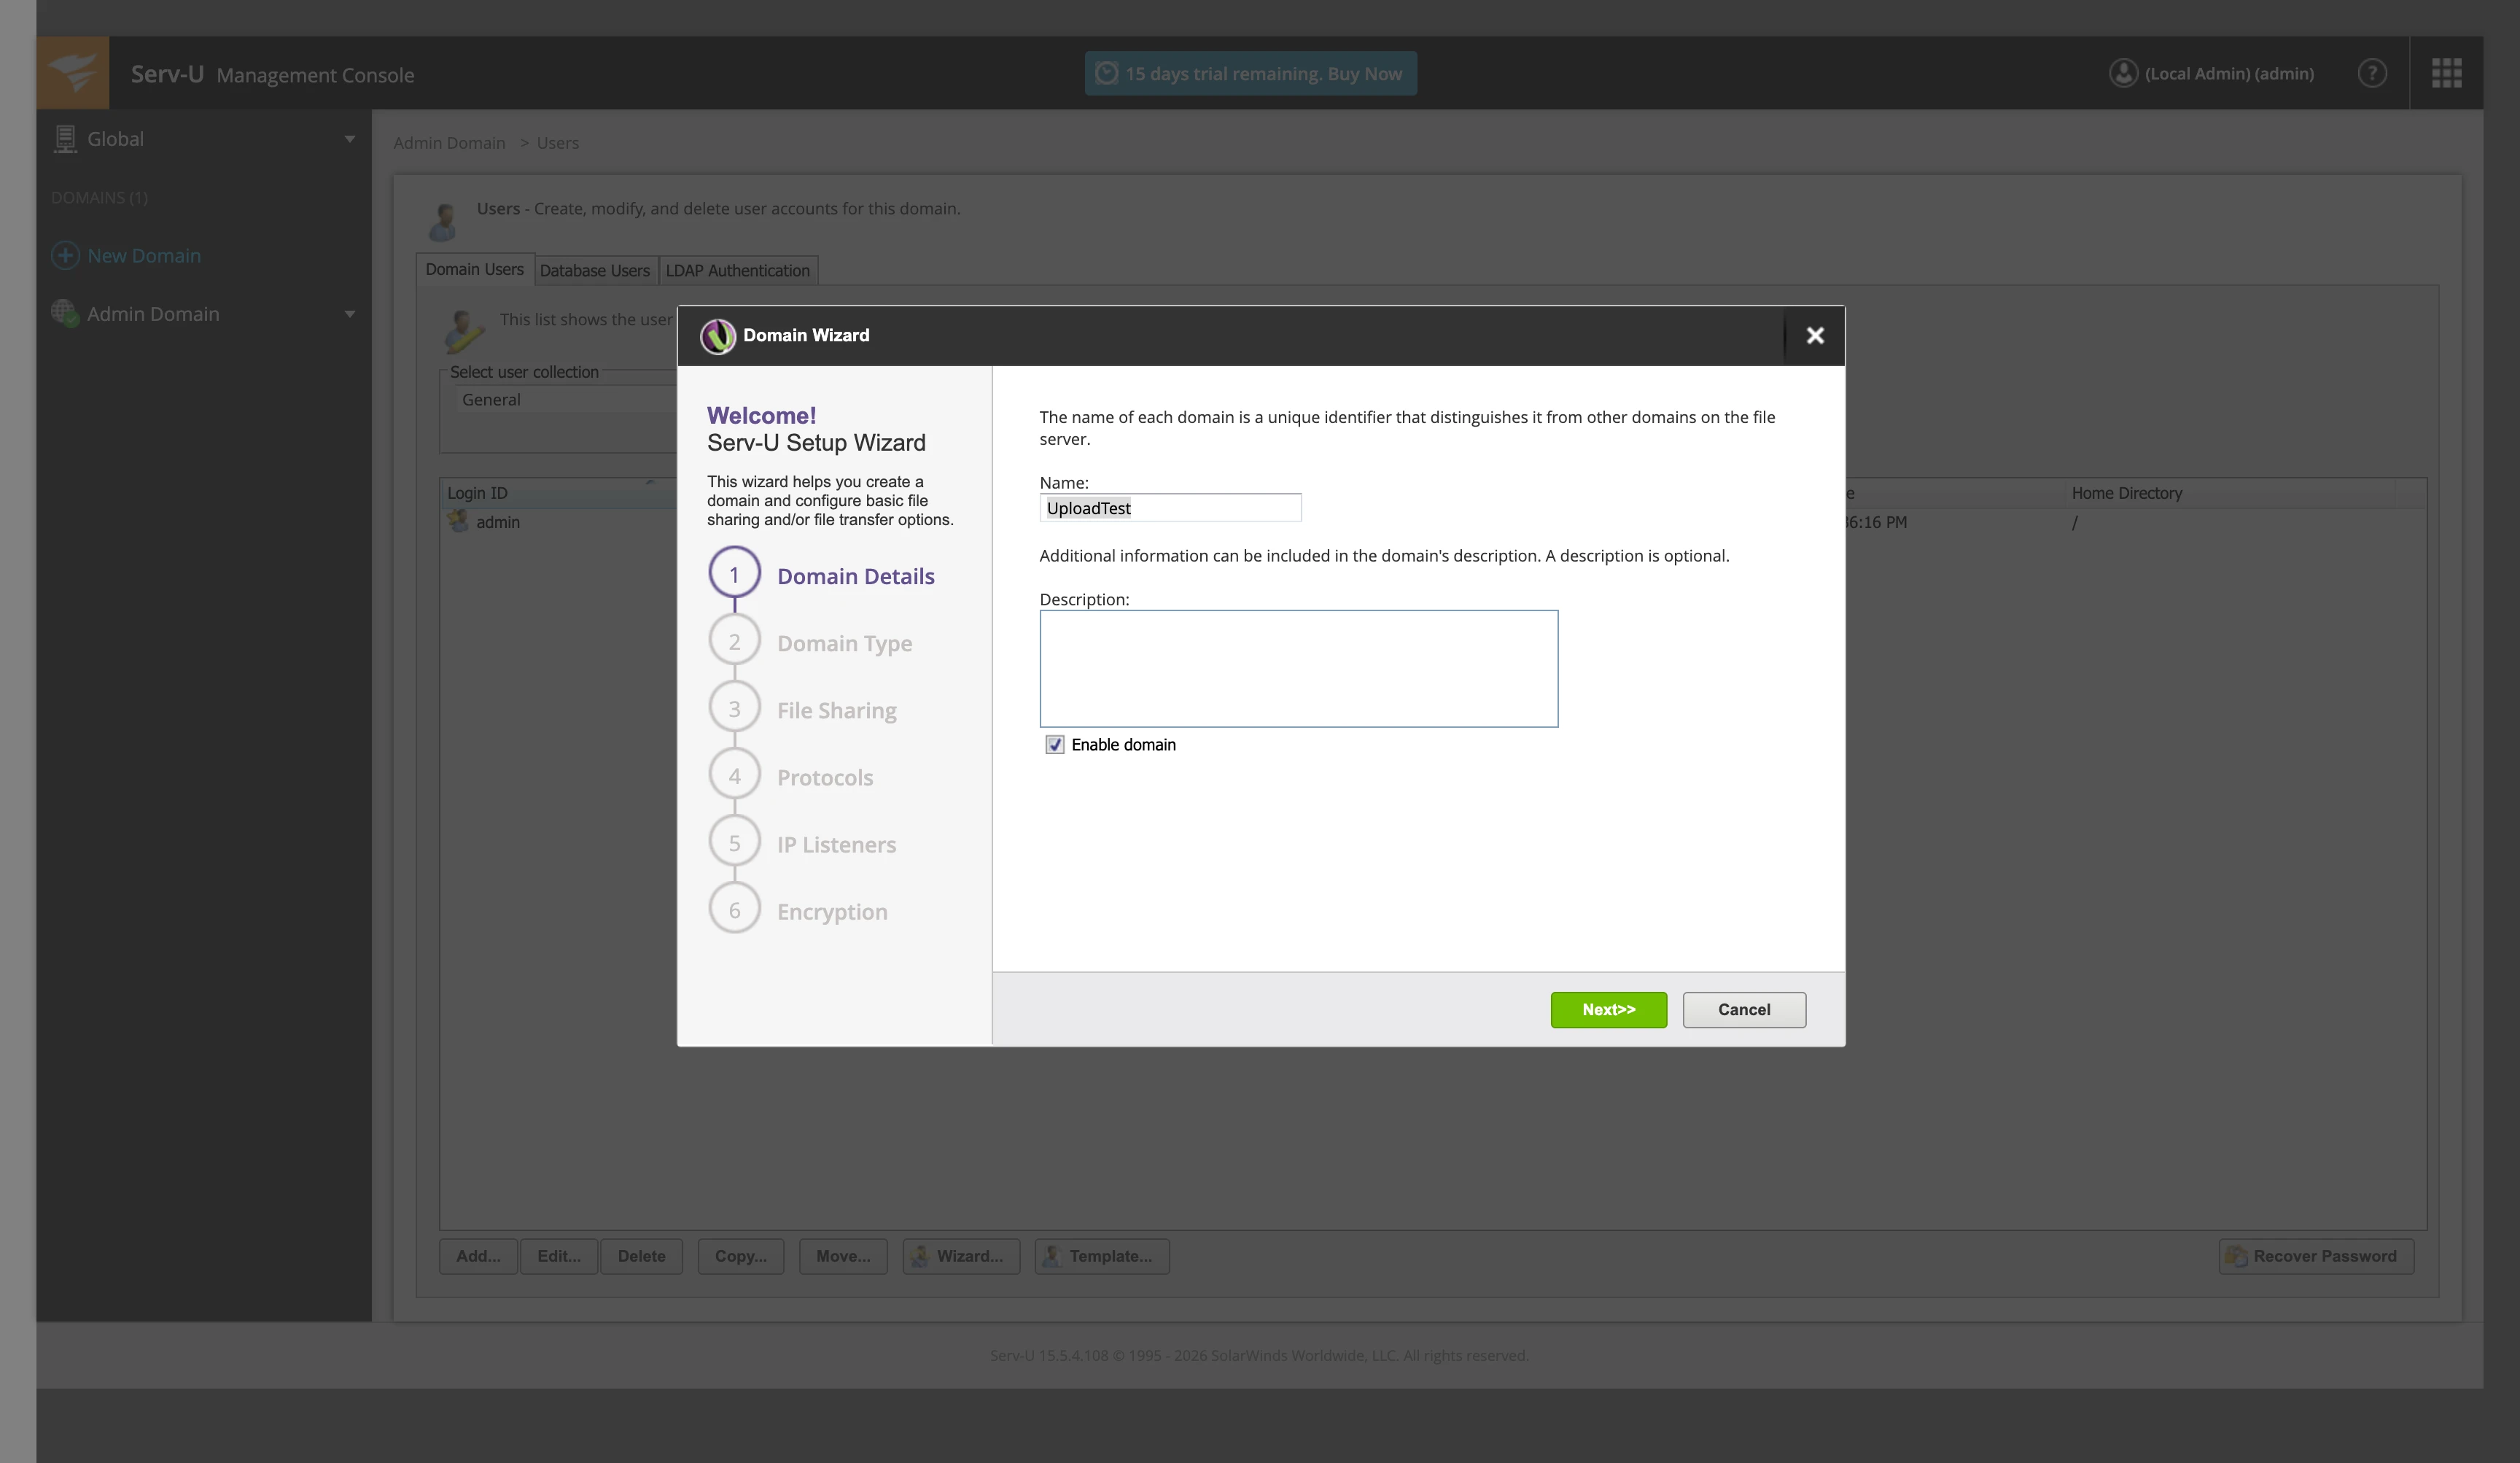
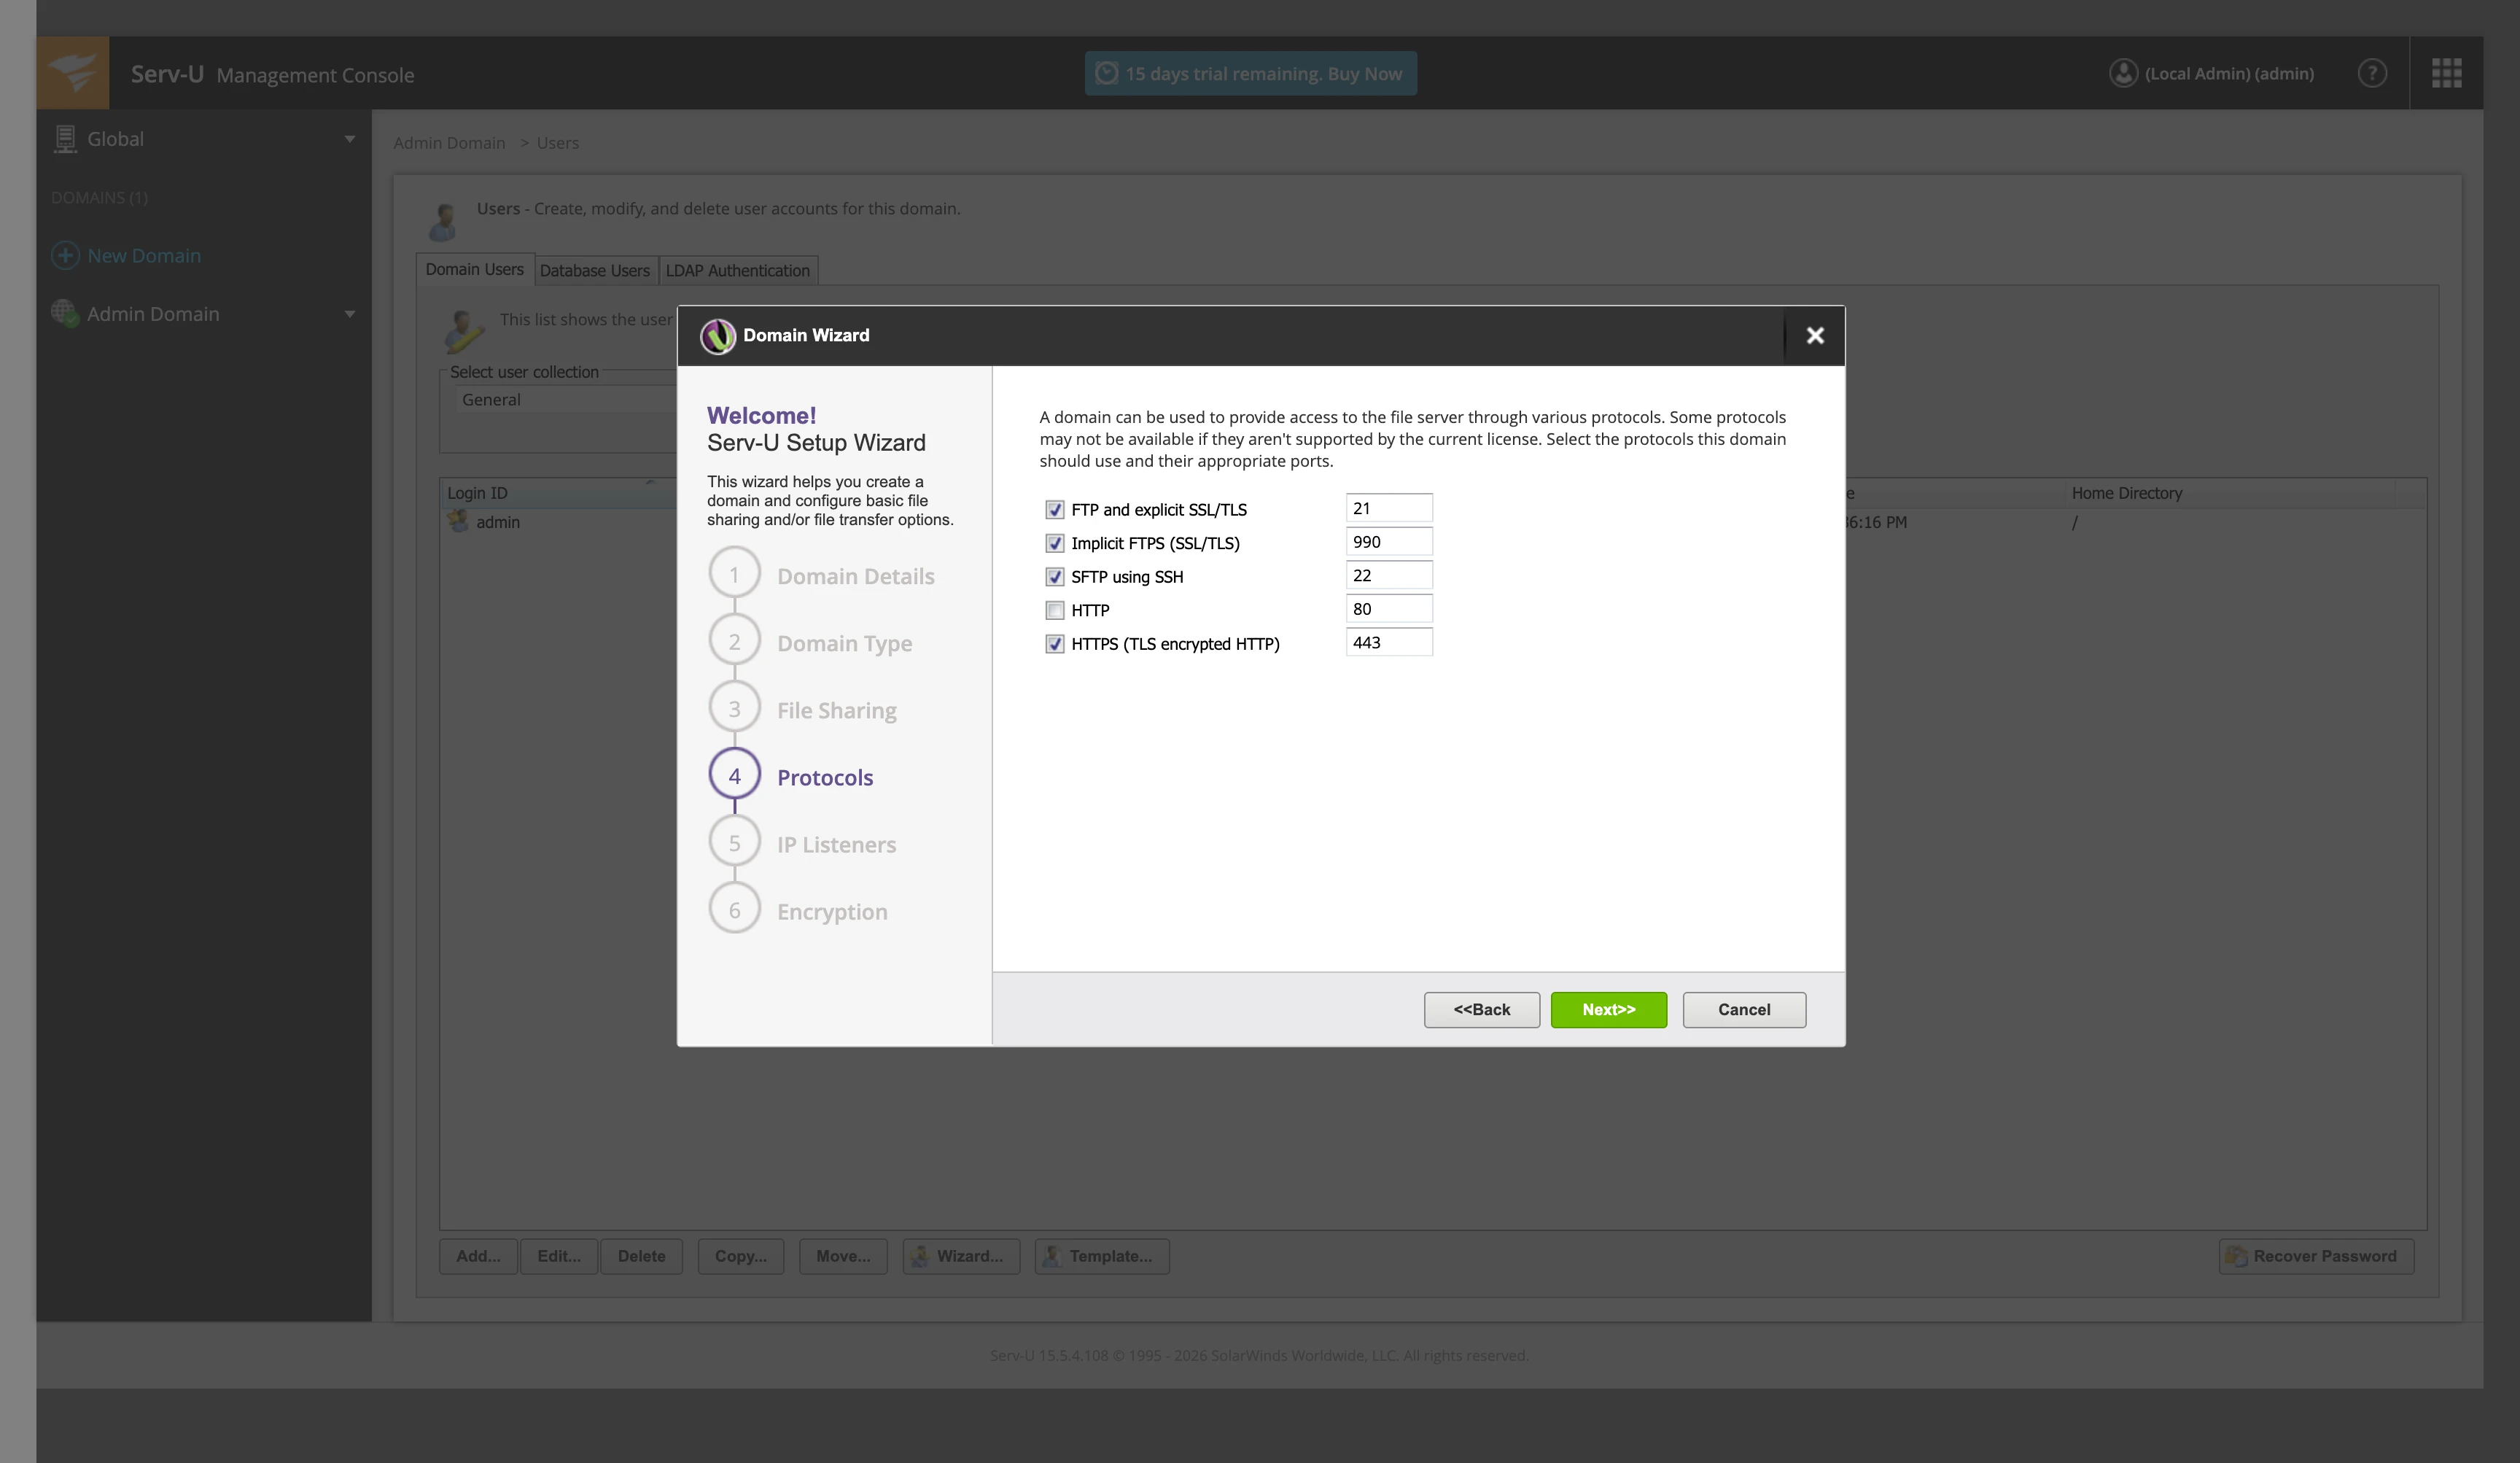
Be the first to comment
Your email address will not be published. All fields are required. Comments are left in their original language.