


How to Setup & Turn Off iPhone Proxy

Configuring iPhone proxy settings lets you manage network traffic and enhance privacy at the system level for any Wi-Fi connection.
Whether you need to set up an HTTP proxy for professional use or want to turn off proxy settings on an iPhone to fix connectivity issues, this guide covers iOS and iPadOS.
Proxy servers for iPhone
Any provider with an HTTP or HTTPS endpoint works with iPhone. Here are some proxy providers that offer free proxies for testing:
Provider | Free allowance (mo) | Protocols | Locations | Card required |
|---|---|---|---|---|
15 IPs, 2 GB | HTTP(S) | Global (datacenter) | No | |
10 proxies, 1 GB | HTTP & SOCKS5 | Global (datacenter) | No | |
5 IPs, 5 GB | HTTP/HTTPS/SOCKS5 | US only | No |
Limitations you should know:
Before setting up, keep these in mind:
- iOS supports HTTP and HTTPS proxies:You cannot configure a SOCKS5 proxy using the built-in settings.
- No Native proxy settings for cellular data: iPhone allows users to configure HTTP and HTTPS proxies in the Wi-Fi settings. Proxies apply to Wi-Fi connections and must be configured individually for each Wi-Fi network.
How to configure HTTP proxy on iPhone & iPad (manual setup)
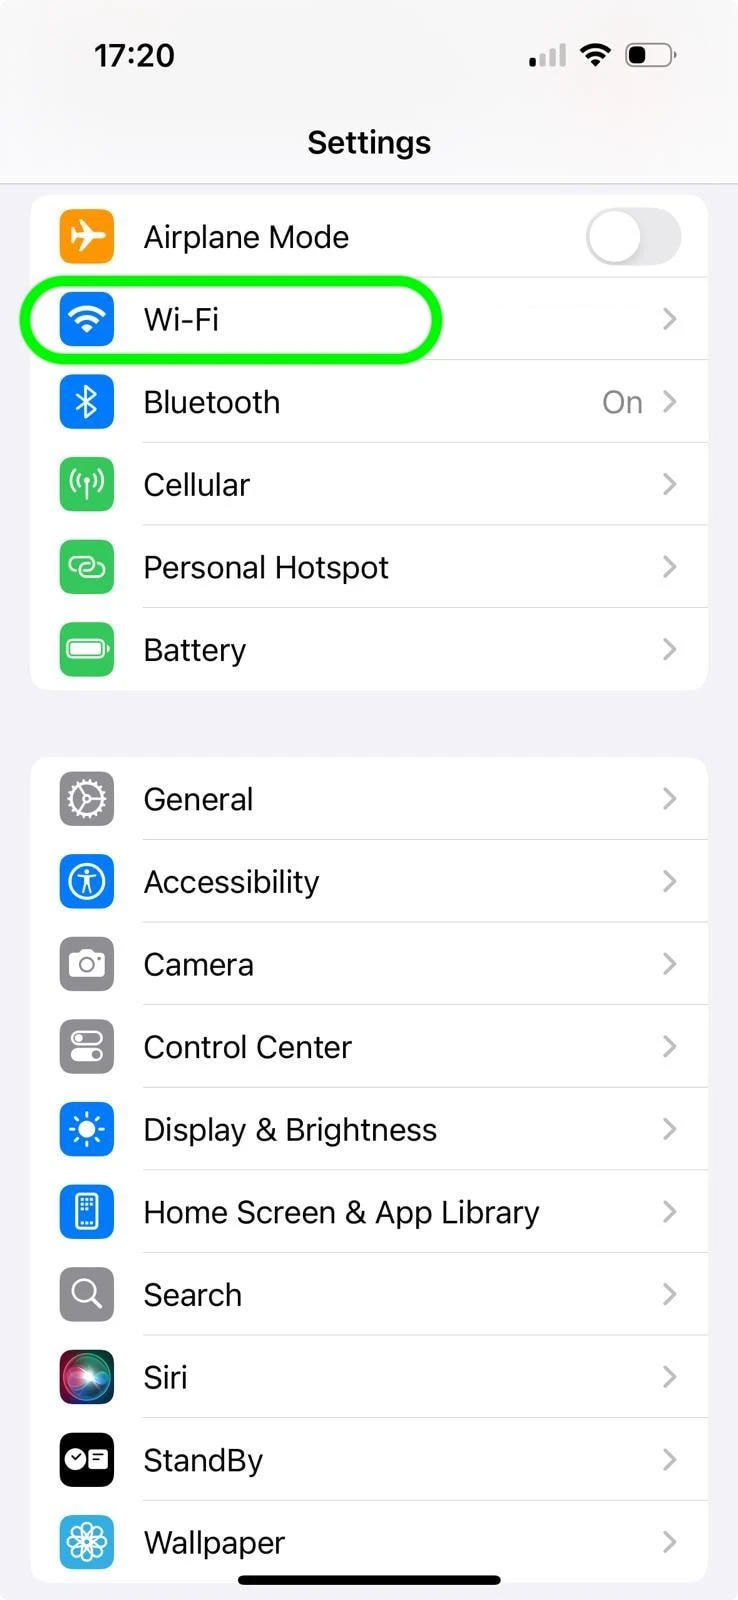
- Open your iPhone settings and tap on Wi-Fi to see the available networks.
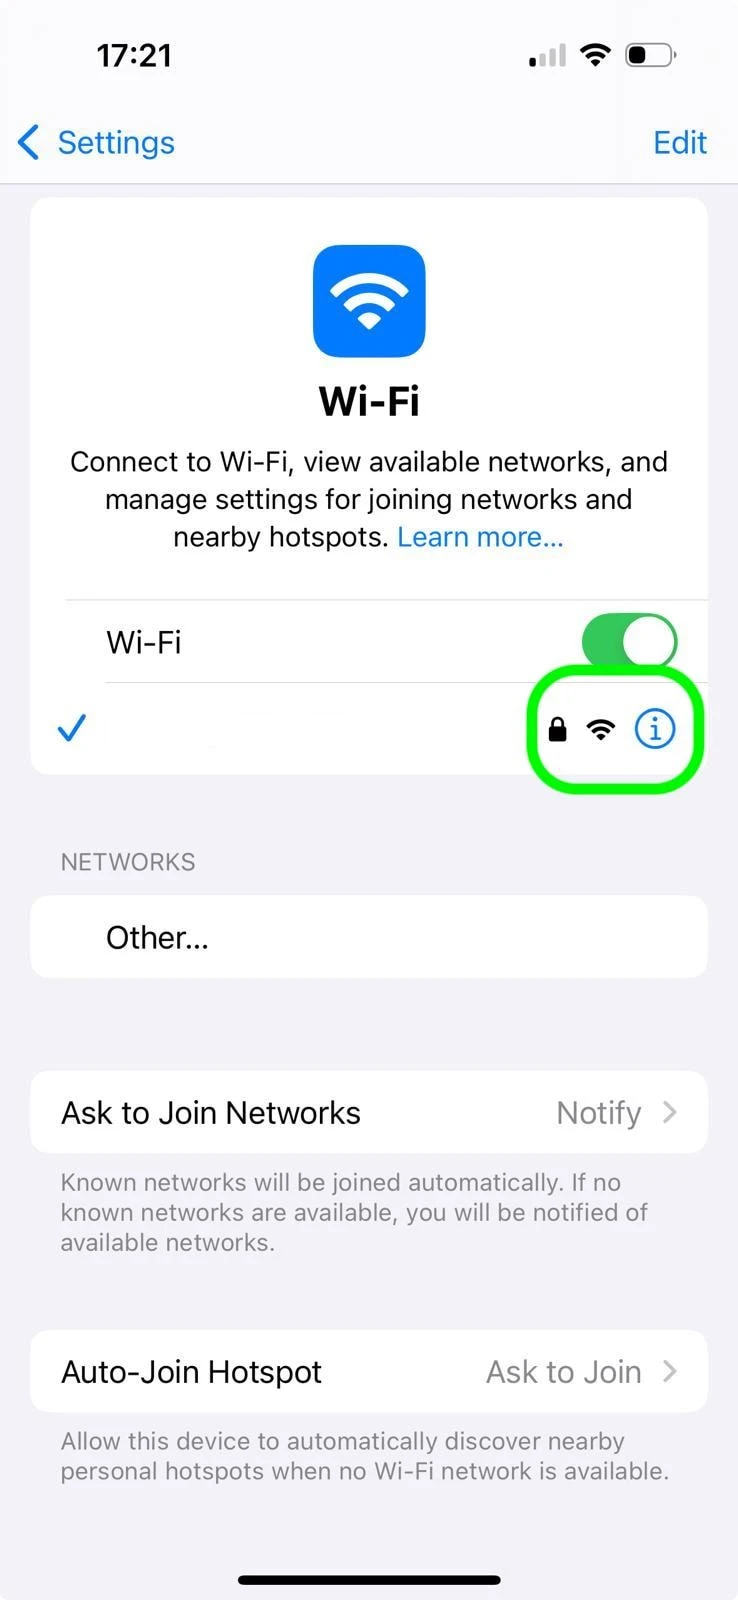
2. Tap the “i” (information) icon next to the Wi-Fi network you are currently connected to.
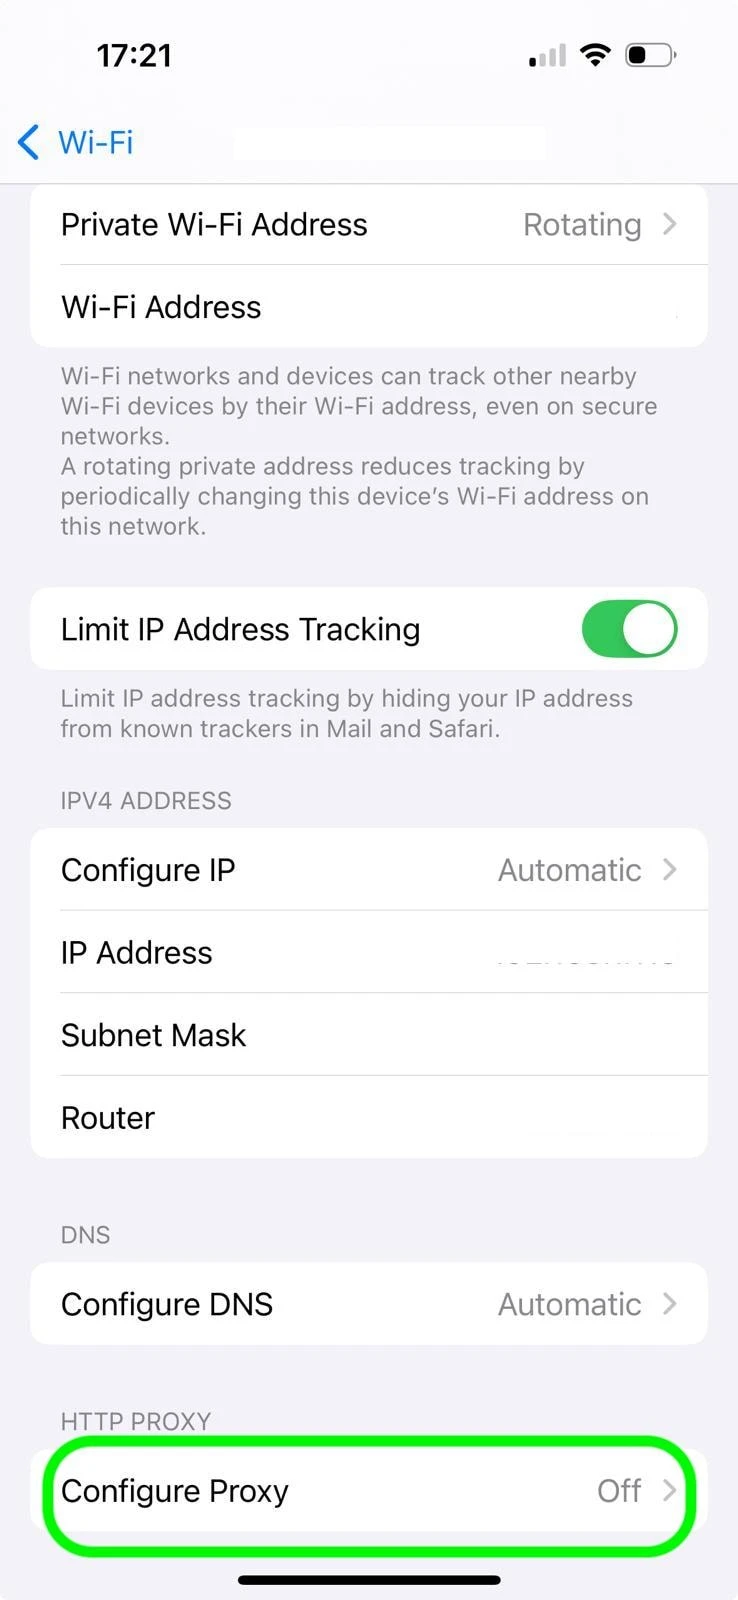
3. Choose “Configure Proxy” by scrolling down to the HTTP Proxy section.
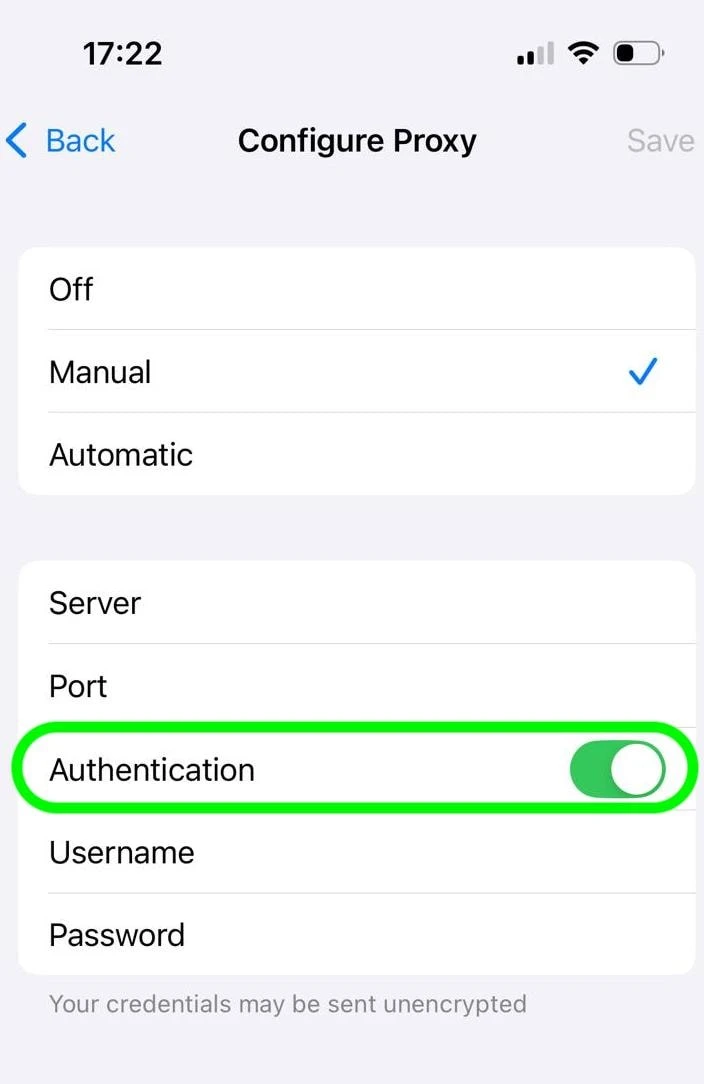
4. Three Proxy Configuration Modes will be displayed to you:
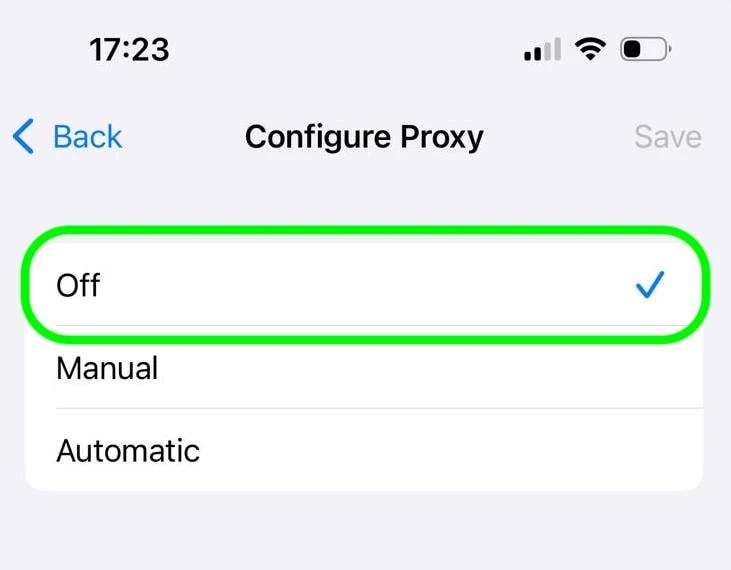
- Off: No proxy is in use.
- Manual: Manually enter the proxy information.
- Automatic: Enter a PAC (Proxy Auto-Configuration) or URL.
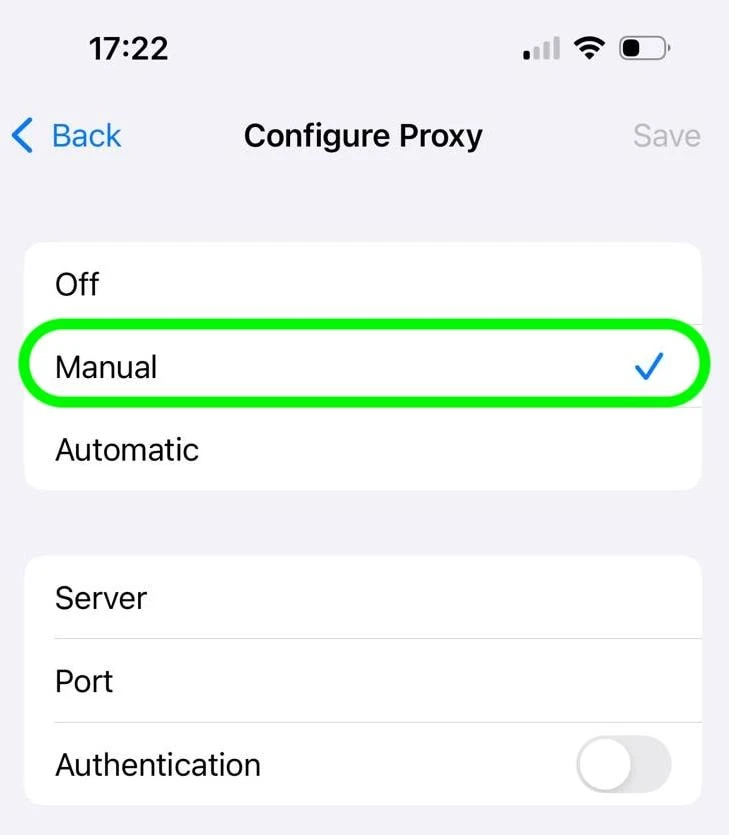
5. For manual configuration, tap manual and enter the proxy details provided by your proxy service providers, including server address and port number. Enable the Authentication option, then enter your username and password if required.
How to turn off or disable proxy on iPhone?
- Go back to Settings > Wi-Fi.
- Tap the blue “i” icon next to the connected Wi-Fi network.
- Scroll down to the “HTTP PROXY” section.
- Select Off.
- Tap Save in the top right corner.
iPhone proxy settings for cellular data
iPhone has no built-in proxy settings for cellular data. The “Configure Proxy” option appears under Wi-Fi network settings. An HTTP proxy you set there applies to Wi-Fi. You can route cellular traffic through:
- A provider’s iOS app or manager: Some proxy providers let you manage mobile connections without touching system settings.
- A third-party proxy client: Apps like Shadowrocket, Potatso, or AdGuard apply their rules to both Wi-Fi and cellular, and they also support protocols iOS can’t (e.g., SOCKS5).
Why iPhone won’t let you proxy cellular data
Wi-Fi and cellular connections are managed differently on iOS. Wi-Fi networks expose per-network settings, including the HTTP Proxy field, which you can edit directly. Cellular connections, by contrast, are governed by APN (Access Point Name) settings controlled by your carrier, and Apple doesn’t expose a proxy field there. Because there’s no system-level menu, you need to route cellular traffic through a proxy with an app that operates at the device level.
How third-party apps get around it
Apps like Shadowrocket, Potatso, and AdGuard use Apple’s Network Extension (VPN) framework. Instead of editing a proxy field, they create a local VPN tunnel on the device and route your traffic, including cellular, through your proxy inside that tunnel. This is why they work on both Wi-Fi and mobile data, whereas the built-in settings touch Wi-Fi. You’ll see a VPN icon in the status bar when one is active.
Manual vs automatic proxy configuration
- Manual Setup: If your proxy provider gives you a fixed server address and port.
- Automatic Setup (PAC file): For enterprise or rotating proxies, since the PAC script can define when/where to use the proxy.
Manual Proxy Configuration:
This is the most common method for individual users to configure their own proxy.
- Tap on Manual.
- Server: Enter the IP address or hostname of your proxy server.
- Port: Enter the port number for your proxy server.
- Authentication (Optional): If your proxy requires a username and password:
- Toggle the “Authentication” switch to the On position.
- Enter your Username.
- Enter your Password.
- Tap Save in the top right corner.
Automatic Proxy Configuration (PAC File)
This method is ideal if your network administrator provides a Proxy Auto-Configuration (PAC) file.
- Tap on Automatic.
- In the “URL” field, enter the web address of your PAC file.
- Tap Save in the top right corner.
 Add as preferred source
Troubleshooting common proxy setup issues
If your proxy isn’t working as expected, or you’re trying to remove one to restore your connection, the fixes below cover the most common iPhone proxy problems.
“No Internet Connection” after enabling a proxy
This is the most frequent issue and usually means the proxy server address, port, or credentials are wrong, or the server is offline. To restore your connection:
- Go to Settings > Wi-Fi, tap the “i” icon, and set Configure Proxy to Off.
- If you need the proxy, double-check the server address and port with your provider, a single wrong digit will break connectivity.
- If you’re using Automatic (PAC), confirm the PAC URL loads in a browser. An unreachable PAC file blocks all traffic on that network.
The proxy keeps turning itself back on
iOS itself won’t re-enable a proxy, so something else is applying it:
- Configuration profile: Check Settings > General > VPN & Device Management. A work or school profile can enforce proxy settings; you’ll need to remove the profile or contact the administrator.
- Proxy or VPN app: Apps like Shadowrocket or AdGuard can reapply proxy settings on launch. Quit or disable the app to stop this.
The proxy is still active after I turned it off
Remember that iPhone stores proxy settings separately for each Wi-Fi network. Turning it off on your home network won’t disable it on your office network. Repeat the disable steps on every network where a proxy was configured.
Settings won’t save
If tapping Save does nothing or the fields reset:
- Make sure both Server and Port fields are filled; iOS won’t save a partial manual configuration.
- If Authentication is toggled on, both Username and Password are required.
- Confirm you’re tapping Save in the top-right corner.
The proxy isn’t applying to cellular data
iOS proxy settings apply to Wi-Fi. Cellular (4G/5G/LTE) traffic is managed through APN settings and can’t be proxied from the built-in menu. To use a proxy over mobile data, you’ll need a third-party app such as Shadowrocket, Potatso, or AdGuard.
Why sites say proxy detected on iPhone
Apple has two privacy features that can hide your traffic. Detection systems often mistake these for proxies.
1. iCloud Private Relay
Private Relay sends Safari traffic through two relays. This hides your IP address from websites. It is available with iCloud+. On the free iCloud tier, Private Relay is off by default.
To turn off Private Relay, open Settings, tap your name, select iCloud, then Private Relay. Choose Turn Off Until Tomorrow to pause for 24 hours or Turn Off Private Relay to disable it.
To turn it off for a specific Wi-Fi network, go to Settings, tap Wi-Fi, then the “i” next to your network. Turn off Limit IP Address Tracking. This applies to all devices on the same Apple Account and network.
To disable it on cellular, go to Settings, then Cellular, then Cellular Data Options. Turn off Limit IP Address Tracking. For devices with multiple lines, select the line first. The setting applies to each SIM or eSIM separately.
2. Private Wi-Fi Address
Turning off Private Wi-Fi Address or setting it to Fixed does not prevent proxy detection. Private Wi-Fi Address changes the MAC address shown to your router.
If Private Relay is off, no profile is installed, and no proxy app is running, but you are still blocked, the problem is with your connection address, not your phone settings.
3. The IP itself is flagged
Detection services check who owns each IP address. Public ASN records make it easy to identify hosting and cloud provider addresses. Datacenter addresses are often labeled as non-residential before any traffic is checked. Shared addresses can cause issues.
Changing your iPhone settings will not fix this. The main factor is your IP address source.
FAQs
Go to Wi-Fi settings, select your network, and set ‘Configure Proxy’ to Off. This is the most common fix when a proxy server stops responding.
1. Go to the iPad proxy Settings > click Wi-Fi.
2. Tap the “i” icon next to your Wi-Fi.
3. Scroll down and select Configure Proxy.
4. Choose Manual configuration (enter server and port details).
1. Open Settings > Wi-Fi (make sure Wi-Fi is turned on).
2. Depending on the network you intend to configure, select the Wi-Fi or Cellular option.
3. Tap the Wi-Fi option to access the Wi-Fi settings.
When a network name has a blue checkmark next to it, it indicates that you are connected to that network. You can change several settings by tapping the network you are connected to.
Not via iOS system settings. HTTP and HTTPS proxies are supported by iOS’s built-in proxy setting options.
However, traffic can be routed through SOCKS5 proxies by using a Third-Party App that supports them.
It is iCloud Private Relay rather than a proxy you configured. Turn it off at Settings > [your name] > iCloud > Private Relay, or for a single network at Settings > Wi-Fi > “i” > Limit IP Address Tracking. If the block continues with Private Relay off, the IP address you are using is flagged rather than the phone being misconfigured.
iPhone saves proxy settings for each Wi-Fi network individually. You can reapply proxy settings using a configuration profile in Settings > General > VPN & Device Management. iCloud Private Relay operates independently of the HTTP Proxy field, so turning off the proxy does not disable Private Relay.
Cite this research
Pick the format that matches where you're publishing. Pasting the link version into your CMS preserves the backlink.
@misc{karatas2026,
  author = {Karatas, Gulbahar},
  title  = {{How to Setup & Turn Off iPhone Proxy}},
  year   = {2026},
  month  = sep,
  howpublished    = {\url{https://aimultiple.com/iphone-proxy-settings}},
  note   = {AIMultiple. Retrieved September 8, 2026}
}Results and timestamps of 3 data points. Download the summary data shown in this article's charts and tables as a ZIP file containing one CSV file.
Want the granular data behind it? Join Premium
Changelog
2 updatesAdded a section, Using Proxy for iPhone mobile data (cellular connections).


Be the first to comment
Your email address will not be published. All fields are required. Comments are left in their original language.