


How to Configure Android Proxy Server Settings

On Android, you can configure a proxy for each Wi-Fi network in the settings app. Once you set it for a network, it stays saved, but you need to repeat the process for every network you want to use with a proxy.
Before you begin, there are three things you should know:
- Built for Wi-Fi: The proxy setting is a Wi-Fi feature. Mobile data has a separate proxy field in APN settings; see configure a proxy for mobile.
- Protocol support: The built-in Wi-Fi proxy handles HTTP and HTTPS proxies. SOCKS5 requires a third-party app.
- Authentication: The Wi-Fi proxy screen has no username or password fields. It works with proxies that don’t require a login.
Proxy servers for Android
There’s a difference between a public proxy list and a free tier from a named provider. The first is risky: unknown operators, no accountability. The second is a company with a privacy policy and a support desk.
Several established providers offer a free tier with no credit card, which is enough to test a proxy on your phone:
Provider | Free tier (mo) | Coverage |
|---|---|---|
15 datacenter IPs, 2 GB | Global | |
5 US datacenter IPs, 5 GB | Global | |
10 proxies, 1 GB | US |
How to set up a proxy on Android (Wi-Fi)
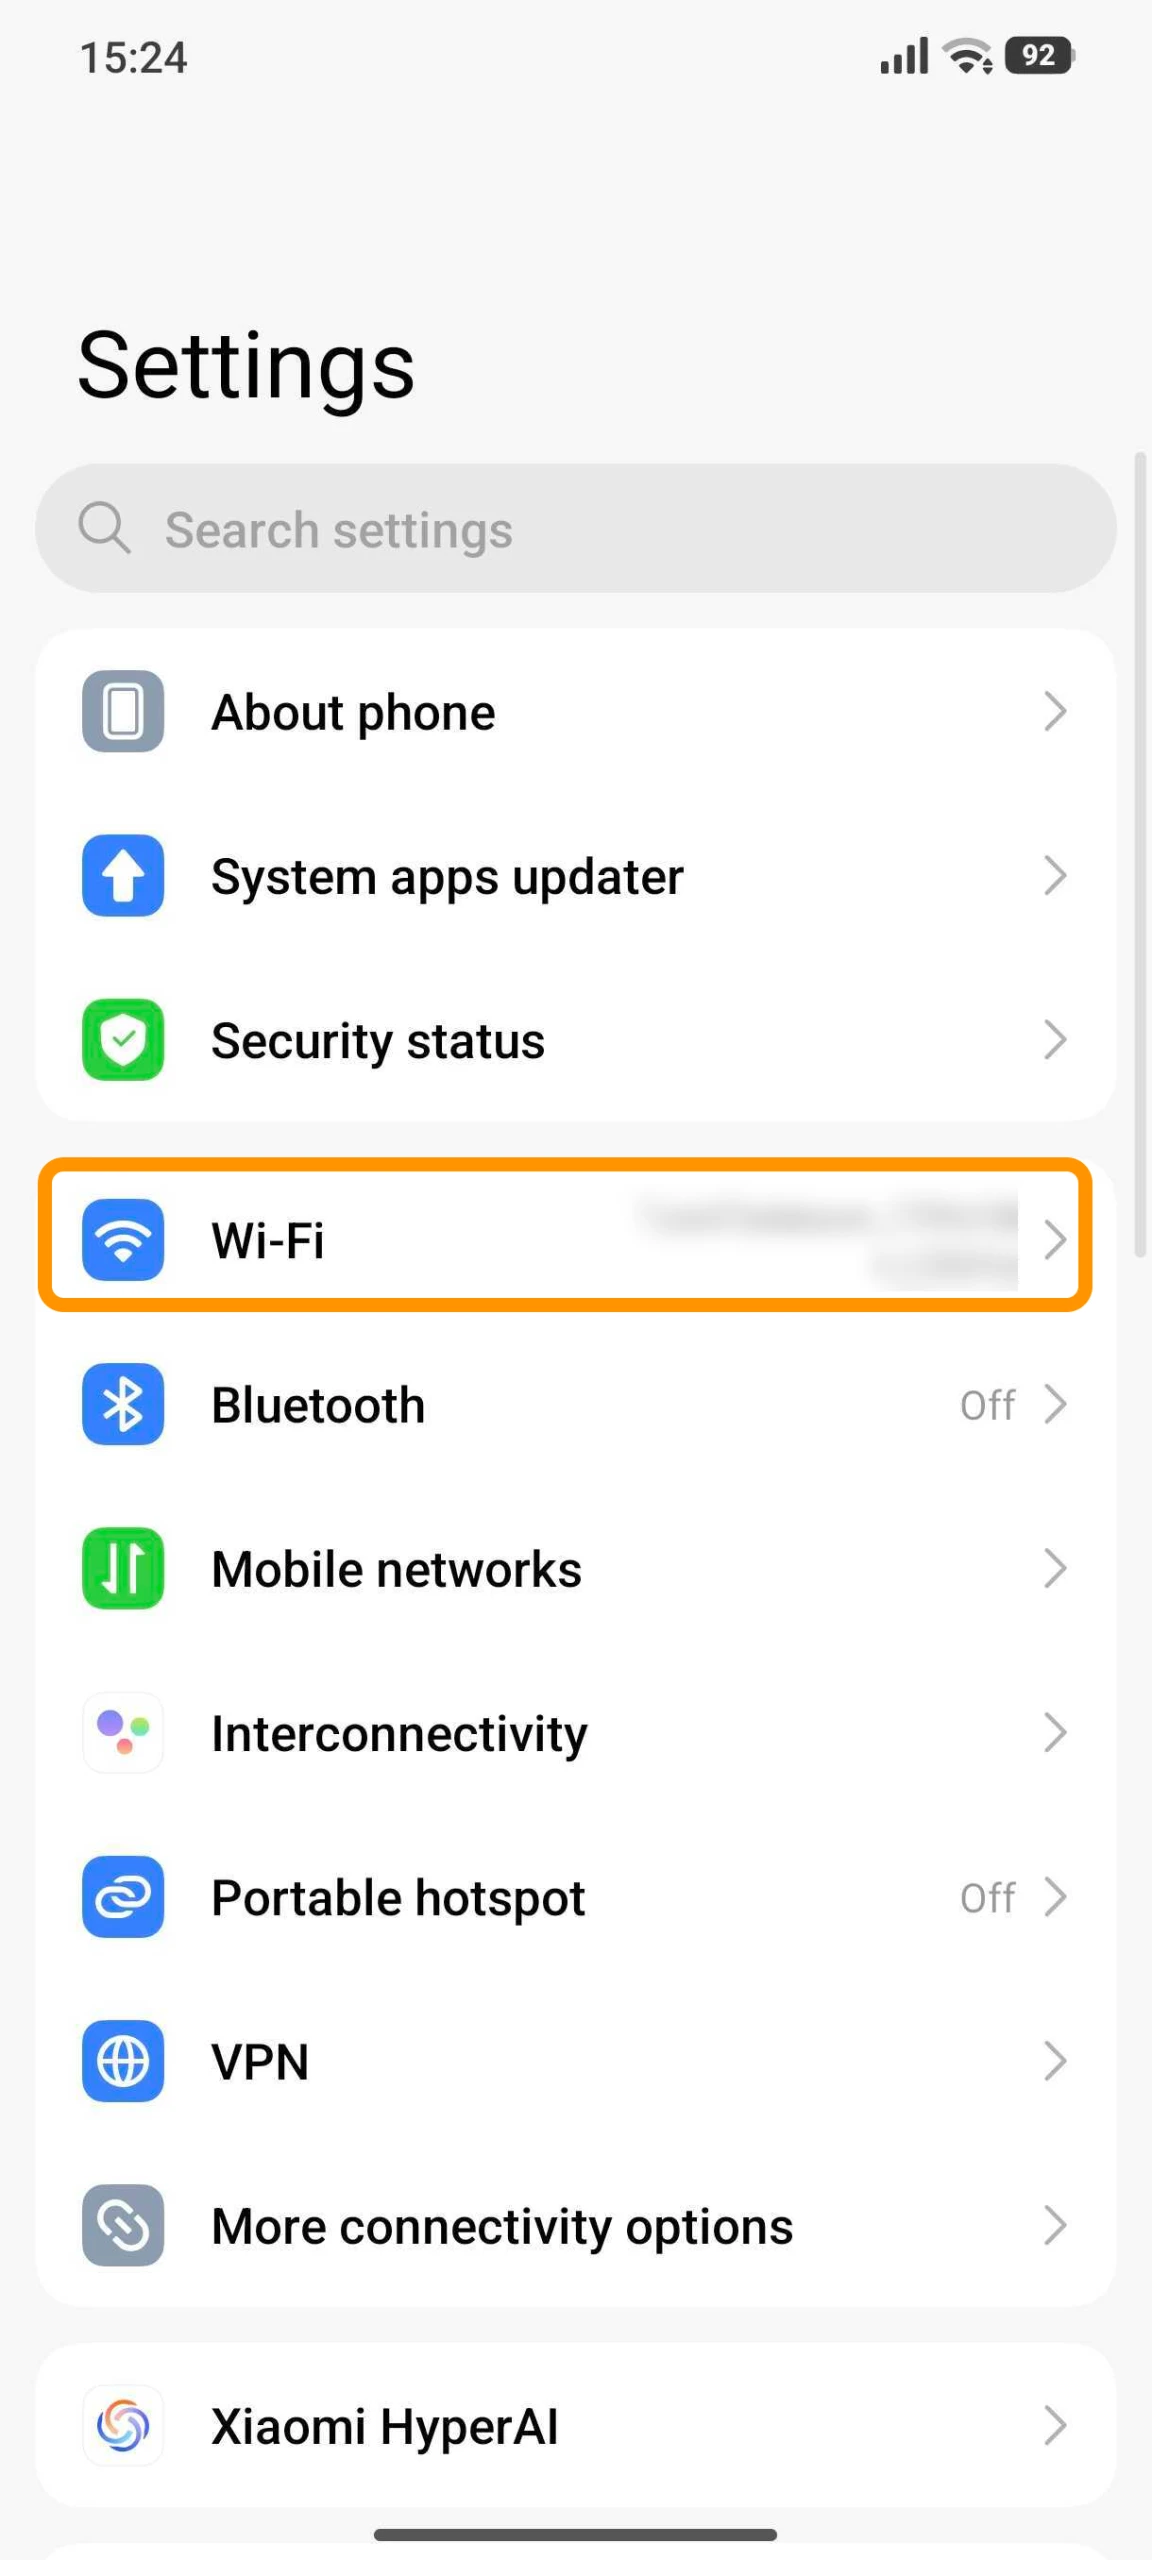
Step 1: Open your Wi-Fi network list
Connect to the network you want to proxy first. The path to the network list depends on your manufacturer:
Step 2: Open the network’s detail view
- Pixel/stock Android: tap the gear icon next to the connected network, then the pencil (Edit) icon in the top right.
- Samsung: tap the gear icon next to the network name.
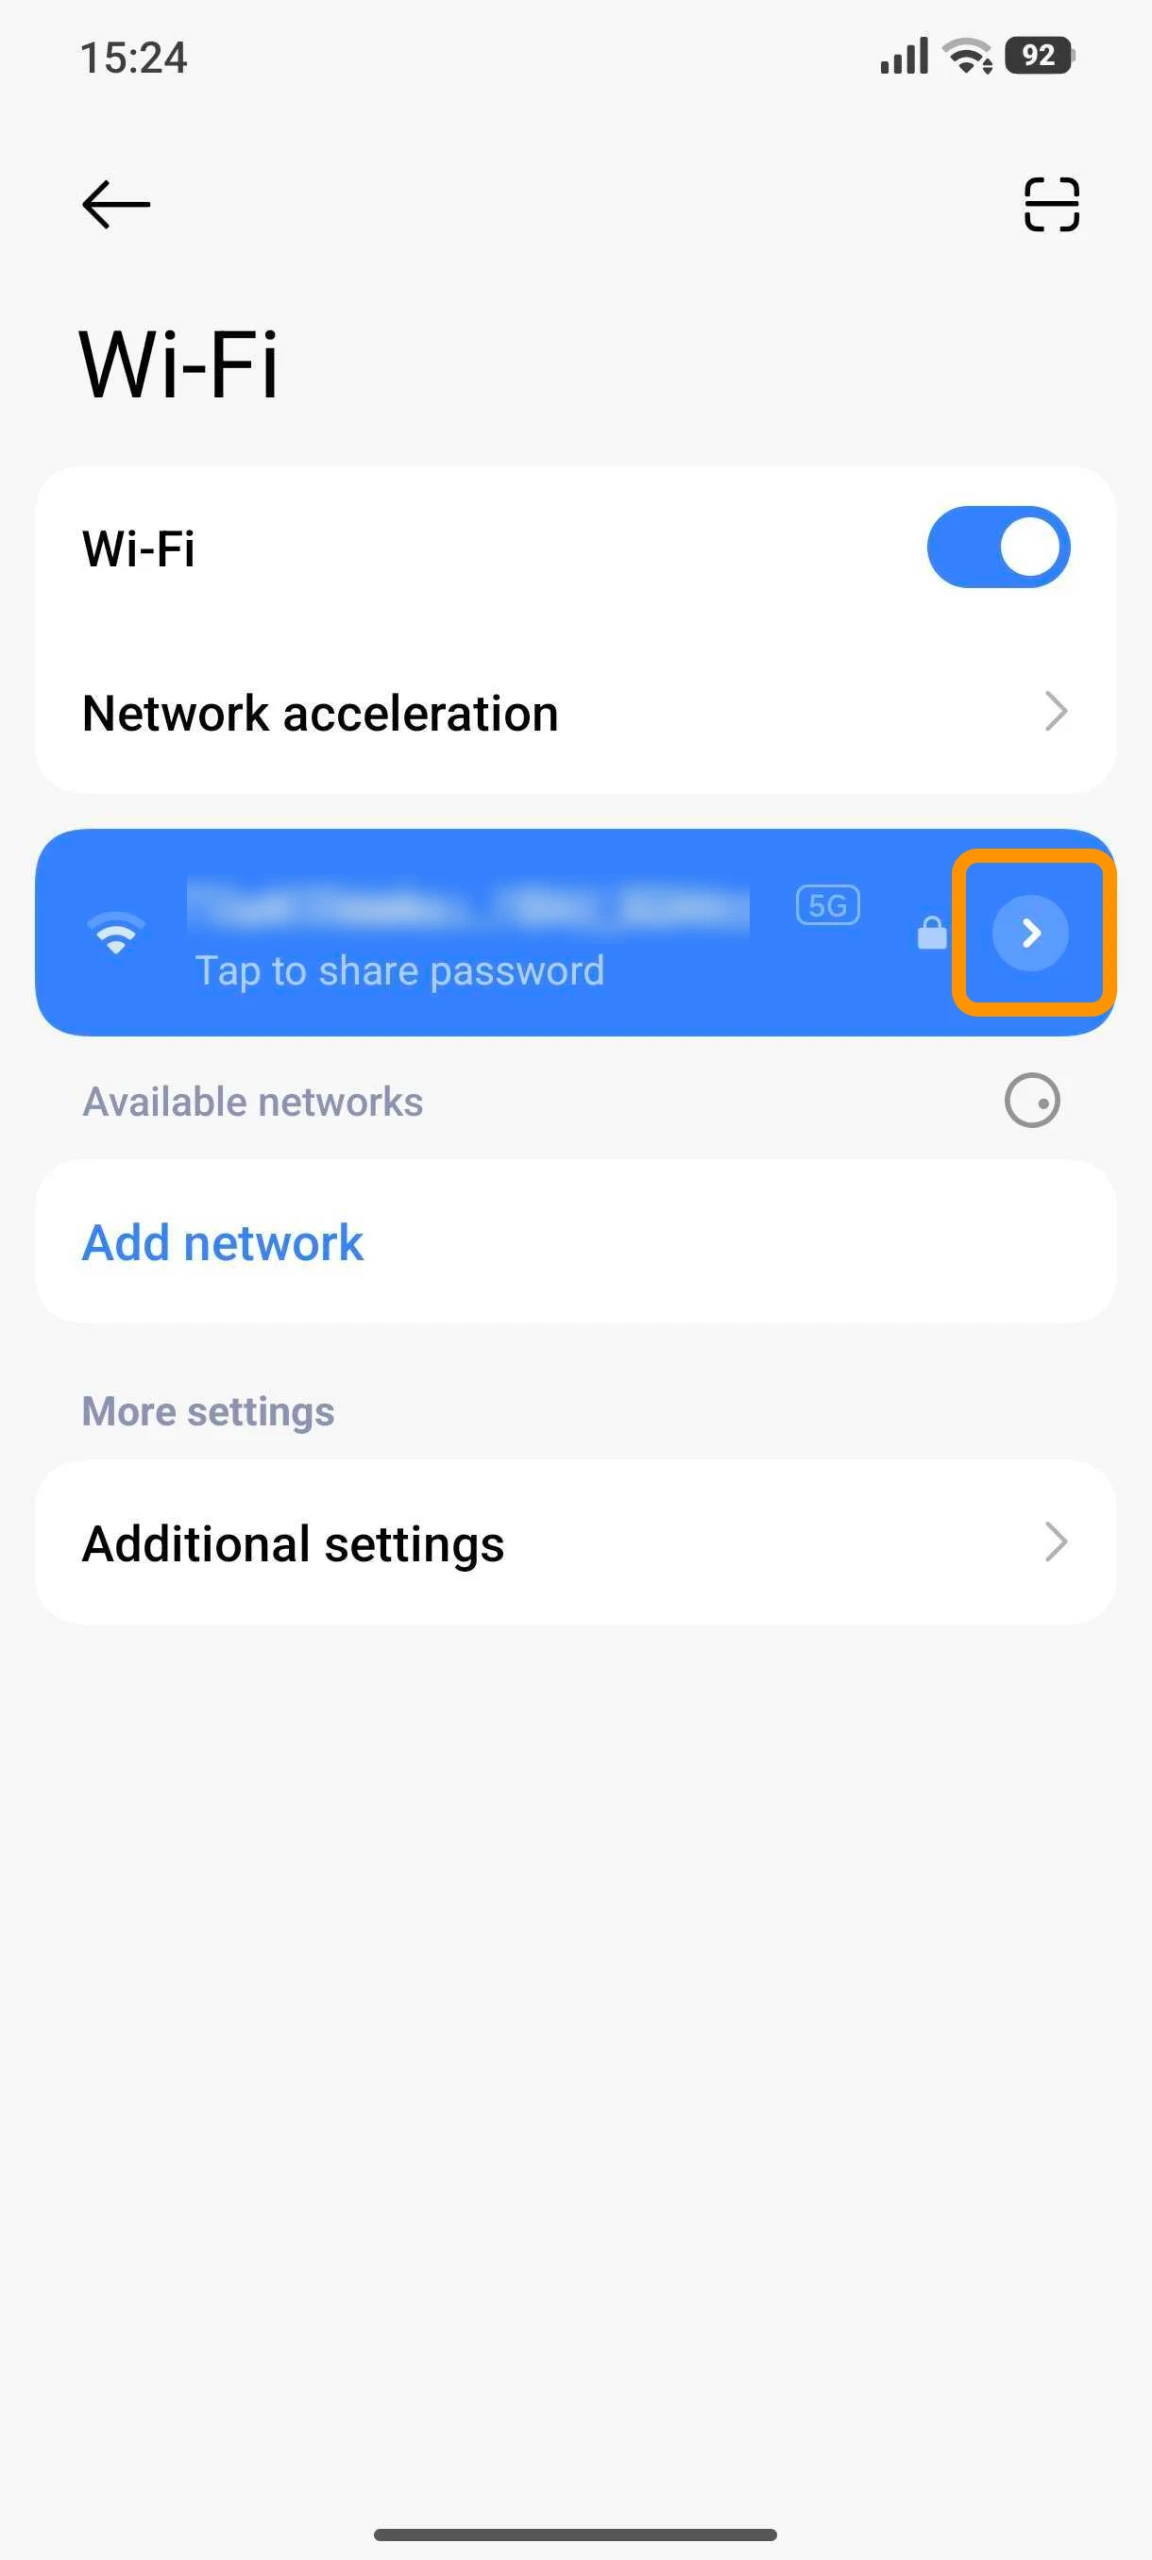
- HyperOS / MIUI: tap the arrow (>) at the right end of the network row
If you can’t find the entry point on your device, tap and hold the network name, then choose Modify network. To configure a network you haven’t joined yet, use Add network and expand Advanced options before saving.
Step 3: Find the proxy option
On the network details screen, scroll to the Proxy section. It defaults to None.
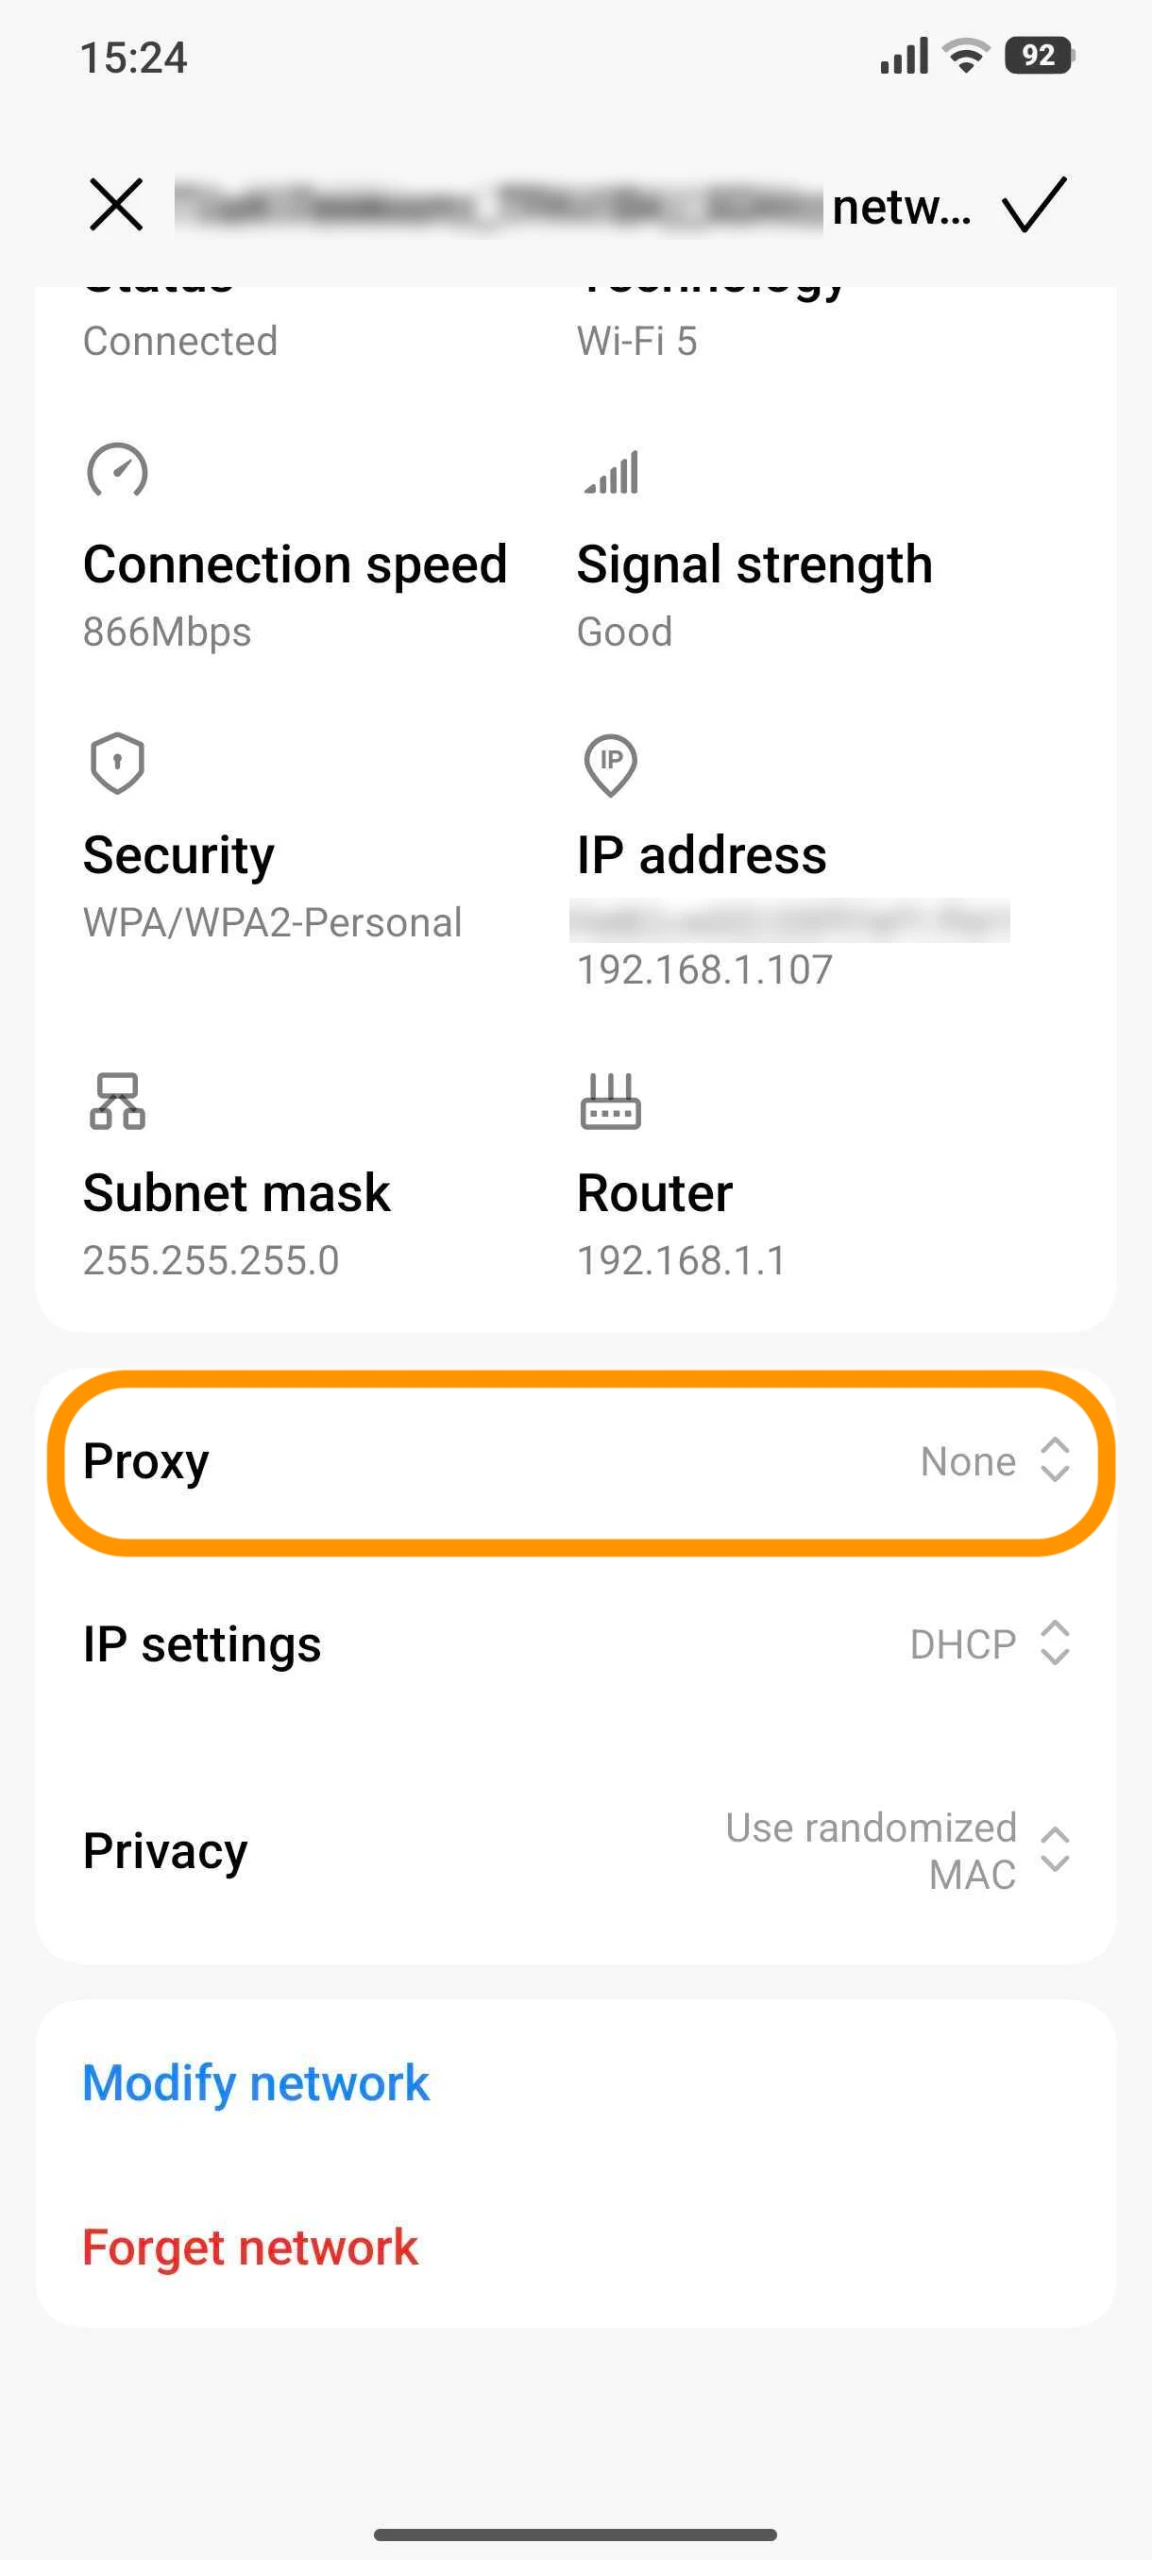
On stock Android, you may need to tap Advanced options first to reveal it. On HyperOS and One UI, it usually sits directly on the details screen with no expanding required.
Menu wording and placement shift between OS versions, so if you don’t see it, look under any “Advanced” or “Additional settings” heading on the same screen.
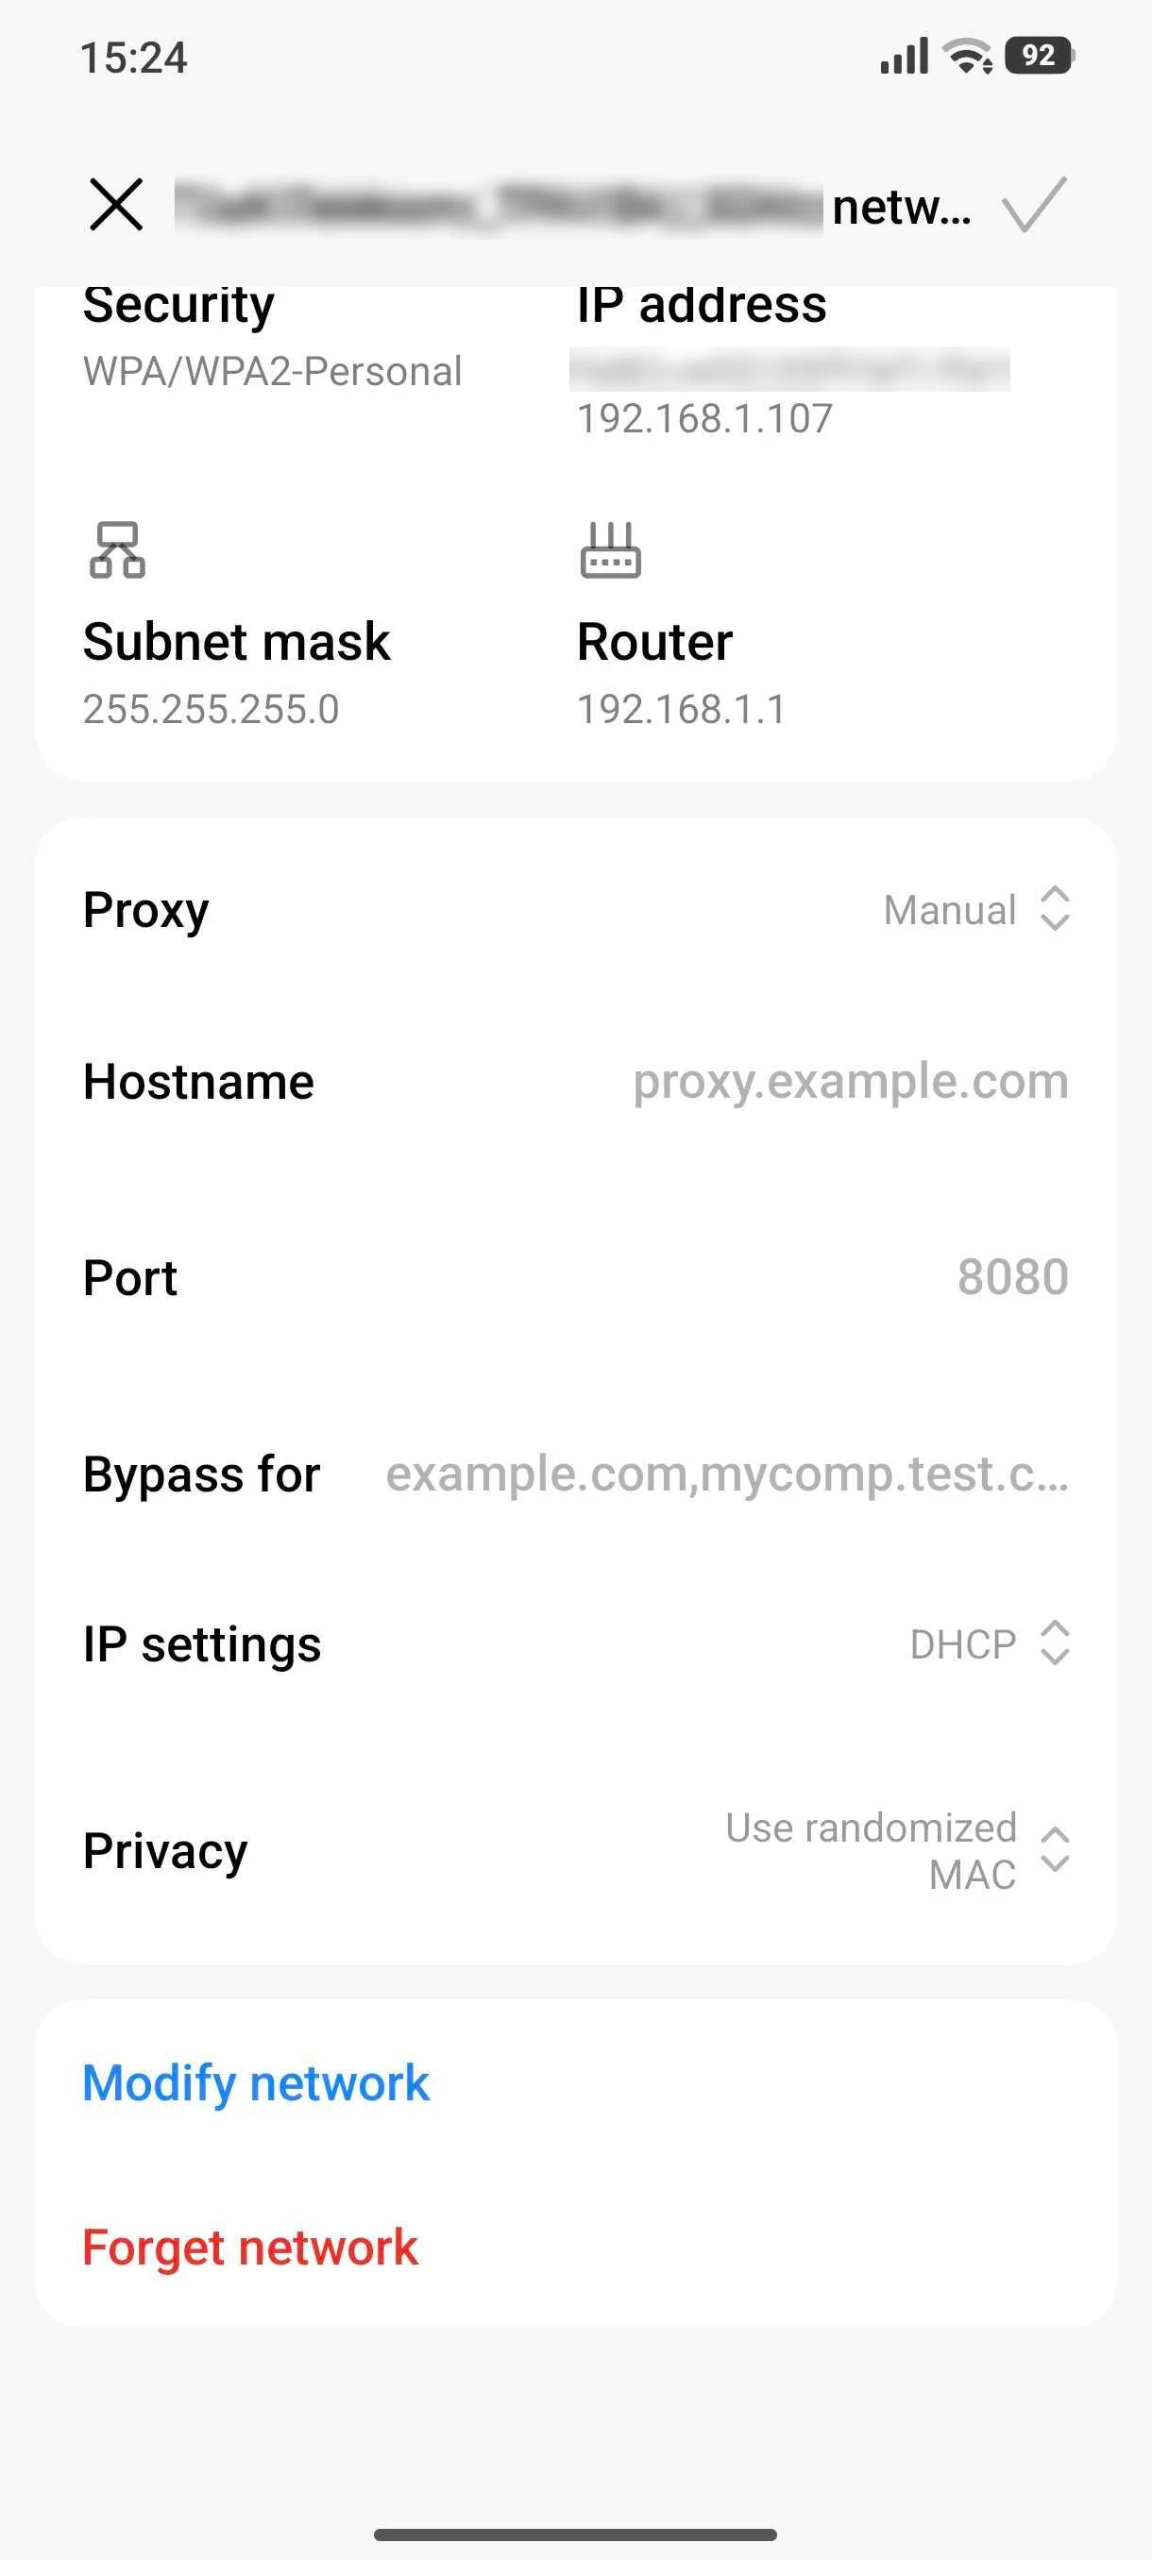
Step 4: Enter the details
Configure a proxy for mobile data
Android’s Settings app has no general proxy switch for mobile data. The Wi-Fi proxy you configured above is stored per Wi-Fi network; switch to cellular, and it no longer applies.
The APN proxy
Your APN settings do contain Proxy and Port fields:
Settings → Network & internet → Mobile network (or SIMs) → Access Point Names → tap your active APN.
On some networks, these fields really do control your HTTP traffic. On many others, they have no effect because carriers often lock APN editing, ignore custom proxy settings, or replace them with their own. Here are some things to know before you try:
- Use the Username and Password fields if your carrier requires a login. These fields work with the Authentication type option. Do not enter proxy credentials here because mobile data will stop working.
- This proxy supports HTTP and HTTPS, like the Wi-Fi proxy. It does not support SOCKS.
- Entering the wrong value can disable mobile data. APN settings also control MMS, VoLTE, and Wi-Fi calling.
- On some Android versions, APN settings may reset to carrier defaults after restarting your phone or changing networks.
ADB
Android does have a global proxy setting; it’s not exposed in the UI. With USB debugging on and the device connected to a computer:
To remove it:
This applies across Wi-Fi and mobile data. Caveats: it may reset after a reboot or certain network changes; it supports no authentication; and if the proxy becomes unreachable, you lose connectivity everywhere, so keep the removal command handy before you set it.
How to disable a proxy and fix proxy-related connection problems
Removing a Wi-Fi proxy
Follow the same path as Step 1 for your device, open the network details, set Proxy to None, and save. Because the setting is tied to a specific network, you have to clear it on the network where you added it.
One thing that catches people out: if you forget a network, its proxy setting goes with it. Rejoining later gives you a clean network with no proxy configured.
Removing an APN proxy
Settings → Mobile network → Access Point Names → tap the current APN → clear the Proxy and Port fields → Save. If anything looks off, use your carrier’s default APN or the “Reset to default” option in the APN menu.
 Add as preferred source
FAQs
Configuring a proxy tells your device to route traffic through an intermediate server. Android’s built-in support covers HTTP and HTTPS proxies; SOCKS5, which also supports UDP, requires a third-party app.
No. You configure a proxy per Wi-Fi network, and the cellular equivalent is the APN proxy field, which many carriers ignore or lock.
The closest thing to a unified switch is the hidden global proxy you can set via ADB, which applies device-wide, but it resets on reboot and supports no authentication.
Android’s built-in proxy applies at the network level, so it can’t target a single app. Some third-party proxy apps support per-app rules, letting you choose which apps route through the proxy and which connect directly.
A proxy doesn’t inherently increase or reduce data usage; it changes the route, not the volume, though some compression proxies modestly reduce bandwidth.
Cite this research
Pick the format that matches where you're publishing. Pasting the link version into your CMS preserves the backlink.
@misc{karatas2026,
  author = {Karatas, Gulbahar},
  title  = {{How to Configure Android Proxy Server Settings}},
  year   = {2026},
  month  = jul,
  howpublished    = {\url{https://aimultiple.com/android-proxy-server-settings}},
  note   = {AIMultiple. Retrieved July 17, 2026}
}Results and timestamps of 6 data points. Download the summary data shown in this article's charts and tables as a ZIP file containing 2 CSV files.
Want the granular data behind it? Join Premium


Comments 1
Share Your Thoughts
Your email address will not be published. All fields are required. Comments are left in their original language.
I have serious issue onproxy server on melbet applications in my phone, now it's too difficult for me to entire in my betting analyses due to proxy server policy or it's something else i don't know exactly happened to my app. So my request to you is that, you can help me for further details on how to solve it efficiently.
Hi Sebit, thanks for your comment! Some apps block connections made through proxies or VPNs because of their rules. Here are a few things you can check: 1. Check your proxy settings: Go to Settings > Wi-Fi, press and hold your network, tap Modify network > Advanced options, and look at the Proxy field. If you did not set up a proxy, select None. If you use a proxy, confirm the address and port number. 2. Switch to mobile data. If the app works on mobile data but not on Wi-Fi, check your Wi-Fi proxy settings. 3. Clear the app cache. Go to Settings > Apps > the app you want to set up a proxy for> Storage and tap Clear cache. Update the app if needed. Hope this helps!